I'm thinking I'll just start over on the handle... I only had about 5 - 6 hours invested in it anyway. I'll just set that one aside to use on a future project, should one arise that needs a barrel shaped handle... and it probably will.
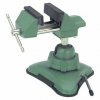
I've been spending time sanding the guard. I started last night by flattening the place where the handle meets the guard, then reshaping the bottom to curve smoothly again. Since then I've gone through 240 grit and 320 grit sanding all over, including the points. I've been using a suction cup based vise from HF to hold the piece in place while working. I had low expectations for that vise, but it has quickly become a favored tool. It came out of the box with rubber grip guards to keep the vise from marking the work piece. Best thing is that the suction cup base really works well, and the pivoting head allows me to put the workpiece in any position I need for best angle of attack.


")

")