Buck Sharpening Methods

Hoping folks still monitor this thread. Does anyone sharpen their Bucks to 20 degrees? I tried rolling with the 15 degree, but it wasn't convenient for field sharpening for me as most easy sharpening apparatuses are 20 degree.

I started using 20 degrees on all of my Buck folders. I've liked it so far, but wondered if I'm breaking some cardinal rule of buck edge retention by going 20.

Anyone else use 20 degrees?
I try to match the factory edge, which is usually close to 15 degrees per side. But if 20 degrees per side is working for you, there is no reason not to use it.

O.B.
 
Sure thing Mak. The factory edges are coarse 250-320 grit. A good utility edge. A flavor many prefer. A stropped edge will be finer. Most paid meat cutters I have visited with sharpen to 180 grit. Then steel their blade during their shift. This gets them thru their shift. Which is the manner I do mine. Except I do edge trailing strokes(burr straightening) on the same stone. It's a coarse, utility edge but it's all I need for opening sacks of feed, cutting hay bale twine or my lunch apple.
Most meat cutters knives become a convex edge during use. DM

Wow. I didn't realize that they were that coarse. I like 600 grit edge.
 
I was too self-confident, not having a good magnifying glass or USB microscope at hand. I thought I was removing burrs, but it turns out I was rather straightening or pulling it out. This became clear quite recently when I became interested in drawing and needed to sharpen pencils. Pastel pencils turned out to be very abrasive and fragile, as it turned out, they contain volcanic pumice (kohinoor gioconda pencils). If the knife is not sharp, it breaks off the lead during sharpening. And after each sharpening of the pencil I need to sharpen Buck 425 420hc again, the cutting edge turns to the side. It turned out to be a burr, which I thought I had removed... Thanks to an article by a cool guy with an electron microscope (site scienceofsharp), I realized that I should try diamond paste with a piece of leather glued to a piece of wood. Found 1 micron paste. This really had an effect, the knife began to last for 3-4 pencil sharpenings! The rest of the sharpening process remains the same - I finish with India Fine and then a leather board

Recently bought a knife with m390, it was difficult to sharpen, something is wrong with heat treatment. A guy with the nickname OldTor from our local forum helped a lot with advice. I liked one of the tips so much that I decided to share it here. This is a homemade device for maintaining a constant angle. It is also very suitable for those who have carpal tunnel syndrome and their hands quickly go numb. This is his video. The device itself can be made from improvised means for very little money. The main thing is a flat surface, since the device rests on this surface, which should be parallel to the stone

Photo of the some options:

They are also sold ready-made, I liked the Hapstone T1


Pencil Gioconda 8804. After applying diamond paste to the skin, the knife can withstand more sharpenings. I store the board itself in a clean, wrapped bag so that abrasive dust from the air does not get on it. Something is wrong with the brightness, the video turned out a bit dark

LV0vpDK.jpeg
 
Last edited:
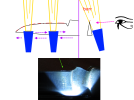
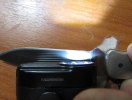
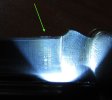
Oh, I accidentally found a way to improve burr removal. Now I sharpened 425 and 501, and I needed to see how much dirt had accumulated in the lock to clean it. I use a small hand torch. And I noticed a burr that I did not remove, although I thought I had removed it. In general, I pass a beam of light almost parallel to the blade, if there is a bent burr, it is visible very clearly. And then a couple of very light movements with a fine abrasive, as if trying to cut a very thin slice from the stone (usually Arkansas or ruby ceramics) and the burr disappears. Well I know it doesn't go away, I just can't see it well enough, but it's a step up from where it was. The next step is to use microscopes for see the burr, but in the field they're usually not available
Burr-detecting.pngIMG_0283.JPGIMG_0284.JPG
 
Oh, I accidentally found a way to improve burr removal. Now I sharpened 425 and 501, and I needed to see how much dirt had accumulated in the lock to clean it. I use a small hand torch. And I noticed a burr that I did not remove, although I thought I had removed it. In general, I pass a beam of light almost parallel to the blade, if there is a bent burr, it is visible very clearly. And then a couple of very light movements with a fine abrasive, as if trying to cut a very thin slice from the stone (usually Arkansas or ruby ceramics) and the burr disappears. Well I know it doesn't go away, I just can't see it well enough, but it's a step up from where it was. The next step is to use microscopes for see the burr, but in the field they're usually not available
View attachment 2808042View attachment 2808044View attachment 2808045
I've always used sunlight to see burrs and poor apexs
 
I'm pretty low tech. About 50 years ago I upgraded all the old, beat up, Arkansas stones that were lying around the shop, to a set of Japanese water stones. For years I used them to sharpen all my knives, woodworking chisels, plane irons.......pretty much everything. And did a darn good job at it too, if I do say so myself.

About five years ago, I bought a Work Sharp, with the grinder attachment to do all the heavy work on tools, axes, lawnmower blades, etc. And a Spyderco Sharpmaker has been doing 95% of my knife sharpening. If I think an edge needs stroped, the Work Sharp has a stroping belt, or more often, I'll just use a cardboard box.
 
Back
Top