Hey everyone, just curious what you all think about this deburring method. I'm kind of new, kind of experiences but can't seem to find a deburring method that works for me. I want my knife to do the 90/90/90 degree push cut on paper and only achieved it once in my life using this method but never again.
-
The BladeForums.com 2024 Traditional Knife is available! Price is $250 ea (shipped within CONUS).
Order here: https://www.bladeforums.com/help/2024-traditional/
You are using an out of date browser. It may not display this or other websites correctly.
You should upgrade or use an alternative browser.
You should upgrade or use an alternative browser.
Deburring method
- Thread starter HIBBS00
- Start date
Would I do this method on my fine stone or on a coarser stone and then do alternating edge leading passes to polish the edge?Yes, this is a 'legit' way to remove a burr.
Usually the bur is removed with 2 methods:
-high angle alternating passes (as in video)
-stropping
Just to add about the video....
the knife is cutting paper but I'm not convinced.
Why are you not convinced?
I usually don't do micro bevels. I strop at slightly elevated angles (+2 or +2.5 degrees from sharpening angle) to remove the burr.
I did a micro bevel a few times when I didn't have a strop at hand. I sharpen on diamonds (mostly #240 or #320) and I did micro bevel on the same plate.... 3 very light alternating strokes at elevated angle.
I would say, try both way ( coarse and fine stone) and you will see, what fits better in your cutting tasks.
I never did those last polishing passes after micro bevel (as in video) so I can't comment.
I do that as a final test after sharpening.
I did a micro bevel a few times when I didn't have a strop at hand. I sharpen on diamonds (mostly #240 or #320) and I did micro bevel on the same plate.... 3 very light alternating strokes at elevated angle.
I would say, try both way ( coarse and fine stone) and you will see, what fits better in your cutting tasks.
I never did those last polishing passes after micro bevel (as in video) so I can't comment.
Well, the knife in the video was cutting paper but I would like to see a test.... some wood whittling and then back to paper if the knife stil cuts news paper cross fibers.Why are you not convinced?
I do that as a final test after sharpening.
- Joined
- Apr 12, 2009
- Messages
- 13,671
It can work well and to a broad range of effectiveness, depending on the angle used, pressure, etc. I try to do most of my deburring in essentially this way. I don't necessarily elevate all the way to 45°. But maybe just a few degrees above the original sharpening angle. You want to get a good feel for making sure the burr created is substantially folded to one side, so an edge-leading pass done to that side will ensure the burr gets folded back underneath the bevel to scrub it away. If the burr isn't folded so far to one side, it may instead be straightened out in line with the edge and won't be scrubbed off. Sometimes that's useful in itself, as it can further thin the burr, making it all the more fragile and easier to break off when it does fold under. There are a lot of things that can be done to further finesse the method, like continually decreasing pressure in the burr removal process as you go.
If microbeveling the edge, I always try to keep the number of passes to an absolute minimum while doing so. Even down to a single pass from each side to apply a microbevel that won't be seen by naked eye. That can narrow the apex width and strengthen the apex at the same time, so the net result is an edge that can effortlessly zip through paper in cutting, and will also be more durable in other tasks, like cutting wood.
If microbeveling the edge, I always try to keep the number of passes to an absolute minimum while doing so. Even down to a single pass from each side to apply a microbevel that won't be seen by naked eye. That can narrow the apex width and strengthen the apex at the same time, so the net result is an edge that can effortlessly zip through paper in cutting, and will also be more durable in other tasks, like cutting wood.
Last edited:
DeadboxHero
Knifemaker / Craftsman / Service Provider
- Joined
- Mar 22, 2014
- Messages
- 5,555
DeadboxHero
Knifemaker / Craftsman / Service Provider
- Joined
- Mar 22, 2014
- Messages
- 5,555
Don't thank me, Thank Dr Todd. Sign up to his blog for email updates.DeadboxHero,
thanks a lot for the link. I have no idea how I missed this article.
It's eye opening and comfirms some of my theories and conclusions I got through 'trial and error'.
Do you usually use your finishing stones for deburring? When I sharpen later I'm going to give the video method a try deburring on my 1k and back sharpening and then alternating leading passes on my finer stones for a polished edge.It can work well and to a broad range of effectiveness, depending on the angle used, pressure, etc. I try to do most of my deburring in essentially this way. I don't necessarily elevate all the way to 45°. But maybe just a few degrees above the original sharpening angle. You want to get a good feel for making sure the burr created is substantially folded to one side, so an edge-leading pass done to that side will ensure the burr gets folded back underneath the bevel to scrub it away. If the burr isn't folded so far to one side, it may instead be straightened out in line with the edge and won't be scrubbed off. Sometimes that's useful in itself, as it can further thin the burr, making it all the more fragile and easier to break off when it does fold under. There are a lot of things that can be done to further finesse the method, like continually decreasing pressure in the burr removal process as you go.
If microbeveling the edge, I always try to keep the number of passes to an absolute minimum while doing so. Even down to a single pass from each side to apply a microbevel that won't be seen by naked eye. That can narrow the apex width and strengthen the apex at the same time, so the net result is an edge that can effortlessly zip through paper in cutting, and will also be more durable in other tasks, like cutting wood.
Thank you! That is very interesting. I appreciate it
- Joined
- Oct 14, 2023
- Messages
- 560
That website is a wealth of knowledge. I'm very grateful for his hardwork and time invested. And it's cool seeing the pictures of what is really going on to learn.
- Joined
- Oct 14, 2023
- Messages
- 560
One interesting comment he made in the 15v article but did not elaborate on much, is the effect of using a guided sharpening system like the KME or DMT aligner to sharpen may help reduce the burr moreso than freehand sharpening. This makes sense to me since your always perfectly angled and the stones always touching the burr. Not knocking freehand sharpening by any means, but I do wonder if there's a quantifiable difference between freehand vs guided and burr formation/reduction
I always deburr with short, leading-edge strokes of the stone. Because the burr leans off to the side, a stone hitting it with the bevel angle will cut it off. However, if you continue the stroke, you will just be creating a new burr. Using a guided system makes this an easy process, because you can keep all the angles precise. If you get the deburring angle wrong by just a bit, you can just bend the burr back to the other side.
I never remove the burr with stropping. That's too late. Edge-trailing strokes of a strop just realign the burr so it appears to be gone.
In the left image, the burr leans off on the opposite side of the stone. In the right image, the stone coming down the burr side at the bevel angle cuts the burr off.
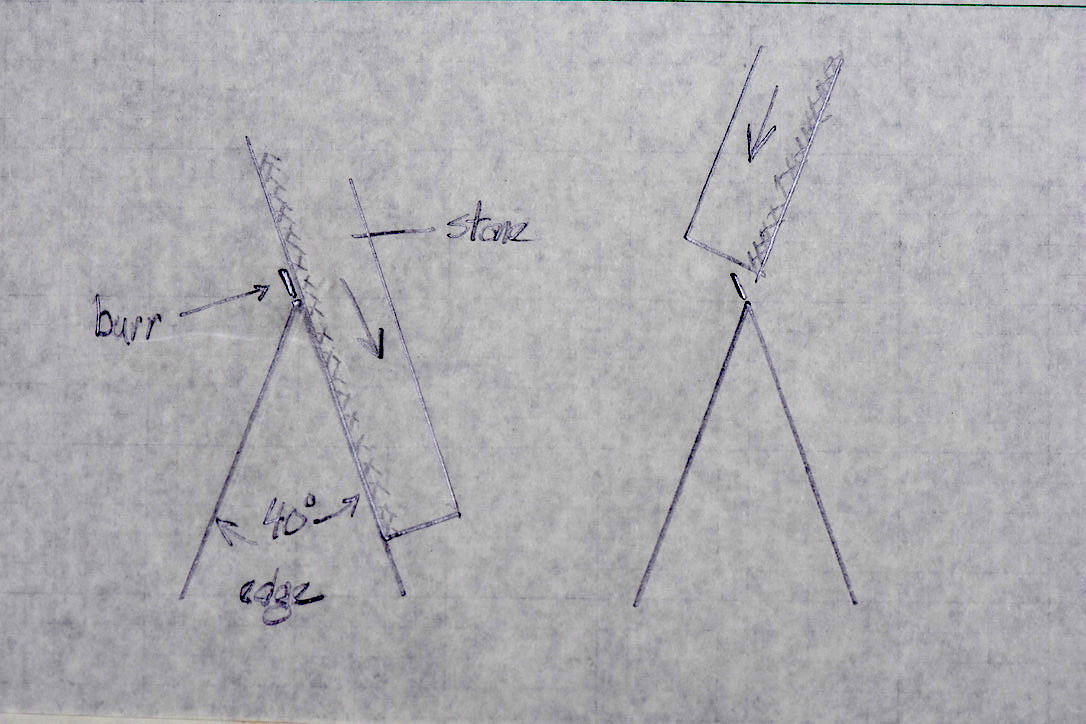
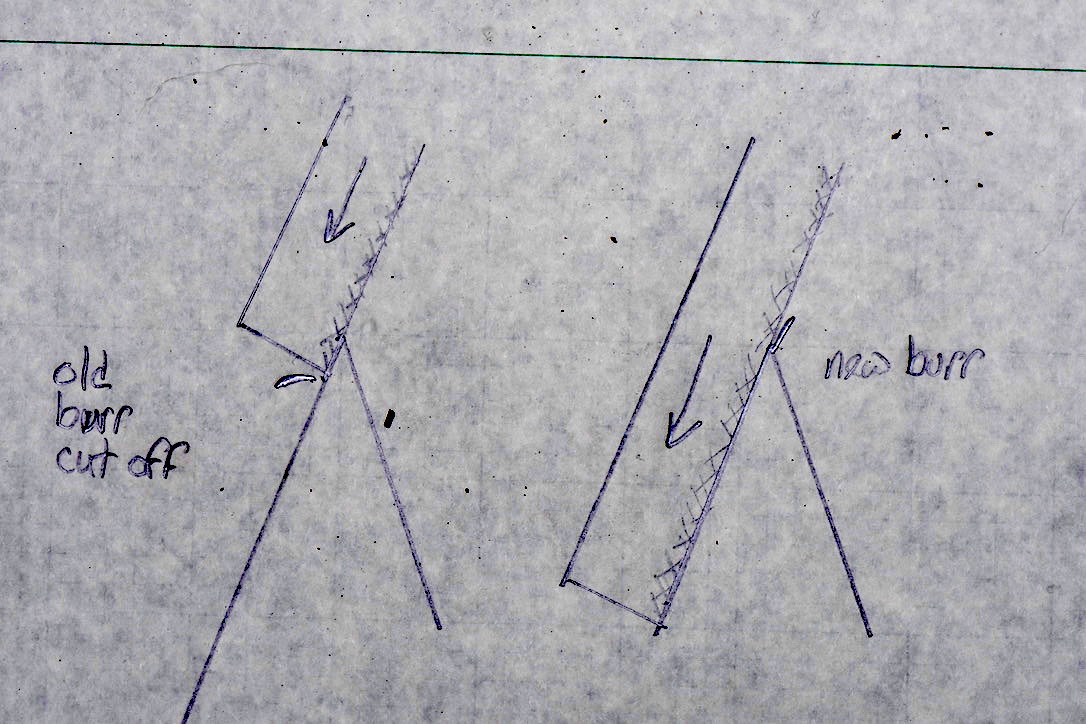
In the image at the right, the stone quickly cuts off the burr. However, if you continue the stroke, a new burr will reappear on the other side, as in the image on the right.
I never remove the burr with stropping. That's too late. Edge-trailing strokes of a strop just realign the burr so it appears to be gone.
In the left image, the burr leans off on the opposite side of the stone. In the right image, the stone coming down the burr side at the bevel angle cuts the burr off.
In the image at the right, the stone quickly cuts off the burr. However, if you continue the stroke, a new burr will reappear on the other side, as in the image on the right.
DeadboxHero
Knifemaker / Craftsman / Service Provider
- Joined
- Mar 22, 2014
- Messages
- 5,555
A lot of good information in Dr. Todd's blog post.
Things aren't working as simply as people draw them in diagrams.
Things aren't working as simply as people draw them in diagrams.
I'm having a hard time understanding how that would be done. Also, what are your thoughts on the video I posted?I always deburr with short, leading-edge strokes of the stone. Because the burr leans off to the side, a stone hitting it with the bevel angle will cut it off. However, if you continue the stroke, you will just be creating a new burr. Using a guided system makes this an easy process, because you can keep all the angles precise. If you get the deburring angle wrong by just a bit, you can just bend the burr back to the other side.
I never remove the burr with stropping. That's too late. Edge-trailing strokes of a strop just realign the burr so it appears to be gone.
In the left image, the burr leans off on the opposite side of the stone. In the right image, the stone coming down the burr side at the bevel angle cuts the burr off.
In the image at the right, the stone quickly cuts off the burr. However, if you continue the stroke, a new burr will reappear on the other side, as in the image on the right.
So far I think I just got a better edge trying the method in a coarser stone and then alternating leading passes on finer stone to polish. I usually try to push cut receipt paper, that still didn't work but I did push cut notebook paper. What's weird though is it almost feels like there's a burr on both sides of the knife
- Joined
- Apr 12, 2009
- Messages
- 13,671
Virtually all of my sharpening anymore usually involves only one stone. I don't use sequences of stones anymore, unless I'm starting with a very coarse stone to hog off steel in a thinning task first. For the rest of the sharpening and finishing of knives in the simple steels I use, it's usually just a Fine India stone. I use it to reset edges on kitchen knives and also for my EDC traditional knives in steels like 1095, CV or 420HC. If I were using anything more wear resistant, I'd likely use a single diamond hone in a grit range of XC to Fine according to preference. With the India stone, I'll do essentially all the deburring on the stone itself - first with edge-leading passes at a slightly elevated angle, and then using a plain sheet of paper laid over the oiled stone as a strop. Stropping in that manner leaves virtually all of the toothy character left by the stone intact, while stripping away any weak remnants of burrs and/or aligning straight any stronger burrs which are still durable enough to be useful in cutting tasks.Do you usually use your finishing stones for deburring? When I sharpen later I'm going to give the video method a try deburring on my 1k and back sharpening and then alternating leading passes on my finer stones for a polished edge.
With the edges I set using a diamond hone, I've grown to like using a medium or fine ceramic hone (like Spyderco's) to create the most minimal of a microbevel, in the manner I described earlier. Setting the microbevel with the much finer ceramic, atop the toothier edge created on the diamond hone, will make for a very aggressive-slicing edge, which I really like. And in the same step, it also works very well for deburring.
I'm having a hard time understanding how that would be done. Also, what are your thoughts on the video I posted?
I did watch your video. It was pretty good. You explained things well.
Certainly, you did remove most of the burr. It's impossible to tell how much. Various sharpening methods fall on a spectrum, from very bad to near perfect. It was a little hard to tell, but it looked to me as though the paper's cut edge was a little ragged (fuzzy). And the noise of the cut was too loud, although it may have been from the electronic sound amplification. My test is to shave off hair-thin curly-cues with almost no sound and leaving the paper's cut edges sharp.
What you did, as you said, was remove the original burr by creating a microbevel. But then you went back to reforming a new apex that wasn't a microbevel and that had less of a burr. I can't judge from the video how well you did that. I'd need the edge or photos that Todd can do.
The real problem is that you are freehanding the edge. No doubt, there are many expert knife sharpeners who can create an extremely sharp edge freehand. But they have to feel their way into. And it's very hard to freehand remove the burr at the bevel angle, which you were trying to do.
You said you were sharpening at 7 or 8 degrees (7-8 dps). But it's really, really, really hard to overcome geometry freehand.
So, your blade like looked like it was about 1.25 inches wide, with the width getting smaller as you went down to the tip.
At 1.25 inches, a 7 degree edge requires you to hold the spine 0.15 inches off the stone. At 8 degrees, it's a half millimeter higher. At 6 degrees, it's a half millimeter lower. Plus, that distance varies as you lift up the blade to follow the edge down to the tip. As you get closer to the tip, the raised height of the edge has to be held at a much tighter tolerance than 0.5 mm. I doubt that you or anyone can do that. That's why a jig is so important.
If you're trying to follow the bevel angle to remove the burr, and you are a half millimeter low, you'll just be polishing the shoulder. The burr won't even know you're there. A half mm higher, and you're created a new microbevel.
With the Wicked Edge system, I can hold the exact angle. Every time. So when I'm done with one grit and I have a small burr hanging off the edge, I can come back down on the burr at the exact bevel angle and cut it off with a 1/8th inch stroke.
The thing with the burr is that it gets smaller as you use lighter, shorter strokes with ever finer grits. Go out far enough with higher strokes and finer grits with a decent technique, and it will be mostly gone. What's left of the burr will be nearly aligned with the bevel and contribute to the initial sharpness, although not durability of the edge.
But by using geometry to cut off the burr without creating a new burr, allows you to have a burr-free edge at much higher grits. Then the strop just refines the edge to jack up its keeness.
Just to be clear, that's not me in the video. Just the method in curious about. Seems to work ok for me. I'm after a 90/90/90 degree push cut on paper. He has another video showing close up images of the edge. I'll have to post that for you. I have nothing against fixed sharpeners, I'm just not in a position to buy one right now and also like having the skill to sharpen a knife to an ok edge on a brick or something if I ever needed too, like Murray Carter lol.I did watch your video. It was pretty good. You explained things well.
Certainly, you did remove most of the burr. It's impossible to tell how much. Various sharpening methods fall on a spectrum, from very bad to near perfect. It was a little hard to tell, but it looked to me as though the paper's cut edge was a little ragged (fuzzy). And the noise of the cut was too loud, although it may have been from the electronic sound amplification. My test is to shave off hair-thin curly-cues with almost no sound and leaving the paper's cut edges sharp.
What you did, as you said, was remove the original burr by creating a microbevel. But then you went back to reforming a new apex that wasn't a microbevel and that had less of a burr. I can't judge from the video how well you did that. I'd need the edge or photos that Todd can do.
The real problem is that you are freehanding the edge. No doubt, there are many expert knife sharpeners who can create an extremely sharp edge freehand. But they have to feel their way into. And it's very hard to freehand remove the burr at the bevel angle, which you were trying to do.
You said you were sharpening at 7 or 8 degrees (7-8 dps). But it's really, really, really hard to overcome geometry freehand.
So, your blade like looked like it was about 1.25 inches wide, with the width getting smaller as you went down to the tip.
At 1.25 inches, a 7 degree edge requires you to hold the spine 0.15 inches off the stone. At 8 degrees, it's a half millimeter higher. At 6 degrees, it's a half millimeter lower. Plus, that distance varies as you lift up the blade to follow the edge down to the tip. As you get closer to the tip, the raised height of the edge has to be held at a much tighter tolerance than 0.5 mm. I doubt that you or anyone can do that. That's why a jig is so important.
If you're trying to follow the bevel angle to remove the burr, and you are a half millimeter low, you'll just be polishing the shoulder. The burr won't even know you're there. A half mm higher, and you're created a new microbevel.
With the Wicked Edge system, I can hold the exact angle. Every time. So when I'm done with one grit and I have a small burr hanging off the edge, I can come back down on the burr at the exact bevel angle and cut it off with a 1/8th inch stroke.
The thing with the burr is that it gets smaller as you use lighter, shorter strokes with ever finer grits. Go out far enough with higher strokes and finer grits with a decent technique, and it will be mostly gone. What's left of the burr will be nearly aligned with the bevel and contribute to the initial sharpness, although not durability of the edge.
But by using geometry to cut off the burr without creating a new burr, allows you to have a burr-free edge at much higher grits. Then the strop just refines the edge to jack up its keeness.
I'll have to try that. I'm curious though, with a micro bevel, do you strop at the micro bevel angle? Or at the original sharpening angle?Virtually all of my sharpening anymore usually involves only one stone. I don't use sequences of stones anymore, unless I'm starting with a very coarse stone to hog off steel in a thinning task first. For the rest of the sharpening and finishing of knives in the simple steels I use, it's usually just a Fine India stone. I use it to reset edges on kitchen knives and also for my EDC traditional knives in steels like 1095, CV or 420HC. If I were using anything more wear resistant, I'd likely use a single diamond hone in a grit range of XC to Fine according to preference. With the India stone, I'll do essentially all the deburring on the stone itself - first with edge-leading passes at a slightly elevated angle, and then using a plain sheet of paper laid over the oiled stone as a strop. Stropping in that manner leaves virtually all of the toothy character left by the stone intact, while stripping away any weak remnants of burrs and/or aligning straight any stronger burrs which are still durable enough to be useful in cutting tasks.
With the edges I set using a diamond hone, I've grown to like using a medium or fine ceramic hone (like Spyderco's) to create the most minimal of a microbevel, in the manner I described earlier. Setting the microbevel with the much finer ceramic, atop the toothier edge created on the diamond hone, will make for a very aggressive-slicing edge, which I really like. And in the same step, it also works very well for deburring.
Here is that video for you with the close upsI did watch your video. It was pretty good. You explained things well.
Certainly, you did remove most of the burr. It's impossible to tell how much. Various sharpening methods fall on a spectrum, from very bad to near perfect. It was a little hard to tell, but it looked to me as though the paper's cut edge was a little ragged (fuzzy). And the noise of the cut was too loud, although it may have been from the electronic sound amplification. My test is to shave off hair-thin curly-cues with almost no sound and leaving the paper's cut edges sharp.
What you did, as you said, was remove the original burr by creating a microbevel. But then you went back to reforming a new apex that wasn't a microbevel and that had less of a burr. I can't judge from the video how well you did that. I'd need the edge or photos that Todd can do.
The real problem is that you are freehanding the edge. No doubt, there are many expert knife sharpeners who can create an extremely sharp edge freehand. But they have to feel their way into. And it's very hard to freehand remove the burr at the bevel angle, which you were trying to do.
You said you were sharpening at 7 or 8 degrees (7-8 dps). But it's really, really, really hard to overcome geometry freehand.
So, your blade like looked like it was about 1.25 inches wide, with the width getting smaller as you went down to the tip.
At 1.25 inches, a 7 degree edge requires you to hold the spine 0.15 inches off the stone. At 8 degrees, it's a half millimeter higher. At 6 degrees, it's a half millimeter lower. Plus, that distance varies as you lift up the blade to follow the edge down to the tip. As you get closer to the tip, the raised height of the edge has to be held at a much tighter tolerance than 0.5 mm. I doubt that you or anyone can do that. That's why a jig is so important.
If you're trying to follow the bevel angle to remove the burr, and you are a half millimeter low, you'll just be polishing the shoulder. The burr won't even know you're there. A half mm higher, and you're created a new microbevel.
With the Wicked Edge system, I can hold the exact angle. Every time. So when I'm done with one grit and I have a small burr hanging off the edge, I can come back down on the burr at the exact bevel angle and cut it off with a 1/8th inch stroke.
The thing with the burr is that it gets smaller as you use lighter, shorter strokes with ever finer grits. Go out far enough with higher strokes and finer grits with a decent technique, and it will be mostly gone. What's left of the burr will be nearly aligned with the bevel and contribute to the initial sharpness, although not durability of the edge.
But by using geometry to cut off the burr without creating a new burr, allows you to have a burr-free edge at much higher grits. Then the strop just refines the edge to jack up its keeness.