File guide issue? updated w/my solution

Joined
Dec 3, 1999
Messages
9,437
Hi folks- :)


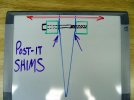
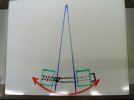
I keep having the same issue with my shoulder file guide--- Since I make my knives with a very short ricasso, there isn't much of a flat/parallel area for the file guide to clamp down on. Since the cap screws and guide pins typically end up just past the ricasso, where the distal taper starts... this leaves me clamping down on a wedge. It's a very lightly tapered wedge, but a wedge nonetheless. That makes the file guide come tight with a bit of a crown. I usually put some kind of shim on the thin side... essentially allowing me to clamp down on a uniform thickness. Pics below are from the thread in my signature.

This is obviously an exaggerated sketch, but it shows the issue I'm talking about.
252.jpg

I'd like to NOT have to mess around with the "shim, check.... shim, check.... etc." program.

I've been kicking around ideas on how to eliminate this, but thought I'd throw the topic up here and see if any of you have any thoughts on it.

One idea is a guide with less height and bigger guide pins (3/8) that would be less forgiving, and so the center line of the pins/screws would be on the flat/parallel part of the ricasso.

Another idea is a much bigger guide, with 4 guide pins.

I don't know what the ideal tolerances are on the holes. Obviously the guide pins are typically pressed into, or peined snugly into the fixed side of the guide, and have a sliding fit on the opposite piece, but I'm not sure what exact tolerances should be used to allow that, but not allow any slop or crowning of the guide.

Any thoughts? :)

These pics show my current solution... Sketch 1- shimming it, pic 2 and 3- eventually getting it clamped down dead flat.
 

Attachments

  • file guide issue.jpg
    file guide issue.jpg
    49.1 KB · Views: 197
  • file guide issue 2.jpg
    file guide issue 2.jpg
    48.6 KB · Views: 288
  • file guide issue 3.jpg
    file guide issue 3.jpg
    47.3 KB · Views: 260
Last edited:
Hopefully A C Richards will chime in. He has a couple plunge/shoulder guides he made for himself with 4 pins.... they are BIG.
I was going to get one from him but my disc sander wheel was thin at the edge and wasn't compatible as he had milled a slot for integral guards in his...otherwise, I don't think you could get his to go out of alignment if you tried...
 
My guides have enough slop to allow them to sit at a slight angle to match the taper. I have tapered washers to keep the pressure even. Slightly enlarging your guide holes and making a tapered washer set will probably solve your problem. Mark the high side of the washer with a notch so you can align it. Rotate it as needed to make the guides sit flush. Use a standard set of washers over the tapered ones, with a drop of oil to hold down rotation.
 
The only thought that comes to me is having the clamp portion of the file guide mechanically independent of the guide surface(s) and the guide surfaces of one solid piece guarantying the guide surfaces stay in alignment. Might get tricky though making sure the guide surfaces are truly perpendicular to the ricasso with the clamp portion clamping on tapered surfaces.
 
If I understand it correctly, my thoughts are to change the guide so you are more centred on the flat spot.
make it narrower or wider as the case may be.
Especially if it's reoccurring and you have a consistent style.

If you wanted, you could have spacers on pins and make that extendable and retractable...but maybe not as simple and useful as 1 or 2 different ones.


Also, just use one reference surface, as easy as putting a bit of rubber or leather on the other side.
Kinda the same idea as a milling vise - the fixed side is reference the other is clamping.


How complicated do you want to be ?

You could have one side with adjustable angles instead of shims, but I don't think it's practical
 
I'm with Cal on this one.

Small diameter set screws as close to the side opposite the carbides as possible.

I think you'ld be able to center the guide on your parallel ricasso and pre-adjust the set screws then move it where you need it and tighten the guide down.

Of course this hasn't been an issue on my blades because I never get my taper quite back as far as I'd like :o so I have enough parallel in front of the ricasso to keep the guide flat. :D

-Josh
 
I like the "leveling screw" idea; reminds me of Nick's sanding platform with the adjustable support screws.
 
Ricasso?... What's a ricasso??? ;) :p

I haven't really noticed any appreciable crowning in with my Uncle Al file-guide (looks like the same one that you are using) even when clamping down on a tapered blade. If there was any significant angle to the carbide faces I'd expect to dull my files when cutting in the shoulders... but I haven't noticed it. I'll have to look more closely... I'm curious now.
 
Last edited:
Just put the file guide on the tang if there's not enough ricasso to clamp to. It takes a bit of fiddling but works out the same. Keep it simple, son! :)
 
Just put the file guide on the tang if there's not enough ricasso to clamp to. It takes a bit of fiddling but works out the same. Keep it simple, son! :)

That's like saying, "put the tires on top of the car." :confused:

Leveling screws is on my list of ideas, but I wasn't sure if it would work as easy in application as it does theory. It does seem like a viable option.

Stacy, I really don't understand why you would enlarge the holes. The guide pins are to keep the two pieces in line, having loose fitting pins negates having them in the first place.

Thanks for the replies fellas. :)
 
Leveling screws is on my list of ideas, but I wasn't sure if it would work as easy in application as it does theory. It does seem like a viable option.)

Should work just fine.

Clamp/hold in place on ricasso.
stepone.png


Adjust set screws.
steptwo.png


Move to correct location.
stepthree.png


Tighten clamping pressure screws.
stepfour.png


Piece of cake. ;)
 
Last edited:
That's like saying, "put the tires on top of the car." :confused:

Not at all. Properly placed, a file guide on the tang will have your final cuts ending up wherever you want them on the shoulders. All that matters is that you have a hard, stable reference point - whether you start from it, or end up at it. It's just a matter of measuring and choosing the right-size files.

Look at it this way: a 9" blade is 9" from the guard to the tip, and also 9" from the tip to the guard. ;)

Don't overthink this stuff, guys.
 
So are mine, Rick. How many degrees are we talking about? What's the pitch on a 4-5" long tang?
 
I hear what you are saying, bud. I would never know the difference, either.... but we ARE talking about Nick "the Bruce Lee of F&F" Wheeler. If he sees a problem where we don't, it just means we ain't there yet, bro. I can't contribute to this thread other than my engineering background says Carls model looks fine.
 
I understand. I'm just sayin'... If a miniscule fraction of a degree is really that important, forget hand-tools altogether and just mill the dang thing. Seriously.

I say again... I'm just trying to keep it simple. I will shush now. :)
 
James, maybe I'm just not following you, but from what I think you're saying that just won't work. You file down to the guide, or in the case of a carbide faced one, grind down to it. How are you going to put the guide on the tang below the ricasso and file/grind up to the guard shoulders?

FWIW- I TOTALLY matters if you start from point A or end up at point A... they are not going to yield the same result.
 
Nick,

What if you taper the inside faces of your jig? If the tapers on your blades are all fairly uniform, it might work. You could grind the faces after they are hardened if you have a multi-axis magnetic sine plate for your surface grinder. (I assume you have a surface grinder, since you seem to own just about every tool known to man. :eek:)
 
Back
Top