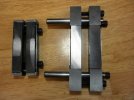
File guide issue? updated w/my solution

You just need to make a narrower version of what you posted in post #1 !

I imagine you are getting your bind because your clamping pressure is over the taper, not over the parallel section.

Get that clamping pressure over your surface ground, parallel ricasso, and you should be golden.


That has been the issue for sure. I probably managed to NOT say that though. :o :foot:

My gut feeling has been to make a different guide with that in mind, but wanted to throw the whole notion up here for some brainstorming help. :)

Fred- you are correct! That's something that's been floating around in my head.

So yesterday I built a new guide that is 5" long. That allowed me to put the dowel pins (bumped up to 3/8" pins) and the bolts right up close to the edge of the guide so my clamping pressure is directly over the surface ground ricasso.

I added a set of screws to offset the flex if needed, but I've clamped it down on several blades without using them and it's coming together dead nuts flat.

I'll snap a pic or two of it later and post it here.

Thanks for the ideas and conversation guys. :)
 
Since the cap screws and guide pins typically end up just past the ricasso, where the distal taper starts... this leaves me clamping down on a wedge. That makes the file guide come tight with a bit of a crown.


One idea is a guide with less height and bigger guide pins (3/8) that would be less forgiving, and so the center line of the pins/screws would be on the flat/parallel part of the ricasso.

Oh wait, I did say it! :p :D

In theory smaller pins and screws would probably be even better... but I went bigger for the sake of rigidity. :)
 
It would have made more seance if I'd posted pictures with my text earlier in the thread.

The blade is from flat stock .187--profiling took 8 minutes including the tapered tang.
DSC01345_001.JPG


This is shot from the bottom of the blade the clamp positioned to grind the bevels.
DSC01346.JPG


The blade with the bevels rough ground [36 grit] 16 minutes. Distal taper ground.
DSC01348.JPG


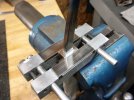
Shot from the top of the blade with the clamp positioned on the 1/4 wide ricasso. Ready to construct the shoulders. I put the clamp in a vise and file the spine and choil sides of the shoulders.
I also make the initial cuts on the sides of the blades shoulders with a long angle lath bastard file. Ten strokes per side. 10 minutes.
DSC01352.JPG


Moving to the grinder; I install a new 120 grit ceramic belt, J-flex, place the side of the clamp "squarely" against the side of the platen and lower the blade to the belt. I run the belt on high and with pressure straight down on the blade grind the shoulder in one move.
Turn the blade over going to the opposite side of the belt and repeat. You want to make sure the edge of the belt is even, or just slightly over the edge of the platen.
This takes 2 minutes.
DSC01355.JPG


DSC01354.JPG


From bar stock to heat treat in under 35 minutes and all the surfaces are square and true.

Have a good day in the shop if you are that fortunate, Fred
 
Last edited:
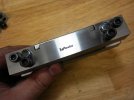
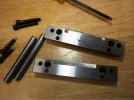
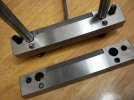
Well, here's what I came up with. I'm very happy so far. ;) :)

I wanted to make sure that I point out Uncle Al's guide is a GREAT TOOL. For 98% of the makers out there it would work perfect every time. It's the short ricassos and thick blades (especially integrals!) that were forcing me to look at something just a little bit different.

Plus, after building this--- I promise you the Riverside guide is a bargain. :)


The biggest factor in this new one working better for ME, is the length allowed me to put the pins and screws very close to the top edge of the guide--- so my clamping pressure is in line with my surface ground ricassos. With that in mind, I also inset the carbide strips so they only protrude 0.020 from the guide.

The big fatty pins are a very tight fit and long--- so I can open this thing up for integrals and it stays all lined up.

Thanks guys :)


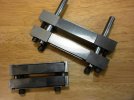
file guide 1.jpg file guide 2.jpg file guide 4.jpg

Uncle Al's guide added for size reference.
file guide 3.jpg file guide 5.jpg
 
Thanks Robert :) Yep, the carbide is kept in place with epoxy.

I got a smoke'n deal on 6" long, ground carbide strips on ebay... so I had to cut a strip in half with a diamond wheel (not fun!!! LOL). :)


Sam- Nope... the carbide is already ground, so with the pockets milled cleanly, they set flat. I did run it over a 10" long diamond stone for a few strokes just tomake sure it was FLAT.

BTW- In retrospect I probably could have put the clamping cap screws even closer to the edge, but I didn't want to be threading into TOO thin of an area. It's doing what it's supposed to though, so there's little sense in worrying about that now. ;) :)
 
I knew something special was going to come out of this discussion but I never expected something of this quality...awesome!
edit: I should have aniticpated this considering what I have seen Nick make...can't hold the guy back-
 
Great thread with a fantastic end result Nick !

An excellent solution and I'll bet you'll find a bunch of uses for the new reamers and drills.

Take care- Josh
 
I...I never expected something of this quality...awesome!

I knew this was coming. I am pretty sure that Nick does this on purpose. As soon as I get better at making jigs and I build one that I am proud of, he post something like this that makes mine looks like it was done by blind monkeys. :(

Is that a mark only for your line of tools Nick? ;)
 
Sweet Nick, I see you got the long pins now! Who would have guessed Nick would make something so nice and Clean? ;)
 
Wow Fred, I got busy posting those pics and missed yours. :o That's great! Thank you for posting your photos! I love seeing how other folks are doing this stuff!!! :thumbup: :)

Patrice- I'm glad you noticed that! ;) I etched it on there, and then told Angi I did it so when I die and she sells all my tools she'll get more money for it! :p :D LMAO


I wanted to show a little follow up. One of the big reasons I wanted this guide, was for an integral I'm working on. I had been fiddley farting around with cutting the bolster shoulders and just wasn't getting them pefectly flat. There was a tiny bit of light showing through between the wood block and bolsters.

Well, I clamped this sucker up and went over to the disc sander (enter the carbide strips ;) :D). Touched it up with psa paper on a square bar (essentially a manly man's nail file ;) ) and in about 5 minutes the shoulders are FLAT. Insert happy dance here! :D

Here it was right before touching it up by hand. It's 5/8" thick at the bolster. The dowel pins are extra long, 3" which is longer than need be for alignment...BUT, they make it super easy to hang onto at the disc sander. (little things, big difference :) ).

file guide 6.jpg

Hmm, well I really have no idea how I managed to attach the pic of the boys... ??? LOL But since it's there.... We took them down to the Toutle River the other day for some play time. Creeping up on a year old and Oliver is 128 pounds and Bentley is 136 pounds. :eek: :)
 

Attachments

  • DSCN4092.jpg
    DSCN4092.jpg
    83.4 KB · Views: 73
Last edited:
I sure have a long way to go, I'm nowhere near that efficient :(

Its not normal for me to be this efficient. Sloth like knife making is my norm.

I wanted to know how much time it takes, never checked.

I've used this system for about 10 years, 4 in its present configuration. Like most anything you do repetitively for an extended period of time, you improve; or should.

I think the reason behind the speed, lies in the systems repeatability and accuracy. If you know the blade is at the correct angle of approach, you can "lean" into the grind the steel comes off in a hurry. Much less chance for errors.


This was a worthwhile and successful thread; we all learned something. Nice solution to your problem, Nick. Well done.

As someone who markets a product on line, its sometimes touchy to join in on a thread that interest me. Many think its always about marketing, but for me its more about sharing and adding what I can to the conversation. I'm a person outside the product. I started out as a knife maker and still am a knife maker.

Fred:thumbup:
 
My goodness that's purdy and built like a tank. I would expect nothing less coming out of the Wheeler shop:thumbup::D. Superb job my friend. So where do I sign up to get one of those. I NEEED one.
 
As someone who markets a product on line, its sometimes touchy to join in on a thread that interest me. Many think its always about marketing, but for me its more about sharing and adding what I can to the conversation. I'm a person outside the product. I started out as a knife maker and still am a knife maker.

Fred:thumbup:


Fred- I never have felt that way about your posts in this or any other thread. I know where you're coming from, probably only because I've been "accused" of doing my process threads as a sleazy form of marketing. Now sure, every post we make anywhere could be considered a small form of marketing ourselves... but that's just how it goes. It's not always good either! :foot: :D

I completely appreciate you being a knife maker and teacher first, with the tool business being a supplemental space for you to focus some time and energy.... and welcome anything you care to share! :) I know we have a different approach with quite a few of these things, but that makes me appreciate your input even more, as I know there are some angles of attack you'll come up with that probably wouldn't even cross my thick mind.

Guys- I'd love to be in a position to make this type of guide for others, but there's two major hang-ups. #1 being I don't want to step on Uncle Al's toes. #2 is I am not set up right now to where I can justify it. If I had my knee mill set up, and a hydraulic surface grinder... it would be a cakewalk. But I don't even have the big machines in the new shop yet. I made this one with an Enco mill/drill and my good 'ol manual Grand Rapids surface grinder. That made it take about 9.76 times longer than would be reasonable for "production."

Now if you happen to specialize in something like French drains, and can come help me fix our soggy yard... then I'd definitely make you like 5 of these things. :eek: :D
 
Fred- I never have felt that way about your posts in this or any other thread. I know where you're coming from, probably only because I've been "accused" of doing my process threads as a sleazy form of marketing. Now sure, every post we make anywhere could be considered a small form of marketing ourselves... but that's just how it goes. It's not always good either! :foot: :D

I completely appreciate you being a knife maker and teacher first, with the tool business being a supplemental space for you to focus some time and energy.... and welcome anything you care to share! :) I know we have a different approach with quite a few of these things, but that makes me appreciate your input even more, as I know there are some angles of attack you'll come up with that probably wouldn't even cross my thick mind.

I appreciate that a lot. I've incorporated, in my shop, many of the fixtures and techniques you have shared with us. They have made my time in the shop more enjoyable and more productive.

Fred
 
WOW Nick, that is a beast of a file guide. Beautiful work. I have had one of Uncle Al's for a good 3 years now and it still looks new. Those carbide plates are incredible.
 
Back
Top