Forge Only (No Grind) Knife

Thanks for the kind words! For most of the time I've been into making knives and hawks my focus has been on what I can do with a hand held hammer. From what I started out doing to what I've been able to do now has been an adventure. Now that I think I know what I'm doing I still know there is more to learn. As most of you know I've taken a break from the hammer and have just been doing some small stock removal blades and I'm actually enjoying it but the satisfaction I got from forging is not there. Hopefully by the time its gets cold enough in the shop that I need to light up the forge to get warm I can get back into the swing of things.

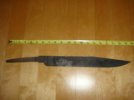
Here's a few pictures of the last hawk I made in September or October.

IMG_1676.JPG


IMG_1685.JPG


IMG_1705.JPG
 
[Raymond what are the outlines on the steel siding behind the hawk?
Chris

IMG_1705.JPG
[/QUOTE]

Back in September I got interested in forging socketed spearheads. What your asking about is the progression during the process from start to finish. About every 15 or 20 minutes I cooled off the work and traced it onto the inside of my sliding shop door. Here's the whole picture.

IMG_1567.JPG
 
I like the note to self above #4 "make sure it's not hot!" lol I have the rectangle branded on my thumb to remind me that when one drops a piece while grinding. NOT to just grab it.... sizzle
 
Count me in as stupid. I don't own a grinder so I forge, brush off the scale so it doesn't get hammered in, file down to an acceptable look (I like a little decarb) but use no power tools. The nickel silver guard and copper spacer are sawed out from a flattened rod. Many blades and file work give me the correct size so these can slide up and fit just right. The tang is silver soldered to copper so I can pein the end tight (butt cap is also same combo as guard).
I have five of these simply because I like them. I have some hawks pounded out from ball pein hammers.
I am going to go for a "black tie" special for my next project. it will be all hand forged and filed but it will have a finer finish and engraving work done with the old fashioned graver -mostly cause I can't afford the power graver :)
I like my stupid work. I do have a power hammer now so I guess I'm half stupid from now on?
One of my stupid bowies:
dsc20173505copyyg4.jpg
 
I just heard about the process of forging a knife complete enough that it does not need grinding except to sharpen. Is this a common practice or an exercise in careful hammering? Has anyone here tried it out? I am fascinated with the idea and would like to give it a try when the weather cools down and I feel more like running the forge.

Comments? Pictures? Advice?

Maybe you are talking about friction forging?
 
I also leave a forged finish and only use files to clean up the profile. I'm still not very good at forging but I'm getting less than a mm of decarb (much less but I haven't tried to measure it).
Using a charcoal forge fwiw.

Chris
 
I've done quite a few that way.

It is helpful to try and keep the decarb to a minimum by using a reducing, and as rich of an atmosphere as possible. I add wood chunks inside my gas forge, which really seems to help with decarb and scale. With charcoal you can also use rich additives like whole corn feed, or just make sure there's plenty of coals between the tuyere and the work. If you do this well, you can remove the decarb just by sharpening. However, I think it's a good idea to file the edge back just a little before heat treat, which you'll probably need to do anyway, just to sweeten up the profile a bit.

It also helps to heat treat from a reducing or shielded atmosphere.

Generally speaking, I really don’t see decarb as being a major problem. Of course, it can be a problem if the forge is running a highly oxidizing atmosphere at high temps., and the work is exposed to it for expended periods of time.
 
Last edited:
I just read this whole thread and I am truly Stupefied.
There is so much information on BladeFourms thank you all.
 
OK, hot weather or not, I had to fire the forge early this morning and give it a try. I was a little concerned about heat treating with such a thin edge but it actually came out straight! Right now the blade sits in a bucket of white vinegar and will be there over night to remove some of the scale. Photos in the morning.
 
I've done quite a few that way.

It is helpful to try and keep the decarb to a minimum by using a reducing, and as rich of an atmosphere as possible. I add wood chunks inside my gas forge, which really seems to help with decarb and scale. With charcoal you can also use rich additives like whole corn feed, or just make sure there's plenty of coals between the tuyere and the work. If you do this well, you can remove the decarb just by sharpening. However, I think it's a good idea to file the edge back just a little before heat treat, which you'll probably need to do anyway, just to sweeten up the profile a bit.

It also helps to heat treat from a reducing or shielded atmosphere.

Generally speaking, I really don’t see decarb as being a major problem. Of course, it can be a problem if the forge is running a highly oxidizing atmosphere at high temps., and the work is exposed to it for expended periods of time.

tai,

I was really surprised when you used your method for hardening Don's blade in the pipe. It was spotless. Mister Goo has some neat tricks!
 
Ray, I agree that tai has developed some good tricks. Years ago he shared the muffle pipe with me. The first time I used it was truly amazing. tais' work inspired me to forge closer to finish and develop much better hammer control.
Mike
 
Here is a photo or two of one I'm doing with minimal power tools. Of course, you can see it was profiled on a grinder, but it's all hand forged, and will be primarily finished with files, stones, and paper.

ForgedLongBowie20.jpg


It's soaking in brown rice vinegar as I type.

LongBowieVinegar2.jpg
 

Attachments

  • ForgedLongBowie20.jpg
    ForgedLongBowie20.jpg
    2.9 KB · Views: 38
  • LongBowieVinegar2.jpg
    LongBowieVinegar2.jpg
    5.1 KB · Views: 30
Last edited:
After a night in vinegar and a quick hit with a wire bush I am generally pleased with the outcome of my experiment but I have some concerns. The longitudinal lines in the blade make me wonder if I am forging too cold creating some slight overlaps or is this normal? I strive to create "waves"with the hammer as I am moving the steel toward the edge; is this what I am seeing here? And I can see that I need to sweep the scale off my anvil more often and dress the face of my hammer.

8-121.jpg

8-122.jpg
8-123.jpg
8-124.jpg
 
Looks good! unsure what the longitudinal lines are. My noob guess is since you have them on the spine and ricasso, to me makes it look like it was forged from wrought iron?

Jason
 
As Tai makes mention in his video, the steel will move in the direction of the heat, all you have to do is hit it. The only time I have ever gotten those ripples/lines was when I was "glancing" with my hammer in the direction I wanted the steel to go.

Edit to add:

Looking at it again... it seems like the steel is delaminating(not sure if that's the right word for separating) My second diagnosis would be thatyou are working it too cold.... but take that with a grain of salt. Let the more experienced guys chime in.

Rick
 
Last edited:
GL Drew,

Great photos! Can you or anyone here please tell me how to embed big photos like that directly into a post? I am lost.

Thanks.
 
G L Drew, if that knife is forged from flat stock, etch part of the bar next to where you took the piece for the knife. The anomalies may be from the rolling process. If that is the case, try forging from round stock. I think round stock has less of this sort of thing.
Good Luck and Have Fun!
Alden
 
I think Alden might be right. They look like some kind of mill flaws. With hot rolled, you can grind the scale off (down to clean steel) prior to forging and check for those first.
 
Back
Top