-
The BladeForums.com 2024 Traditional Knife is available! Price is $250 ea (shipped within CONUS).
Order here: https://www.bladeforums.com/help/2024-traditional/
You are using an out of date browser. It may not display this or other websites correctly.
You should upgrade or use an alternative browser.
You should upgrade or use an alternative browser.
Getting Started on My First Knife
- Thread starter Dulledga
- Start date
- Joined
- Jun 11, 2014
- Messages
- 40
May I ask, when grinding the distal taper how are you holding the blade?
from what I can see it appears as though it is a magnetic handle attached to the blade? Am I far off?
from what I can see it appears as though it is a magnetic handle attached to the blade? Am I far off?
- Joined
- Sep 21, 2013
- Messages
- 1,574
It's a long magnet. Good for tapering tangs, grinding flats (for fixing hosed up plunges at the spine of you are me too ") ) .
) .
I've even begun using it for grinding plunges and bevels for thin (.070) stock for paring knives and things like that to minimize flex.
) .I've even begun using it for grinding plunges and bevels for thin (.070) stock for paring knives and things like that to minimize flex.
Stacy E. Apelt - Bladesmith
ilmarinen - MODERATOR
Moderator
Knifemaker / Craftsman / Service Provider
- Joined
- Aug 20, 2004
- Messages
- 38,467
Yes, I use a grinding magnet. I have several from small ones with a "D" shaped handle to long ones with a wooden backing. A simple $5-10 HF welding magnet will work well, too.
Working on the flat platen, I hold the blade with the magnet and rough in the distal taper across the blade ( spine to edge). Then I turn it tang up ( or down) and grind the whole taper flat along the long axis of the knife. If tapering the tang, I do the same thing. Repeat on the other side. It is best in the beginning to do some on each side and sneak up on the proper taper. I usually use a 36 grit belt for this type work.
On blades with a dropped edge that is below the tang, I often do the bevels at the same time as the distal by just turning the blade a bit toward the edge.
- Joined
- Sep 21, 2013
- Messages
- 1,574
Stacy if I can ask are the gloves you are wearing heat resistant gloves? If so can you recommend some to me? I don't use a work rest or grinding stick a lot and it's a pain in the arse to quit 2/3ds of the way through my pass.
Thanks!
Thanks!
- Joined
- Jun 11, 2014
- Messages
- 40
It's a long magnet. Good for tapering tangs, grinding flats (for fixing hosed up plunges at the spine of you are me too
I've even begun using it for grinding plunges and bevels for thin (.070) stock for paring knives and things like that to minimize flex.
Yes, I use a grinding magnet. I have several from small ones with a "D" shaped handle to long ones with a wooden backing. A simple $5-10 HF welding magnet will work well, too.
Working on the flat platen, I hold the blade with the magnet and rough in the distal taper across the blade ( spine to edge). Then I turn it tang up ( or down) and grind the whole taper flat along the long axis of the knife. If tapering the tang, I do the same thing. Repeat on the other side. It is best in the beginning to do some on each side and sneak up on the proper taper. I usually use a 36 grit belt for this type work.
On blades with a dropped edge that is below the tang, I often do the bevels at the same time as the distal by just turning the blade a bit toward the edge.
thanks for the response folks!
Stacy E. Apelt - Bladesmith
ilmarinen - MODERATOR
Moderator
Knifemaker / Craftsman / Service Provider
- Joined
- Aug 20, 2004
- Messages
- 38,467
They are just knit work gloves. I buy them by the gross in small, which pulls on nice and snug. They help in holding hot metal a bit...but that is only part of their main use. They wear away , which is their main purpose, because they wear away instead of my fingers When doing heavy hogging, I sometimes wear double gloves on my left hand.
When doing heavy hogging, I sometimes wear double gloves on my left hand.Hi guys,
Just wanted to update the thread with some references I will be using. Stacy should be sending out the stuff this weekend. In the interim, I've been trying to wrap my head around the hand-sanding process.
These videos by Nick Wheeler were very informative. The video is a little drawn out but the little nuggets of information will help reduce the probability of screwing something up (which I'm sure will happen at some point).
Anyway here are the videos for your (and my) reference:
[video=youtube;4I4x4QLpfnk]https://www.youtube.com/watch?v=4I4x4QLpfnk[/video]
https://www.youtube.com/watch?v=4I4x4QLpfnk
[video=youtube;NJ4Mitbpyzc]https://www.youtube.com/watch?v=NJ4Mitbpyzc[/video]
https://www.youtube.com/watch?v=NJ4Mitbpyzc
Nic. - Thanks for the suggestion.
- Joined
- Sep 21, 2013
- Messages
- 1,574
Thanks Stacy.
Another great one by Aaron Gough:
[video=youtube;1b1mvkZcBw8]https://www.youtube.com/watch?v=1b1mvkZcBw8[/video]
https://www.youtube.com/watch?v=1b1mvkZcBw8
[video=youtube;1b1mvkZcBw8]https://www.youtube.com/watch?v=1b1mvkZcBw8[/video]
https://www.youtube.com/watch?v=1b1mvkZcBw8
Stacy E. Apelt - Bladesmith
ilmarinen - MODERATOR
Moderator
Knifemaker / Craftsman / Service Provider
- Joined
- Aug 20, 2004
- Messages
- 38,467
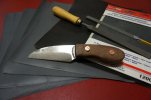
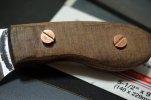
OK, everything is ready to mail out. Blade is profiled and a simple starter bevel cut. Handle is pre-fit and the front is sanded and buffed. Drilled for copper Corby bolts. Wood is Ringed Gidgee...which should look really stunning on a knife like this. It doesn't show much of its depth and rings now, but will look much different when sanded and buffed. I added enough sandpaper to make several knives, and a couple files. After Vin gets the bevels done, I will HT the blade and try for a nice hamon.
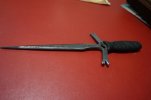
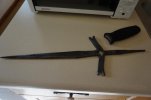
In the photos are two shots of a project I want to finish for Ashokan. I forged this large Medieval dagger last year during the open forge/demo on Saturday night. It is forged from a single 3/4" square bar of 1070. There are no welds, just cuts and flips. It has been through HT to Rc 55, and only needs clean up and some pretty clothes. Handle is a wooden core with water buffalo wrap. Pommel will be WI. The toaster oven gives an idea of the size of this beast. It has a diamond shape ( cross-section) front end that would pierce armor easily.
In the photos are two shots of a project I want to finish for Ashokan. I forged this large Medieval dagger last year during the open forge/demo on Saturday night. It is forged from a single 3/4" square bar of 1070. There are no welds, just cuts and flips. It has been through HT to Rc 55, and only needs clean up and some pretty clothes. Handle is a wooden core with water buffalo wrap. Pommel will be WI. The toaster oven gives an idea of the size of this beast. It has a diamond shape ( cross-section) front end that would pierce armor easily.
Attachments
Stacy E. Apelt - Bladesmith
ilmarinen - MODERATOR
Moderator
Knifemaker / Craftsman / Service Provider
- Joined
- Aug 20, 2004
- Messages
- 38,467
Here is a thread with a shot of one of Nick Wheeler's Ringed Gidgee handles:
http://www.bladeforums.com/forums/s...ged-Gidgee-handle-as-new-(EU-sales-preferred)
http://www.bladeforums.com/forums/s...ged-Gidgee-handle-as-new-(EU-sales-preferred)
OK, everything is ready to mail out. Blade is profiled and a simple starter bevel cut. Handle is pre-fit and the front is sanded and buffed. Drilled for copper Corby bolts. Wood is Ringed Gidgee...which should look really stunning on a knife like this. It doesn't show much of its depth and rings now, but will look much different when sanded and buffed. I added enough sandpaper to make several knives, and a couple files. After Vin gets the bevels done, I will HT the blade and try for a nice hamon.
In the photos are two shots of a project I want to finish for Ashokan. I forged this large Medieval dagger last year during the open forge/demo on Saturday night. It is forged from a single 3/4" square bar of 1070. There are no welds, just cuts and flips. It has been through HT to Rc 55, and only needs clean up and some pretty clothes. Handle is a wooden core with water buffalo wrap. Pommel will be WI. The toaster oven gives an idea of the size of this beast. It has a diamond shape ( cross-section) front end that would pierce armor easily.
Just saw this after I emailed you.
That dagger is amazing!
Thank you very much for the kit! It looks awesome so far. And thanks very much for the scales. They will look great once sanded down. Thanks very much for everything. I hope I can do this knife justice. Any chance to switch out the copper for silver colored bolts. If it's going to be a pain to switch it up then no worries!
Thanks so much, Stacy. You're awesome!


- Joined
- Jul 7, 2015
- Messages
- 35
Good luck Dulledga! Your build and this thread is the best tutorial i have found yet. Inspired to start my first blade. Post pics when i start.
and special thanks to stacy for helping out some newbies understand the process better. lol.
and special thanks to stacy for helping out some newbies understand the process better. lol.

 (couldn't find anything sturdy enough)
Stacy E. Apelt - Bladesmith
ilmarinen - MODERATOR
Moderator
Knifemaker / Craftsman / Service Provider
- Joined
- Aug 20, 2004
- Messages
- 38,467
Looks good - A pair of #12 flat head screws, two washers, and a cordless drill to screw them in/out will hold the blade even better. That way you can use two clamps to hold the arm to the table.
A Black and Decker Workmate is only $30 at Home Depot. They are great for clamping arms and other jigs. Unless you have special needs, there is no need for the more elaborate and expensive ones. The unit folds up and can store behind a door.
http://www.homedepot.com/p/BLACK-DE..._-100671605&ci_src=328768002&ci_sku=100671605
Harbor Freight has their copy for $20,
http://www.harborfreight.com/folding-clamping-workbench-with-movable-pegs-47844.html
The 2X4 can be notched 2" deep at the two places it crosses the clamping arm tracks so it fits down into the Workmate on its 4" axis, and the blade screwed to the 2" side. This allows more clearance and much sturdier filing/sanding. A 12" longer 2X4 will allow a blade attached to each end for working on two knives.
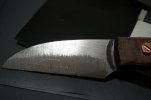
Work your way up toward the spine ( or as high as you desire) and leave some metal to take off in sanding. When nice and smooth at 400 grit, it will be ready for HT. The edge should be about half a dimes thickness ( .02-.03") when done. Like I said earlier, don't sweat it if it gets sharp by accident. Just take a swipe or two along the edge with a file and move it back a few thousandths.
A Black and Decker Workmate is only $30 at Home Depot. They are great for clamping arms and other jigs. Unless you have special needs, there is no need for the more elaborate and expensive ones. The unit folds up and can store behind a door.
http://www.homedepot.com/p/BLACK-DE..._-100671605&ci_src=328768002&ci_sku=100671605
Harbor Freight has their copy for $20,
http://www.harborfreight.com/folding-clamping-workbench-with-movable-pegs-47844.html
The 2X4 can be notched 2" deep at the two places it crosses the clamping arm tracks so it fits down into the Workmate on its 4" axis, and the blade screwed to the 2" side. This allows more clearance and much sturdier filing/sanding. A 12" longer 2X4 will allow a blade attached to each end for working on two knives.
Work your way up toward the spine ( or as high as you desire) and leave some metal to take off in sanding. When nice and smooth at 400 grit, it will be ready for HT. The edge should be about half a dimes thickness ( .02-.03") when done. Like I said earlier, don't sweat it if it gets sharp by accident. Just take a swipe or two along the edge with a file and move it back a few thousandths.
Stacy E. Apelt - Bladesmith
ilmarinen - MODERATOR
Moderator
Knifemaker / Craftsman / Service Provider
- Joined
- Aug 20, 2004
- Messages
- 38,467
Be sure to read the sticky "How t Instructions for Making a Knife" , and the rest of the stuff in the stickys is really helpful too. Take a week or so to go through all the stickys and you will be months ahead.