I propose a dual.... I am calling you leather benders out....

You plan so much better than I do. I just - like - wing it. I know what steps come next - and then my ADHD mind is like "Oooooo - let's try this".

Like tonight - I was working on a lefty Hiking Buddy sheath (that will be available for sale by the way) and - I was like - Hmmmm - let me cut some off the welt - and single stitch it - and flare the end.... and an hour later.... Sheesh..

I am hoping to have it done by tomorrow to enter it into the competition too! ;)


With as close as you made that welt - and as small as the welt is - don't be shy to double up the thickness of the welt at the handle (skive it thinner to blend it in with the blade) and you might get a more smooth appearance and better fit. Just two pennies - but you have a great start.

TF

You want to talk about planning....it occurred to me that i didn't even ask Hugh if he was right-handed! :eek: and that's how the narrow welt happens too....when i just decide on a welt size without even really testing the fit. ;)

thanks for the advice. i will double up and skive, as necessary. we'll see how snug the fit is. i have had to triple up before too. i like a sleek footprint on the sheath, so i don't add leather in the cutout, even on a thick handled knife. it might be smart if i did.

....buuut, that comes with planning and preparation. :D

thanks Tal. looking forward to seeing that HB sheath.
 
I am the other way around - I barely worry about the welt until I have the blank nearly wet formed - then I let the welt determine what I need to do.

It ISN'T the efficient way to go for sure. ;)

TF
 
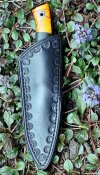
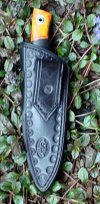
Here is the second sheath I made for this picture series.

Again - nothing to drastic - and I don't think I really fulfilled my OWN challenge - but - anyway - here it is.

A Fiddleback Hiking Sheath - Lefty - with Dangler.

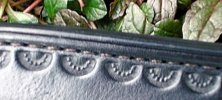
The reason I explicitly wanted to try this one is that I wanted a light weight, strong, leather sheath. This meant setting the welt at 1/4 inch and putting the stitch right in the middle. This would give it a good look and stitch relief, without adding any unnecessary weight. The 'knife' you are seeing is my mock up Hiking buddy - carved from wood.

HikingBuddy-Russet-Sheath2_zps73578111.jpg


HikingBuddy-Russet-Sheath5_zps56b02aba.jpg


HikingBuddy-Russet-Sheath3_zps5aa02506.jpg


HikingBuddy-Russet-Sheath6_zpse47e4513.jpg


HikingBuddy-Russet-Sheath4_zps8fe34e8c.jpg


I struggled with lighting today (I really need to add more light to my light tent) - but I wanted to get the pics to you.

TF


p.s. - Lefties - this one is available - PM me. I will likely put a for sale thread up.
 
^^ agreed.

And, with that said...hey Tal...what do you use to burnish your edges? i have tried various things. i have tried the for-real wooden burnisher. i have tried glass. and, i have tried corrugated cardboard.

right now, i use the cardboard to do my flats and the wooden tool to do the hard-to-reach places. but, i'll tell ya...my edges look nothing like that.

So, i have to ask....what do you recommend?

P.S. that sheath was worth waiting for. top notch. :thumbup:
 
You plan so much better than I do. I just - like - wing it. I know what steps come next - and then my ADHD mind is like "Oooooo - let's try this".

Aha, so being like this can produce a good sheath! I'm very much a wing it I know what comes next, it's all in my head guy. Because of this thread I actually, started to write it down and try to do better, I have a knife blank coming soon enough so I plan on taking WIP pics and actually being crazy enough to enter something here, but I have no busse knives, if that's okay?

Really love all the work here, learned more about the process then I have mucking around by myself for a couple of years, I'm very much an amateur, they always kind look rough but I do enjoy it a great amount.

With some advice from 1066 here on the forum i've actually started buying good leather instead of scrap as well :)

latest attempt:

 
Ah yes. Ironically enough, i am sure i have read that. Whoops. I will take a new look. Thanks.
 
TPVT - Feel free to drop me a PM if you want.

I think it goes like this.

No matter the edge:

Cut square.
Sand dry to flat - with a worn out 300 grit belt.
Use #1 or #2 Edger
Sand again to smooth out the rounded edges.
Lightly wet edge.
Sand again.
Sand in ONE DIRECTION with about 600 grit.
Lightly wet edge.
Sand again ONE DIRECTION with 600 grit.
Use wooden or horn burnisher.
Stain.
When dry - Use wooden or horn burnisher.
Gum tragacanth - jean or duck cloth burnishing.
Drink Beer.


This is obviously done throughout the process - not all at once.

TF

hmmm...out of all that, i think i only had the beer step correct. :D

thanks Tal.
 
Finally got time to put one together for this thread. It's made for my own Bushfinger, so did a little extra. Got to say that I don't like doing black due to several reasons, but this handle called for black from the day I bought it. When I do go black, I use a vinagaroon solution that changes the leather to black all the way through. Makes the work a lot cleaner on the hands and if scratched, the marks will not show. Also took time to shoot pictures as I went for a WIP just to show different ways of getting to the same end result. Will try to post that in another thread.
WIP 006.jpg
WIP 007.jpg
WIP 009.jpg
 
I agree on the black - the vinagaroon makes it TWICE as messy - but it IS the way to go.

Great work Rick - finally made one for yourself huh?

TF
 
Even after a soda bath the leather has a faint salad dressing odor for a day or so, but sure is nice to work during finishing.

Well, the intent was for myself, but like most other knives/ sheaths I've made for myself, if someone likes it, I can make myself another.:D
 
I'm only just starting mine. In my defense, the leather only arrived from W&C last week. But in truth, I just finished the knife I am going to make a sheath for.
 
Hey Tal....re-reading your tutorial again. i had forgotten all of that. it sure would have been easier to use your guide rather than doing things my own way. don't get me wrong....i have learned a lot fudging my way through, but i picked up a bunch of great tips from your tutorial. thanks much.

i have been using my adjustable groover for all the grooving. as you mention in your tutorial, having a freehand groover sure would make things easier. with that said, i see the freehand groover and an adjustable V gouge. i read what you used them both for. can i get away with just one of them? i know the answer is "yes", as i don't have either of them now. let me rephrase that....if you had to choose just one...which would you choose?

sorry to gum up this thread. this post might be more appropriate in the "sheaths" subforum. but, i figured....ahhh, what the heck. :D

thanks.
 
TPVT,

If I could have only one - I would choose the freehand groover - when You need to trace the holes you have punched - doing it any other way is a pain in the butt.

With that said - they are both SO cheap - that to add the freehand groover to the v-groover would cost very little.

TF
 
TPVT,

If I could have only one - I would choose the freehand groover - when You need to trace the holes you have punched - doing it any other way is a pain in the butt.

With that said - they are both SO cheap - that to add the freehand groover to the v-groover would cost very little.

TF

thanks Tal.
 
Ok, so i still have Hugh's knives. that served as motivation to try to get these done this weekend.

The good news is the knives fit.
8730393332_2aa2455960_b.jpg


Self-critique (the major flaws):
1) i grooved (and hence stitched) wayyy too close to the edge. i don't like it. BUT...i keep reminding myself they should serve as a functional sheath for a while.
2) i am never happy with the "finish" on my edges. And unfortunately for you Hugh, learned how to remedy this after i started yours. The answer is to spend more time prepping my leather. sand, burnish, etc. prior to any stitching or gluing. i learned this from the tutorial link that talfuchre shared above. thanks Tal!
3) not so much a critique of myself, but i don't much like the leather i got. one of the sheaths especially...the flesh side is super-rough. i learned another tip from TF in his tutorial that i can skive and sand it, but again, i read that after i stitched up the belt loop (sorry Hugh).

I like the "au natural" look. I don't like to dye the leather (though i have before, and i have the dyes to do it). But, to me, i prefer just taking the raw leather and treating/sealing it with several coat of Neatsfoot oil. it darkens the leather a bit and i like the way it ages with use.

drying....
8730393048_23382be153_b.jpg


i'll get better pics up of the finished product within the next couple of days.
 
Tpvt

Are you about 1/8th away from the edge with your stitches? If so - you are fine with that. If 1/16 - it will work - but a little more would be better.

If you want to set those sheaths out in the sun to dry them - they will 'tan' on you just like your skin. Gives it a nice mellow look.

I noticed you ran your stitch groover all the way around - if you are going to do that - burnish that goove (when done stitching) with the tip of a bone folder or what have you - it helps it look a little more finish.

Concerning the leather - the raw material has a LOT to do with the final outcome. If you buy an economy side of leather from Wickett and Craig it runs about 100 dollars shipped - and you will have about 50 sheaths worth of QUALITY leather. Ask them to skive it to whatever thickness you want (Around 8 ounce would be good).

Here is what matters - in my opinion - you dared to fail. You learned a ton - and those knives are not safe to carry. You know how to get better and your learned and I hope you had fun. That can only be a success.

I think your best result is the one in the middle of the first picture - a great start and I am sure that it will work for a long time to come. Well done bro.

TF
 
Back
Top