Keyhole Fighter WIP

Status
Not open for further replies.
Update 7 Part 2

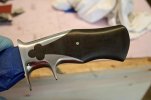
I then mixed the epoxy and put the knife together. No pictures of the process, because of the limited time I had to assemble the knife before the epoxy harden. My assembly process was: pour the mixed epoxy into the void in the handle block, smear epoxy on all the contact surfaces, slide handle into the keyhole, pout additional epoxy into the tang slot, insert the tang into the keyhole block, place the knife assembly in the clamp, lineup the blade and handle, use a C-clamp to apply additional pressure to the keyhole block and the African Blackwood, and finally clean up all the epoxy that squeezed out.

knife24_zpsadfbcfee.jpg
 
Last edited:
Update 8

The glue-up went well, no movement while in the clamps. Here are a few shots.

knife25_zpsada60dfd.jpg


knife26_zpsd96bc839.jpg


knife27_zpsa4a0ea85.jpg


Next, I begin to shape the sub-hilt area with a ½” wheel on the KMG.

knife28_zps1b1f2a3b.jpg


knife29_zpsc46bb40f.jpg


Next, I go to the disk grinder to flatten both sides and make them parallel.

knife30_zpsc20917c0.jpg


knife31_zps7362b3e3.jpg


With the sides parallel I drill a hole for the tang pin (1/8 SS).

knife32_zps2cd3691a.jpg


Here is a shot of the keyhole as I start to clean up that area.

knife33_zps22f7cb0a.jpg


Now with the pin in place I can start to grind toward final shape. I move back and forth between the disk grinder, ½” wheel, 8” wheel and the flat platen as I slowly grind the guard/keyhole to shape. This is a slow process, because I don’t want to remove too much material at one time and I don’t want to cause any issues with the epoxy with getting it too hot. To control the temperature I swirl the handle in water and allow time for it to cool. The following is a set of pictures showing some of the ways I am shaping the guard and handle. Most of the focus is on the guard.

knife34_zpsf472a1a5.jpg


knife35_zps66c2a8d7.jpg


knife36_zpse7a6be51.jpg


knife37_zpse81d68a2.jpg


At this point I have finished the shaping with the grinder. The next update will focus on my hand sanding process. I think it starting to look like the drawing.

knife38_zpsfc2f7e3d.jpg


knife39_zpsdd89aed2.jpg
 
Really enjoying this. Waiting for the next posts.
 
Update 9

As I start to hand sand I focus on rounding the top and bottom of the handle. I use a shoe-shine technique where I put the sand paper strips back-and-forth to round off the curves, starting at 220 grit, and then using 400 grit.

knife40_zpsc8da172b.jpg


knife41_zpsf80c85a7.jpg


knife42_zpsdc168e11.jpg


After I get the wood to finial shape, I go back using the same process and clean up the guard, using 400 grit.

knife43_zps928004ee.jpg


knife44_zps6a6d6f2e.jpg


At this point I’m nearly finished. The hand sanding took about two hours. It is a slow process, but I have the most control over this part doing the sanding by hand. Now, I need to go back using good light and look for scratches clean those up and apply a finish to the Blackwood and un-tape the blade and clean-up any issues there.

knife45_zps663b65da.jpg


knife46_zps290b8da5.jpg


knife47_zps4d680e58.jpg


knife48_zpsdc14f525.jpg


knife49_zpsa37d79eb.jpg
 
Do you have to watch over sanding the wood where it meets the guard? This is something I have wondered and thought this would be a great time to ask.
 
Hi Big Chris,

The area where the wood meets the metal is always a difficult area to sand. If you are not careful you can or will sand the wood down more than the metal. When I was shaping the guard area I did all of it with the KMG. When shaping with the platen or the belts, the KMG apply equal pressure to both the metal and the wood. The metal helps hold the belts up from digging into the wood. If you look at the last picture in post #44 you can see that wood and the metal is even. When I was hand sanding I did very little work on the wood. What I did do was with 400 grid or a scotch bright pad. With the rest of the wood part of the handle I stop grinding with the KMG when everything is not to final shape. I find I can shape that area with better control by hand. It takes much longer, but yoiu don't over grind by hand very often.

Hope this answers your questions.
Regards,
Ken
 
Ken,

That looks beautiful! thanks for taking the time to write up and post this WIP. What do you use for a finish on the blackwood?

Thanks,
Ted
 
Ken,
Thanks for the clarification.
 
Update 10

As I begin to talk about my handle finish approach let’s go back and look at picture from the last post. In this picture you will see little voids in the Blackwood. My objective is to fill those in. To do this I’m using super glue. My approach is to use my finger to spread a coating of super glue over the entire wood area, let it dry, sand it smooth (800 grit paper), then repeat the process 5 or 6 times. This provides a nice even buildup of glue. Then complete the process by buffing the entire handle.

knife46_zps290b8da5.jpg


Applying the glue

knife50_zpsdb7acb62.jpg


Several layer of glue and some sanding.

knife51_zpsd37ae184.jpg


Pictures after many layers and sanding

knife52_zpsaf4c64a5.jpg


knife53_zps28e5782e.jpg


knife54_zps76295f9f.jpg


Then buffing


knife55_zpsad5ff535.jpg


knife57_zpsff6cb3ce.jpg


Then I sharpen the cutting edge

knife58_zps0b4d0b00.jpg


And then the knife is finished. My next step is to make a sheath for the knife over the next few days. When that is complete I will post more pictures of the completed package.

Thanks for following this WIP.
Ken
 

Attachments

  • knife52_zpsaf4c64a5.jpg
    knife52_zpsaf4c64a5.jpg
    30.7 KB · Views: 32
Fantastic thread Ken. Thank you for taking the time to show us all the build on this. You have answered many questions.
Cheers Keith
 
Great job Ken. Thanks for showing the process, the knife looks terrific. Looking forward to seeing the sheath.


Doug
 
knife55_zpsad5ff535.jpg


And here I was budgeting for a buffer...:thumbup::thumbup:

Beautiful knife, Ken. Thank you for this thread.
 
Final Update

Finally I got the sheath made. Here are a few more pictures of the knife and the sheath. Thanks to everyone who can along for the ride, hope you enjoyed the build out.

Thanks
Ken

74-1_zpse209d00b.jpg


74-2_zpse3a5e802.jpg


74-3_zps0ef15a50.jpg


74-4_zpsb92606e9.jpg


74-5_zps7695adbe.jpg
 
Looks great Ken, clever idea with the keyhole on the sheath. The Hamon looks good on the blade. Thanks for taking the time to show the process.


Doug
 
Status
Not open for further replies.
Back
Top