Making a pouch sheath - Apprentice Thread.

Diomedes Industries

Gold Member
Basic Member
Joined
Mar 19, 2007
Messages
7,420
The video series is complete!

CLICK HERE FOR THE ENTIRE VIDEO PLAYLIST - OVER 4 HOURS!

It appears after a general interest thread that there is enough people to make this thread worth while for a while. I will take any and all people who want to learn how to make a basic pouch sheath and keep on top of this thread until the end of March 2014. At that time I will not be able to really keep up and answer any more new questions. However - if we do this right - there should be a record of the questions asked and people wishing to learn should have a great resource.

The Plan:

To give resources, either original or linked (with all credits mentioned) on how to get into basic leather working and go from nothing to a working finished belt sheath.

Who can join:

Anyone. What I quickly realized from the interest thread was that we had a bunch of people ready to commit to making a go at this.

What I ask of you as an Apprentice:

1) Commit. Please take the time, if you are going to join the process, to take it seriously enough to read the thread in its entirety and be up to date before asking a question that may have already been asked.

2) Be flexible. There is more than one way to skin a knife and this way is just my current way to do so. Know that there are a lot of other ways to do things. If I know of another way - and a person who does it well - I will link you to it.

I will try and watch this thread as carefully as I can - but being a professor there are times where I have all I can do to keep up with my students.

3) Instead of only taking on 5 apprentices (I didn't want to be overwhelmed) I will take any and all comers for the durations of this thread. I have to put some value on my time, as I could be making sheaths or just spending time with the family. I guess time is money in some ways. So, if you find some use to this thread and want to donate to the cause - please send a small donation to my PayPal (jmoulenbelt - at - hotmail - dot com). This will ensure that I don't devalue my own time but keep my motivation up throughout the process.

I hope this is the right approach to the process - if this turns you off - I am sorry. It was not intended.

I think that is all that needs to be said - so - let's get started.

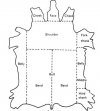
Step One - Making a pattern:

The pattern that I have drawn up for this project is a VERY basic pouch sheath. I eliminated much of the style that I have developed over the years, as well as the complications that come with it. However, just because this pattern is very basic - does not mean you have to stick to it - to the letter. You can add what you like - but this will get you a very easy to cut out and assemble sheath.

Here is the Pattern - in a .jpg image:

SheathScan20001_zpsbae5743b.jpg


This is for an Arete / Bushcrafter / Lady Finger length knife. (Or a knife with a 4 inch blade - 4 inch handle - and a blade height of no more than 1.5 inches). Note that I put a 1 inch scale on the sheath so that when you print it - you can use your printer or a copier to make it the actual size I drew it.

However, just because this is the size I drew - does not mean you cannot make changes. For instance - if you have a Hiking Buddy / Kephart / Bushboot you will need take some height (About 1/2 inch or so) from opening to tip of your sheath - as well as a little width from the over all sheath (about 1/2 inch).

Also note that I made a few different length belt loops on the pattern. For now I would cut out the longest length I have - and you will be able to decide before you cut the leather how long you will want your belt loop to be.

Further note that I set up the welt to have a 3/8th width and thus will accommodate a single stitch line. I would advise keeping it simple and making your first sheath with one stitch line. If you want to make two stitch lines like I tend to use - you will need to add to the welt as well as the sheath by 1/8th inch (1/2 inch welt overall).

Do not transfer this pattern to leather just yet. We are just working on the pattern for now.

Grab a few old manilla folders (or the inside of a cereal box) and trace the pattern over to this weight stock. Cut it out.

SheathScan20002_zpsf159b0a0.jpg


What I did was to carry over my trace to a manilla folder and then started to see if my knife fit. What you want to do is to take the sheath and set it up on it's spine - with the blade perfectly straddling the center line and carefully trace the knife all the way around. Then turn the knife on its side and trace again. This will allow you to see where your knife will sit inside the sheath as well as determine if your pattern is the right size for the knife you are making.

At this point. Slow down and take your time. Planning in the pattern stage can really save you leather and time. Fold the drop loop over (it should be 1 inch wide) and see if there is enough room for your belt once you have it folded where you will want to stitch it at. Your loop should not go beyond the depth of the handle when the knife is inserted. If it does - either bend the loop at a different point - or cut the loop shorter.

Essentially the pattern will act as the leather for right now. Fold it over - tape it shut - pretend it is a sheath. Does it wear right? Does it do or have what you want it to have. If not - make changes. Take your time - and remake your pattern to make the changes you want.

When you have this done - find some bubble wrap and cut the pattern out of bubble wrap. The bubble wrap is about as thick as 10 ounce leather - which is what we are going to make this sheath out of. Refit everything and make sure you like it.

If everything fits - make sure you have a welt pattern that matches your sheath pattern. For single stitch sheath - use a ruler and add a line on the inside of the that traces the edge of the sheath from the center point at the tip (the bottom) to the center line at the top near the drop loop.

Of course - if you don't want to make any changes and simply make yourself a sheath - size my pattern to scale and cut it out.

General thoughts on Pattern Making:

Be cognizant of your welt when making your pattern. Lay your knife on your pattern in the way it will rest in the sheath and then trace the blade - this will allow you to make a welt that you want. You want the blade to be almost resting on the welt - but have a little room (something like 1/16th inch) of space between the blade and the welt. I do it this way so that if the leather get's damp inside the sheath - at least wet leather isn't just sitting against the blade of my knife.

The type of knife will depend on the kind of welt you can put into the sheath. With a knife that has a guard you can put a shelf in your welt that can serve as a stop while inserting the knife. Simply trace your blade and trace the guard so that the welt becomes a sort of shelf that prevents the knife from being over inserted into the sheath and causing the sheath to cut through your stitching.

This knife has no guard and thus the welt is one smooth radius that simple guides the blade into the sheath and allows for the most amount of surface area for the blade to come into contact with before getting to the stitching of your sheath. In my case, I like the look of a sheath that has been double stitched (I am not at all sure if a double stitch makes a stronger sheath or a stronger way to secure a sheath - but I like the looks and I don't think it compromises the sheath at all. What is does mean, though, is that I need a wider welt. You want your outer stitch to be about 1/8th of an inch away from the edge of the sheath - so with a double stitch I need 1/8th to the first stitch - 1/16th or so gap - a second stitch (1/16th) - and another 1/8th of leather between the blade and the stitching. This makes for a LOT of welt (almost 1/2 inch) - and some sheaths when paired with some knives will not look right with this much welt.

Making a Welt Pattern:

Before you can make a welt pattern - you need to duplicated the sheath pattern you have already made. Carefully copy the sheath you have on to another piece of manilla folder and label it. I label all of my sheath patterns in a few different ways. First, I put the knife's name on it. Second, I put the 'top' and the 'bottom' on the respective sides. If you reverse the pattern and trace it upside down you will make a sheath for the wrong hand. Meaning, if you are a righty and you are trying to make a sheath to rest on your right hip for your right hand - carefully label the flesh side and grain side for the hand you are making it for. This happens more than I would care to note, so be sure and do this.

Now you have two identical sheath patterns and you can use one to make the welt for. What you want to do is basically trace the blade and extend the line from the blade to the opening where you want the welt to be.

For additional resources - please see Al Stohlman's book How to Make Leather Cases Vol. 1 or watch Chuck Burrows "Custom Knife Sheaths". These are not necessary - but will give a ton of advice on making general cases (Stohlman) or on how to make a great sheath from start to finish (Burrows).

Also a great video that shows the making of a pouch sheath including the pattern making is by Leodis Leather on Youtube: http://youtu.be/ykhcHMpqE28
 

Attachments

  • 108812d1349790309-whats-your-favorite-strop-material-diagram-cut-sections-cattle-hide1.jpg
    108812d1349790309-whats-your-favorite-strop-material-diagram-cut-sections-cattle-hide1.jpg
    20.1 KB · Views: 649
Last edited:
Step Two: Deciding on Tools:

In terms of tools I will advise you to watch the first video to see what I am using and decide from there. I have made two lists. Essential and Non-Essential. Try to use your own ability as a guide when deciding which tools to select. If you know you have an unsteady hand - lean more toward buying more tools. If you can freehand well and with finesse - you may be able to get away with less tools than I advise. This is simply a list of what I used in this video - and what I find to be very good for making sheaths.

Essentials:

a) #2 or #1 Edger. Technically you could sand all of your edges off - but a finished edge is really what separates a good looking sheath from a crappy one. Buy a #2 and be done with it.

b) Safety Beveler (also known as a safety skiver)

c) 000 Harness needle and 0 harness needles - you need one 000 and a two 0 Harness needles.

d) Waxed Sewing awl thread. I used Natural thread to give it the sinew look in a way. You can use Artificial Sinew - but be prepared to split some off of the width of the thread (as you would with real sinew) as it is a bit thick for the groves and holes we are going to make.

e) h) Adjustable Stitchgroover You could buy a fixed stitch groover but you better have steady hands. Further you technically don't need to make a groove for your stitches - but the stitches sit on TOP of the leather and thus can become frayed in use. The grove allows them to sit below the level of the leather and stay protected. With that said - there is some concern that grooving the leather weakens it. This I am sure is true - but I have never seen this process cause failure in a sheath. I have seen stitching become worn. For this project - buy an adjustable one - they last a lifetime.

f) Adjustable V Gouge. You don't need this - but in making a sheath and getting the bend right - around the blade- they are super easy to use. If you have a small sanding drum on a Dremel tool and you have a steady hand it will work.

g) Overstich Wheel. You can buy a fixed overstitch wheel - and I would buy 5 stitches per inch if you do so. However - for a little more you get two other wheels and are set for almost all projects. Your call. In this project, I am using a 5 Stitches Per Inch Wheel.

h) Bone Folder I use it for a few things in this project - but if you have a chunk of antler that you can sand smooth and blunt the tip - skip it. I use horn as much as I use the plastic "bone" folder.

i) A D-Ring - I use a removable D-Ring (These can be purchased from www.hardwareelf.com) If you don't want a removable D-Ring and one that is more solid - get a welded D ring (one inch internal) from Tandy. You can get these in Brass or Nickel Plated. Whatever look suits you better.

j) Wool Daubers: Buy a small pack of these for this project and decide if you like the look they give you. You could simply use a small rag - but daubers make this first project easier.

k) A Sharp Nimble Knife. I use a Utility knife in this project - you could get away with an x-acto knife. Make sure the blade is small whatever you use (like the small blade on a pocket knife) when cutting your round corners. A larger knife makes it VERY hard.

l) Some sort of cutting surface. I have used a cutting surface from a hobby shop for hobbyists. A poly cutting board of the right size will would fine for this project. A scrap of wood would too.

m) Needle nose pliers. Smooth jaws are better. You will use these in hand stitching.

n) Some way to make clean holes in the leather. I will be using a cheapie drill press in this video (like Harbor Frieght cheap). However, you can use a hand drill as long as you are careful to go straight through the leather. Other options are a Dremel tool or a Diamond Shaped Awl from Tandy.

Dyes, Glues, Sealant's, etc:

o) I used Light Brown Leather Dye Feibing's - but you can use any color you would like - just use QUALITY dye I used Spirit based - but Oil Based is fine too.

p) Some sort of sealant. This is totally up to you - but I use my sheaths in the woods - so I want them to have as much water protection as I can get - without hindering the leather. I have found the best stuff to use is Montana Pitch Blend - Leather Dressing. This stuff is awesome for all leather sheaths. When conditioning and re-conditioning your other sheaths - this is a great choice. All natural and the 4 ounce tub has lasted me about 2 years. In the video below I am using Fiebings Tan Kote.

q) Gum Tragacanth: This is a natural gum compound generally used in edging. I find with the Montana Pitch Blend it is not necessary - but it makes your edging SO shiny when done right. Get the smallest amount of this you can - a little goes a LONG way when edging.

r) Contact Cement. I use Weldwood Original Contact Cement.

s) Contact Cement Thinner DAP makes their own - if you cannot find it - get thinner with Toulene.

t) Some sort of Brush to brush on the contact cement. I would get two small bottles of Dap Contact cement and use one until it runs out - clean it - and use the brush in the cap of the empty bottle, half filled with cement thinner. This keeps your brush clean and able to be used when you need it. Simply clean off the thinner before you use the cement. I learned this trick from Chuck Burrows DVD.

u) Blue painters masking tape. This is used for the knife while I am wet forming. Get 3M and it will come off easy while protecting the blade. You can also use saran wrap on the knife while wetforming.

Non Essentials:

v) Strap edge punch - I use a English Strap end punch. Skip this one for now. You can simply trace your lines and go from there.

w) A 1/4" hole punch Maxi Punch set - so that you have a few extra holes you can choose from. Buy this if you plan to make a dangler for yourself - and even then you can use a drill and carefully cut out the extra

x) Adjustable Strap Cutter. You don't need this - but it makes straps whatever size you want VERY easily. When you are making danglers - you simply cut a huge length of 1" straps and then use it to cut out danglers with. However, you can simply use a metal ruler and use a sharp knife to cut out 1" strapping.

y) Two Spray bottles. One filled with Water - one filled with isopropyl alcohol. You can use a clean sponge and water though.

How to Choose Leather:

For this project you are going to have a tough time sourcing super high quality leather. But, this does not mean that you cannot find a good piece of leather to work with. The picture below gives some idea where on the cow leather is taken from. You want to stay away from anything that is not the shoulder or the butt. A single shoulder would be fine. A double shoulder is great if you want to make a bunch of sheaths. A double butt is the the thickest stuff - perhaps tougher to work with - but bomb proof. It is the tab of the belt on the high quality leather belts you see gunslingers wear.

View attachment 403284

In terms of weight - you want to stay between 7 and 10 ounces. each 'ounce' is 1/64th of an inch. So - 8 ounce leather is 8/64th or 1/8th thick or a little over 3 mill.

If it were me - I would buy 8-10 ounce leather for your first sheath. 7-8 if you want a little more give and bend in your sheath - but will be a bit easier to work.

Terms that are kicked around are 'Genuine leather - Real leather' all sorts of things. Most of this is just to hide that they have modified and cheapened the leather a bit. Here is what you need to know:

Grain - is the the epidermis or outer layer of animal skins.

Full Grain - Leather that is just as it was when taken off the animal. Only the hair has been removed and the grain or epidermis is left on.

Top Grain - Top grain leather has often been sanded to remove scars and then sprayed or pasted to "cover up" the work. Top grain is not the same as "Full Grain" leather.

Split - This refers to the undersection of a piece of leather that has been split into two or more thicknesses. Splits are usually embossed with a design and finished or sueded.

Use only FULL GRAIN leather no matter what you get - do NOT buy a split for this project. They are fine for many things (lining a sheath for instance) but not for what we are doing.

502.jpg


In essence you want the highest quality grain you can find with the best finish put on the corium of flesh you can afford.

Concerning quality - GENERALLY - you get what you pay for - but this is not always true. If you have some time and you know a bit of what you are looking for - you can head with confidence over to the Economy area and choose something that will be great.

1) You only want Veg Tanned. No Chrome Tanned or unknown tan.
2) Flip over each piece that looks decent and look at the "Flesh" side. You want to look at the flesh side (under side) of the leather and you want it to be as smooth and suede looking as possible.

leatherback.jpg


The image above shows lower quality leather on top and higher quality leather on the bottom. The bottom is such high quality (Wickett and Craig) that you will likely not see this sort of thing on the economy table. But take your time and get as close as you can. This will matter a lot later - when you are trying to burnish edges - for instance.

3) Once you have a few shoulders that are of the quality you want - flip them to the "grain" side and look for range marks and blemishes. You want to have as little scratches - branding marks - holes - and other stuff that you can find. This will give you the best blank slate you can get.

Here is an example of some leather I had when making a sheath recently. Grain:

HowtoMakeaPouchSheath004.jpg


Here is an example of some pristine flesh - next to a cut off showing flesh side with a tanning mark on top:

HowtoMakeaPouchSheath005.jpg


With that said - if you like a rustic look - you can always use the marks in the grain to your advantage.

Check out the leather on Heber's sheath where he featured the brand marks to great effect:

fs_09_med.JPG


If it were me - I would head to a decent leather shop - hand pick some quality leather - and get the best you can.

For instance - here is a link to Tandy - on a single shoulder - that is on sale:

http://www.tandyleatherfactory.com/en-usd/search/searchresults/99606-03.aspx

29 bucks will get you about 5 sheaths here.

Step Three: Tracing the pattern on leather:

As I said above, you need to be careful how you set up your pattern. You don't want to cut out the wrong handed sheath - so carefully, while double checking, lay out your sheath on to some leather and trace it with a reg uni-ball type pen. This is a trick I learned from the Chuck Burrow's DVD I mentioned above. Red pen tends to blend in an disappear when using brown dye, like I plan to with this sheath. If you want to keep your sheath natural (which takes an absolutely clean work surface and careful preparation) use a soft lead pencil. This will be harder to see, so I advise starting off dying your sheaths and use a red pen.

HowtoMakeaPouchSheath004.jpg


You can see above I have a few sheaths laid out on this piece of leather. I highly advise rough cutting a section of leather and then drawing and cutting out your pattern (and welt) on a smaller piece of leather. When you are using a smaller piece of leather you will make fewer mistakes and have an easier time cutting and tracing as you can rotate the piece as you cut. I had, in the past, tried to cut my sheaths out of the whole side of leather, trying to save every scrap of leather and not waste any. This is laudable, but will produce an product that will take more time to clean up - or simply have to be tossed out due to large cutting mistakes.

Cutting out the sheath and welt:

Using a sharp knife carefully cut out your pattern and welt. I use a simple utility knife:

HowtoMakeaPouchSheath005.jpg


In the video below you will see the outside of the welt is not carefully cut, I did this on purpose. The inside is what matters here - the outside you will have to trim later. Simply use your welt pattern to ensure you have enough material to cover the area needed and leave the outside cut alone. This will make more sense later.
 
Last edited:
Step Four: Preparing the inside of the sheath:

HowtoMakeaPouchSheath006.jpg


I prep the inside of the sheath a little before I start. Quality leather will come with a prepared rough side - but I like to make some further preparations. Because I have thicker leather to begin with - I wanted to skive the leather down some. I used a safety beveler to make these adjustments. Then I use 100 grit sand paper to even out any marks that may not have left a level surface. I then use 320 grit sand paper to prepare the inner surface further. This is probably overkill - but when sanding (only in one direction) with your sand paper - it sets up the rough side of the leather to be smoothed later when burnishing the belt loop as well as the inside of the sheath.

A word about your bench as you begin to sand and skive. You are going to make a mess. Keep a paint brush on hand in order to keep your work surface clean and free of debris. What you will find is if your work surface gets a bunch of debris - you will prevent a lot of damage to your leather and you will have a better surface and look when you complete your sheath.

HowtoMakeaPouchSheath009.jpg


Also, you will notice I am doing my skiving, and most of my work, on a granite block. This makes for a GREAT work surface. It does not catch the blade of my skiver when I go off the edges and does not dull my skiver when I do so. This block is essential when doing any tooling as you need a dead surface to take up any of the blows from the tooling you use and so I purchased one for about 40 dollars. I keep this block clean at all times - this makes for better leather work. A word of advice on this one - go to a custom counter installation place and ask for "Sink Cut outs" or "cut offs" for a few bucks you can usually get an awesome piece of stone to work on.

Step Five: Cutting recess grooves for thinner blades:

HowtoMakeaPouchSheath014.jpg


At this point my leather is damp and I am ready to work the edges and inside of the leather. I wrap my knife in the leather in the approximate position that it will rest when I get finished and mark where the handle terminates. I take the knife out, and marry up the edges of the sheath so that it is folded much like it will be when I get the sheath stitched. I then mark a line, again using a red pen, from the handle portion of the knife down the middle of the sheath to the tip, as seen above. This shows me where the spine of the blade will rest when I get the knife finished.

Because it is tough to bend 8-10 ounce leather around a 1/8th inch blade - it makes the sheath look puffy - and throws off the wet form of the sheath. So I want to take some material off this portion of the sheath so that it bends more easily around the blade. I don't need to do this all the way up the sheath as it is easy to bend the leather around the circumference of the handle. I then use an adjustable V-Gouger to make three gouges in the leather. One gouge in the center of the sheath, where the line was made, and two right next to it. Be careful to set the depth of the gouge properly (I set it about 1/2 the thickness of the leather) and don't let the lines run into each other. When it doubt, set the gouger shallow - you can always follow up with a little more depth.

HowtoMakeaPouchSheath015.jpg


What you end up with is three gouges in a row - and if you reinsert your knife and wrap it around the blade - you will see how, with just a little thumb pressure - you can easily start to wet form the knife to the sheath and the blade portion flattens out more and looks appropriate. If you are truly anal, you can set the depth of your gouger a little shallower as the blade comes closer to the handle and a little deeper as it gets to the tip. This will allow the leather to follow the contour of the blade more exactly and give your wet forming a nicer transfer from the handle to the blade.

What you have at this point is 3 V's that when folded over, become solid again inside the sheath. You loose very little strength in the sheath doing so.

Step Six - Cutting the Belt Loop:

HowtoMakeaPouchSheath016.jpg


As mentioned above I left the belt loop long - it had to be trimmed at a later time and so it doesn't make sense to make measurements when you don't need to. At this point - I put the knife back in the sheath at about the point it will rest when I complete the sheath and mark the belt loop at the point where the handle terminates. This is the furthest down on the handle I can go and have a firm sewing point to stitch the belt loop on to the back of the sheath. What you are striving for, no matter where you cut the belt loop, is a belt loop that is at least 2 inches long. The widest belts are 2 inches and having some wiggle room on a 2 inch belt is nice to have. I like having at least 2.5 inches on my belt loop as it allows for some movement on the sheath while sitting or getting snagged on branches. I want it to give - not pull on my stitching over and over for no reason. So, I put the bottom of my belt loop at the point where the handle meets the blade. I mark this point and then cut the belt loop at this length.

I use an 1 3/4 English Strap End Cutter - it makes quick cuts and makes them uniform. However, this tool is EXPENSIVE (40 bucks!) and not necessary. In the picture above I have the burnisher that comes with the plastic bone folder sold by Tandy. That semi round circle makes an easy traceable end for your straps too. Just use whatever is handy round off this end - or make a template in the design you like and then simply cut it with a knife. I like the look of the English strap - so that is what I use - but you can save a lot of money if you are willing to just trace and cut at this step. When you start making sheaths for sale - you can justify buying a strap cutter. Until then, don't sweat it.

At this point you have the inside of your sheath prepped and the belt loop cut - you are well on your way to having a finished sheath! It is now time, oddly, to start doing some finishing work on your belt loop and opening of your sheath. The more preparation here - the better your end product will look, trust me.

Step Seven - Marking the Welt:

Before we can edge the opening of the sheath we need to mark where the welt will go in order to know where NOT to edge. Take out your welt pattern and lay it down on the sheath. Trace this pattern on the sheath on both sides so that you know where the welt will be when glued in place. Do not edge or sand on the INSIDE of the opening of the sheath at these point. You want these flat so when you glue the flat sheath to the flat welt - it will make a seamless look. If you bevel the edge at the point where the welt will glue in - it will leave a gap and look wrong.

HowtoMakeaPouchSheath028.jpg


Step Eight - Beveling and burnishing the strap and opening:

HowtoMakeaPouchSheath020.jpg


Use #2 edge beveler along the now squared off edges of the opening of the sheath (again, staying away from the welt area) and the entire belt loop. . If you find the edge beveler pulling or grabbing, and messing up your work - sharpen the beveler. You can see in the picture below what difference the edge beveler makes. The tip is not beveled - but the length of the belt loop showing has been beveled. Can you see how nice and round those edges are starting to look?

HowtoMakeaPouchSheath022.jpg


Once you have beveled all of the edges - I use a worn fine grit to begin the finishing on my edges at this point. I carefully and lightly sand the length of where I beveled, rounding the edges, evening everything up, and getting my edges to look good. When everything is even - go over the edge only in one direction - this will even out your edges even more. Then I use 320 grit sand paper and go over the edges by hand - then switch to worn 320 grit paper. First I do the edge dry, then I add a little water, and go over it again. Things should start to look very good at this point, the more you work on your edges now, the better they will turn out when you finish burnishing them.

HowtoMakeaPouchSheath029.jpg


You can see in the picture above how the edges are getting to look more shiny as we go. Experiment with this phase, add and edging of water and sand again, try sanding in only one direction and see if your results are better. I find that sanding dry first, adding a little water (dip your finger in water and run it along the edge) and sanding again - only in one direction - makes the edge finer and finer. Wipe off the dust with a rag and inspect your results. Keep going until it is without blemish - this will not take all that long.

Wet the edges slightly again and burnish the edges. If your leather is so wet that as you start to burnish you start to smush the edges - let it dry a little more. I find at this point a little wetting is necessary at the edge you are burnishing - but the inside can be a little dryer to give you a good backing to place a little pressure against.

Burnishing can be done in a few ways, but the simplest is to use a round, hard, non steel object to rub vigorously on the edging. I use a deer antler that I carefully sanded down to 1000 grit and over time has become so smooth that it is just a joy to use. Another method is to use your bone folder to rub the edges. It, however, doesn't do well in tight places, so I use the antler.

HowtoMakeaPouchSheath035.jpg


Step Nine: Burnishing the belt loop and opening:

At this point I also burnish the belt loop and opening of the sheath (staying away again from where the welt will glue in) and make sure it looks flat and as smooth as possible. You can use a little water if your sheath has dried out some - but don't soak it so it becomes mushy. Again, vigorously rub the belt loop and opening until it gets shiny. This will make for a great looking belt loop when you get done dying your sheath.

Step Ten - Skiving and roughing your welt.

Set your welt inside of your sheath - and mark where the handle ends and the blade begins. This should be easy to do as that is where you made your V grooves.

HowtoMakeaPouchSheath023.jpg


Once you have made this mark - what you want to do is use your safety beveler to skive the welt thinner as the welt approaches the tip of the sheath. If you have a fat welt at the tip of the sheath where you will fold it over - it will leave a gap at the tip of the sheath and look like crap. Gradually taper the welt slowly with your safety beveler until you have a welt that is about 1/16 thick at the end.

HowtoMakeaPouchSheath024.jpg


You want the welt to be full thickness at the handle and no thinner that 75% of the width of the blade at the end. With this done you want to use about 100 grit sand paper to rough up the smooth side of the leather to prepare it for glue. This doesn't need to be carefully done - you just need to make sure it is roughed up enough to take the contact adhesive once you are ready to glue.

HowtoMakeaPouchSheath027.jpg


Step Ten - Setting the stitch marks for your belt loop:

Once you are happy with your sheath - it is time to get serious and start to get ready to stitch it up. This is a multi staged process - but it will be the same for every time you stitch something. Let's start with something simple, like the belt loop. Use a free hand and adjustable stitch groover to set the grooves on your belt loop.

HowtoMakeaPouchSheath040.jpg


Here is how I do mine. I measure down the belt loop with it folded over to make sure I have 2.5 inches of clearance before the stitching. I set my edge groover at about 1/8th inch and run a V down the edges of the belt loop at the tip - making sure these lines are even. I then use my red pen to make a shield like look to connect the top of the stitch. I like the shield look and it has become sort of my thing (although I am sure others use different looks) - again - do your thing.

However, one caveat. You do not want a straight line at the top of your belt loop stitches. A straight line of stitching can cause a 'zipper' effect and make the stitch line weaker. I round this line in a convex manner to make this stitch line stronger.

Once you have your groove made, use your over stitcher to mark where your stitches will go. I use a 5 stitch per inch wheel. Mark where your stitches are going to go. What you will find is that at times you will not have your stitch marks will not be even - and you will have to fudge them a bit to make them even. To do this - use a sharp tool (like one of your needles) to remark your stitch marks to make them even and looking right.

HowtoMakeaPouchSheath042.jpg


TF
 
Last edited:
Step Eleven - Gluing the welt:

Get out your contact cement and use a clean brush to brush a thin coat on the welt as well as on the sheath - staying just a hair back from the line your drew to designate where the welt will go. What you want are two or three thin layers of contact cement rather than one thick layer. Once you have a thin layer of glue on your welt - set it in front of a fan or in a well ventilated area in order for it to dry. What you are looking for is for the glued areas to take on a shine and be completely dry. This is important. You don't want a tacky non shiney glue line. Shiny, dry, and not tacky will make for the best adhesion.

HowtoMakeaPouchSheath039.jpg


Once you have both sides dry, and even, carefully place the welt on the place where you made the mark where the welt should go. You need to be careful at this point as once you put these two pieces together - they are pretty much stuck there. This glue is called contact glue for a reason - when it comes into contact with itself - it is stuck.

One caveat while gluing. Make sure you do not get the tip of the welt too close to where the sheath will fold over - or else you will have a lump at the tip (bottom) of the sheath. Just be careful. Also - if you want to make a weep hole at the tip of your sheath - simply cut the welt a little short and it will leave a small hole for water to drip out if you get rained on.

Step Twelve - Cutting the welt:

Once you have the welt glued in place, you need to cut it back to match the edges of the sheath. Use your sharp knife to follow the lines of the sheath and cut away the welt to match the edge of the sheath. I usually don't get this exactly right - I need to sand this back a little to even the edges perfectly.

HowtoMakeaPouchSheath050.jpg


Step Thirteen - Drilling out the holes for stitching:

HowtoMakeaPouchSheath042.jpg


You need two types of needles to drill out your holes and stitch your sheath. You will do the majority of your drilling with the 000 needle but a few of your holes you will make with the 0 size needle. For the belt loop you will be using all 000 holes. Chuck up the needle in the drill press, move the flat plate out of the way for this process, and begin to punch out the holes. I use a needle for this process because it acts like an awl. Drill bits actually remove leather, weaken the stitch slightly, and do not allow for the leather to 'heal' around the stitch once you have made your stitches.

Hold the belt loop tightly with both hands, being sure not to get your finger poked while doing this, and punch out the holes carefully. Once you have the holes drilled - use your overstitching wheel to run over the holes. This will prep them for stitching.

The inside of the sheath will look like this at this point:

HowtoMakeaPouchSheath045.jpg


What you need to do is make sure the inside stitches lay BELOW the surface of the leather. You do not want you knife tip or the scales dragging on these stitches, forcing them to come unstitched or simply wearing them out. You need these stitches to lay low. So, use your free hand stitch groover and connect these dots left from your drilling process - making sure they are lower than the width of your thread.

Here is what this will look like when you stitch it up - you can see how the threads are recessed into this groove:

HowtoMakeaPouchSheath069.jpg


Step Fourteen - Stitch grooves and stitch marks for the edge of the sheath:

Now that you have double checked your sheath and are happy with it - know how to use a stitch groover and a overstitching wheel to make your marks - you should be ready to make your edge marks on your sheath for the main stitch or in my case, stitches. I use the edge of the granite block I work on and carefully (using my adjustable stitch groover set at about 1/8th inch) make my line all the way up my sheath - starting at the tip. You may want to dampen the portion of the sheath that folds in order to get it to be more malleable at this point - you can see in my pictures below that the middle of my sheath (where it will bend and fold over) is damp.

HowtoMakeaPouchSheath051.jpg


When I am done with both of my lines (again you don't have to do a double stitch - I like to do it - but for your first one - keep it simple is probably the best idea) use your over stitcher, starting at the top and set your stitch marks all the way down to the bottom. Here is a trick to keep in mind - your stitchmarker will likely not end up at the bottom of the sheath perfectly. Again, you will have to fudge your stitch marks a bit to make the stitches end at the bottom of the sheath. Use your needle to move these marks around slightly, keeping them as even as you can, to get the bottom of the stitches to terminate perfectly at the end.

HowtoMakeaPouchSheath052.jpg


Step Fifteen - Drilling out the stitches at the edge:

Use your 3M tape and put a layer of it on the plate on your drill press. Any steel tends to turn leather, especially wet leather, black. If you use your bench or drill press for metal work too - be sure it is certainly clean before you start any leather work. Steel dust plays hell on the look of clean leather. When your tape gets dirty - simply peel off that layer and set another layer on there.

This part can be tricky - but what you need to do - is fold over your sheath - keep the edges perfectly even, the folded sheath perfectly flat, and make holes that go straight through the leather. If the entrance hole of the leather is 1/8th inch from the edge, your goal is to get the needle to come out the other side of the sheath 1/8th inch of the edge on the back. Again, keep your edges even, keep your leather folded and flat, and take your time making your needle holes. Once you start - try not to unfold the sheath and start again. Once you start, finish.

HowtoMakeaPouchSheath055.jpg


Here is another tip that will make a cleaner stitched sheath. Use your smaller needle to make the top and bottom holes of your sheath - those will only be getting one loop through them and if the hole is punched too large - it will look not as professional as it can. So, what I do is use my larger needle first - run all of my holes except my first and last hole and then use my smaller needle to punch those remaining holes. This will make more sense as you stitch up your sheath.

HowtoMakeaPouchSheath056.jpg


Step Sixteen: Prepping the back of the sheath for stitching:

When you are done punching the leather from the front, this is what the back will look like:

HowtoMakeaPouchSheath057.jpg


What you need to do now is much like the inside of the sheath where the belt loop was going to attach - connect the dots you have made with the punch from the front. If you were careful when punching the holes from the front - you can usually set your stitch groover to match the front and use it on the back. What you can also do at this point is straighten out any slight deviations from straight that you have on the back of your sheath. What you can do if you have a few straggling holes is simply cut to the left side or right side of the hole that is off slightly and get them back on track. You can't move them much - but if you were careful on the front end - you can straighten out what may look a little rough at first blush.

HowtoMakeaPouchSheath058.jpg


Once you have these holes drilled - go back over the front and the back of these holes with your overstitcher and prep them for stitching.

Step Seventeen - Making the Dangler:

If you don't want a dangler for your sheath - simply skip this part. But if you are like me and almost always wear your sheath dangling - here is what you need. You need a one inch strip of leather about 8.5 inches long to make a dangler with. This will allow for a two inch belt and allow it to swing and move when bumping into obstacles. However, I like a long dangler (I am likely making up for some... shortcomings...) so you might want to experiment with the length of your dangler.

Use a good metal straight edge and cut a strap about 1 inch by 8.5 inches.

HowtoMakeaPouchSheath036.jpg


Once you have this done - use a 1/4" hole cutter to set your holes. As I don't know how long you will make your dangler - I couldn't really make a pattern for you - but with a little experimentation and a D-ring you will see where to put these holes. If you don't have a hole punch - simply use a 1/4" drill bit. This will not be AS neat - but it will be close - and frankly it will be covered up by a Chicago Screw.

HowtoMakeaPouchSheath038.jpg


Step Eighteen - Dying your dangler and sheath:

When dying - you want to do this in a protected area and away from where you will do future work. Dye is nasty and - well - stains anything it touches. Including you. Wear gloves - put down some plastic to protect your area (I use an old towel) - and be careful.

I will start by dying the dangler first as it is easier to see what we are doing.

A) Deglaze the leather. In the tanning process there is often oils and wax's left behind on the surface of the leather that will take the dye unevenly. You want to get rid of this. Also, you want to wet the leather to open the pours in order to accept the dye well. So, use a spray bottle filled with isopropyl alcohol (you don't need the high quality stuff) and dampen the inside and out. Isopropyl alcohol has a high water content - so you are really killing two birds with one stone by using this method for deglasing.

B) Use a clean soft rag to clean off the outside of the leather as well as anything you want to be dyed properly.

HowtoMakeaPouchSheath046-1.jpg


C) Shake your bottle of dye very well and get a wool dauber ready to be used. Dye is suspended in mineral spirits and needs to be shaken well to spread that dye evenly throughout the suspension.

D) Once your ready to dye - put some latex gloves on and be ready to move quickly. What you want to do is get quite a bit of dye on your dauber, and spread the dye quickly and evenly using your dauber in a circular motion until you have the desired color at the desired evenness. Set the dyed leather down for a minute or two and then wipe off the dye using an old but clean rag. As stated before, this dye is in suspension and when the mineral spirit dry, they will leave behind a powdered dye that needs to be wiped off.

HowtoMakeaPouchSheath048-1.jpg


E): Let the dangler dry for a minute or so and then rub use your clean rag to buff off the excess dye from the top of the leather. You may see quite a bit of dye come come off at this point but - put more on if you need to and then rub off the excess.


The process is exactly the same for dying your sheath. Deglaze, dampen, dye, wipe off, and let dry. One thing you are going to want to do is to keep the dye off the welt and the part of the sheath where the welt will glue into. You want to keep it as clean as you can - so be careful when you are dying the inside of your sheath.

HowtoMakeaPouchSheath059.jpg


HowtoMakeaPouchSheath061.jpg


Step Nineteen - Stitching the belt loop:

Before you glue up the inside of the sheath you need to stitch up the belt loop. If you glue it before you stitch this part - you will never be able to stitch it - all of your stitches are deep within the pouch. So - let's get started. Get two of your smaller needles and pull off a length of thread that is long enough to stitch the entire run without needing to cut thread and start over. The rule of thumb is that you need 7 times the length of your stitch in thread to have enough to stitch the whole thread. In other words, if your stitch is 2 inches long - cut a piece 14 inches long in order to have enough thread to sew the entire run.

In this case, my stitch is about 4 inches long - so I cut off about 28 inches of thread and thread them through two needles. You want a needle on each end of the thread - as we are doing a double needle 'saddle' stitch. Thread the first needle on - and pull it the full length of the thread, stopping about 2 inches short of the end. You will notice a bunch of wax will come off at this point. This is good. You want the thread to be waxed, but you don't want it to be so waxy that it leaves a bunch of residue on your first few stitches. Then thread your second needle on the end and pull it about 2 inches in. You should now have both needles on opposite ends of the thread and be ready to stitch.

cont...
 
Last edited:
Where you start and end your stitch needs to be thought out to give a uniform look. If you look at the picture below you can see that I started on the top edge hole and have sewn two holes and stopped in the center.

HowtoMakeaPouchSheath063.jpg


Push one needle through - then the other needle through from the opposite side - and pull tight. In fact, you can actually do a few stitches before you pull them tight, being a little more efficient. However, this belies the truth of double stitching. When you start, you will push the needle through, even up the threads so that you are starting in the middle of totality of thread, and then push your first needle back through the leather. This needle will go through simply enough, and you will pull it snug. You will then push your second needle through and realize that it does not want to come out of the leather as easily as the first needle went in. It has not only the hole it needs to go through, but also the thread from the first needle in the hole. Keep a pair of needle nose pliers on hand to pull straight on the needle and then snug up the second needle. You want this to be pulled tight as it will set the stitch in the groove created for it by the stitch groover.


Be careful, however, you do not want your second needle to go through the first needles thread. If it does, it will lock up the stitch in such a way that you cannot pull it tight. If you do push the second needle all the way through the first needles thread without realizing it until you go to pull it tight, don't worry. You can simply unthread the offending needle and pull it back through the hole, rethread the needle, and start over. Pull all stitches tight so as to seat them in the groove.
The picture below shows me with my first few stitches that stop in the center hole of the belt loop:

HowtoMakeaPouchSheath064.jpg


I then back stitch over these two holes and go the opposite way with my stitching all the way around until I end up back at the center hole:

HowtoMakeaPouchSheath066.jpg


I am now ready to cut my stitching off and finish my stitch - however - I need to secure my stitch before doing so. In or to secure a stitch I do not need to tie a knot, use a lighter, or doing anything fancy. Simply back stitch a few stitches to lock in their thread and then cut it flush so that that excess thread is hidden from view. In this case I will back stitch one and one half stitches so that both of my loose ends end up on the inside of the sheath.

HowtoMakeaPouchSheath067.jpg


You can see above where I have back stitched - and now the top portion of the belt loop has a double stitch at the point it needs it most, the point of most stress. If we turn the sheath inside out you will see it now looks like this:

HowtoMakeaPouchSheath068.jpg


In this picture you can see one thread poking out and if you look close you can see where I have trimmed the other thread off as close to the leather as possible. A trick I learned on the Chuck Burrows DVD is to use Cuticle scissors. This leaves a neat cut and those are very cheap to procure (you wife probably has a pair you can gank. Use one hand to pull up on the thread and then cut it as close to the leather as you possibly can. The clipped thread should pop back into the leather and disappear (or come close)

At this point you use your a light mallet and tap the threads down on the inside and outside of the sheath - to seat them in their positions, and then run over the threads with your over-stitcher (now you see where it got its name). This tool not only marks where the stitches are supposed to be drilled, but allows you to make your stitching look very professional. Carefully, with pressure, run your over-stitcher over your threads (being careful not to stray as you will make permanent marks on the leather if you do) and you will see a difference. The stitching becomes more uniform and flatly looks better. Here is what the stitches looks like after I was done running my mallet and over-stitcher.

HowtoMakeaPouchSheath082.jpg


You see they lay flat and look straight.

Step Twenty - Gluing up the sheath:

You have done this process before with the welt - so I am just going to quickly iterate what you are trying to do here. You want dry leather that is roughed up (welt and sheath top - with 100 grit sandpaper), and then multiple thin coats of contact cement applied that is totally dry. You know you have the right amount of cement on your leather when it looks shiny and is slightly tacky to the touch.

HowtoMakeaPouchSheath069.jpg


Once your contact cement is dry - you are ready to adhere to top and bottom together. Take your time, line your stuff up and go slow. Once you have the two pieces together, use a mallet and tap them together to get the best adhesion possible.

HowtoMakeaPouchSheath070.jpg


Step Twenty One - Stitching up your sheath:

Start your outside stitch about three or four holes down from the top and stitch to the opening of the sheath. Then turn around and back stitch over these existing stitches toward the bottom of the sheath. The needle nose pliers will come is especially handy when you double up and back stitch your stitches. Take your time, keep your pattern, and get the sheath done.

HowtoMakeaPouchSheath071.jpg


When you have reached the bottom of the sheath (the tip) back stitch the same amount of stitches you did at the top (to keep things uniform) ending your stitches with both needles hanging out the back. Again, in this manner you are hiding the stitches on the back of the sheath.

HowtoMakeaPouchSheath072.jpg


Cut the threads off at the back after pulling them tight and tap down your stitches with a mallet. My sheath looked like this at this point:

HowtoMakeaPouchSheath073.jpg


Run your over-stitching wheel over your threads and tap them down again. After running my overstitching wheel front and back (using my granite block as my backing) my sheath looked like this:

HowtoMakeaPouchSheath074.jpg


Step Twenty - Two - Edging your sheath:

At this point the sheath is almost done. The only thing left is to finish up the edge of the sheath. Use your sander to carefully even up the edges, making everything flat on the edge and rounding off the corners (carefully) so that the edges look nice and even. Switch to higher grits of sand paper, wetting the sheath edge with a wet finger from time to time, until you have sanded the edges nearly glossy with a high grit sand paper. The more time you take with the sandpaper now, the better your edges will look. You will likely have to touch up the opening of the sheath where the welt met the top fold of the sheath, this is normal, and you will likely take some dye off the opening of the sheath. No worries, you will redye this anyway.

Here is what mine looked like when I finished sanding:

HowtoMakeaPouchSheath075.jpg


If your edge is not damp, dampen the edge with a wet finger again until you have evenly dampened the edge and then use your burnishing method (antler, bone, or automatic bunisher) to finish the edge. Take your time and get a very glossy and even finish on your edge. Here is what mine looked like when done:

HowtoMakeaPouchSheath076.jpg


While your sheath edge is still damp (if not redamped slightly) use your dauber and carefully dye the edges of the sheath. Do not get too much dye on the dauber at a time as you don't want to slather on the dye and accidentally dye the thread you so carefully made look good. Take your time, use several thin coats, and keep redying the sheath edge until you have a uniform and matching dye job for the edging. When you have the desired darkness in your dye, carefully wipe off the dye with a rag (being careful not to mess up your stitching) and then add some Montana Pitch Blend. Let this sit for a minute and then wipe it off.

Step Twenty Three - Final edging for the sheath and the dangler:

Wet form the sheath one more time with the wrapped knife, then take the tape off the knife - and let the sheath dry completely (this may take overnight) and you should have a dry sheath and a dry dangler. Get out your gum tragacanth, dip the edge of a cloth in it and put a light coat of the edge of the sheath and use your burnisher to add an additional shiny edge to your sheath - running this process all the way around to the belt loop and the opening the sheath. Repeat this process for your dangler. Once this is dry, put another light coat of gum tragacanth on your edges and use a scrap of jean material to buff this light coat to a high sheen. Repeat this for the dangler as well.


Here is a Video Series showing every step I went through above in great detail:

http://www.youtube.com/playlist?list=PL6olOLjjLqB1TLfagsDaR4Suk7_MScGux


TF
 
Last edited:
I just may jump in on this with both feet. Professor, you are going through an awful lot of trouble on this and I hope others recognize it. I have some time next week and hope to start this.

My only "concern" is I have some veg tanned leather from Tandy. Part of a shoulder, I think. (The first chunk of leather I bought was a cut of the belly and I won't do that again. Learned the hard way) But what I have is somewhat thick. I'm sorry I don't know what weight it is but I could measure the thickness with calipers.

I have made a sheath and a few leather items with it, but would there be any caution to using something that may fall under the thick side of things?


Edit to add: I just noticed your post above about weight. Sorry. I'll stand in the corner for a bit and reread the info.
 
Last edited:
Thanks Tal for doing this! I'll be following along and ordering up some tools and supplies to get started.
 
Schmittie - this is what this thread is for. Post up some pictures of it. Let's all learn from what you have. As long as it is a little smaller or larger than 1/8th inch it will be great for this application (which will be 8 ounces). But a little thinner wont make a bad sheath at all. Sharpshooter sheath are 5 to 6 ounce. They will be a little lighter - but I don't think you will see a difference in the end result. A little thicker can be thinned out.

Thurin. Great man - glad to see you getting into it.

I think what you will see is that buying sheaths are worth every penny when you do an entire sheath on your own. BUT - there is no price on the satisfaction of making something of your own hands. Also - you can easily sell the list of tools I have listed above if you find that leather work is not for you. A lot of guys wanna try their hand at leather making - so selling the basic tools will be great for them.

Get them on sale - or slightly used - and save yourself some money.

TF
 
Again, thanks Tal for doing this. I've ordered the tools and leather necessary to get started, and can't wait for them to arrive. While I'm waiting I'll make some patterns, and review your previous posts on sheath making. You've provided the motivation I needed to get going; so thanks.
Rich
 
Okay - I have revamped my previous work on making a pouch sheath and added a 45 minute video to the mix. I will be making another video shortly - but this should take you a long ways in making your sheath.

The point of this thread is to have a place where you guys can actively ask questions as you go through the process.

So - post up.
 
Tal thanks for your many helpful pointers and posts on sheath making. Your posts were what got me thinking I would try some leather work. I have nearly completed my first sheath. Just have to get it stitched up. Doesn't look perfect but I think it will work. Just a simple pocket sheath for a small fixed blade. Kind of a practice sheath. Next I plan to follow your plans here and try to make a sheath for my Arête. Quite a bit trickier than the first one I made.
One thing I was wondering was how you go about attaching your fire steel loop, is it glued and stitched or does it have Chicago screws? Seems like I ran across a picture somewhere that looked like you had the Chicago scews on it.
 
Good solid tutorial going on here. You guys are going to be able to assemble a very workable sheath. With Tal's approval I thought it might be useful to list some suppliers and tools that would ease the chore of collecting materials.

Leather-Wickett/Craig has some of the very best quality leather available, BUT they do not sell single or double shoulders. Buying a whole side is pretty expensive for the guy planning to make a couple of sheaths and accessories, plus there will be a good bit of waste in the belly section. You can use all of a single or double shoulder if you take time to lay out the patterns. Tandy does offer shoulders, BUT you have to be very selective to find the good stuff. That means knowing what to look for and being in the store to look. For the last two years I've been buying from RJF Leather out of Elmira, NY. The owner is Roger Folmar and all it takes is a phone call, 607-742-8969, to place an order. Leather is as good as any I've found, price a little less per foot than W/C, he'll split to your thickness at no charge (W/C does the same), fast shipping, double shoulders available. I buy his #2 grade which works very well. I don't have any stock in his company, but spend $800-$900 every month with him for leather, so quality and service are important.

Cutting mat- Sewing supply centers have the mat you see in Tal's photos. Try checking a Dollar Store, Dollar Tree, etc. for the kitchen cutting boards in plastic. I buy them for $2.50 here and use them outside on my anvil for punching holes, slots. Work just fine for cutting your patterns, too.

Knives-Like Tal says, best cutting tool is a razor knife. Been trying for years to make a blade that I liked and worked well for cutting leather. Haven't made it yet. Tandy sells a simple razor knife with good ergonomics, quick easy razor change and priced right. Just tried a Stanley Fat Max and sure liked the feel. The quick blade change feature didn't work well, so back to the Tandy.

Contact cement- I use the same brand as Tal, but buy the low voc, water base in the green labeled can. Couple of years ago I had a bad reaction to the regular cement after doing 25 sheaths in one day. Yes, did them inside with no air flow, but didn't know what my name was the next day. Probably okay dong one or two, just be aware. The water base has done just fine for me in all applications. It does take a bit more time to cure before joining the two pieces.

Hope some of this will help. Just keep following Tal's thread and enjoy!
 
This is such a great opportunity!! Unfortunately the holiday season has me extremely busy but I'm hoping to all of my supplies ordered in the next few days. My schedule slows down dramatically after N.Y. Day and I'll be able to get rolling in this project.
 
seems like my last milt sparks sheath had a card in it about being made with wickett & craig leather
 
I just returned from Tandy Leather. I will have to get the initial supplies in stages. This is my first part of the supplies. I ran out of cash. :eek: :D I did join the Tandy Gold club which cost me more but it will pay for itself before I finish this project.

IMG_20131230_150127_677-1_zpsec171a2d.jpg


This is a exciting project. I think my initial sheath will be for a Hunter.

I really appreciate the opportunity Talfuchre. THANK YOU
 
Nice going Major Dave!
My closest Tandy store is over 100 miles away, so I've ordered online much of the same stuff I see in your pic. Should be here in a few days. Can't wait to get started.
Really would have liked to go there to hand-select the leather, but don't have the time right now so will have to rely on them to select a shoulder for me.

Thanks again, Talfuchre, for getting this started. You've created a monster!

By the way, I'll have more 0 and 000 needles than I need so the first 3 Gold Members or above that PM me asking for them, are welcome to two of each by return mail as soon as they arrive. Update: all three sets spoken for; will mail out as soon as they arrive (Thursday?).
Rich
 
Last edited:
Ricsha That is a great offer.

I'm curious how the needles will hold up?

If breakage won't be an issue I can probably do the same thing to help other members out. The needles were a bit pricey to just get a few.
 
Your work is greatly appreciated - I'm acquiring the required tools and studying up :). Thanks for your help and happy holidays!
 
I'm excited to give this a shot. My goal is to not embarrass myself :)

I have my list of tools and supplies ready and I'm hitting the local Tandy and Home Depot tomorrow to hopefully pickup everything I need to give this a shot.

Tonight I laid out a template for my Kephart. For my first attempt, I'm going a little more simple, I think, and doing a square bottom. Probably hard to tell, but there's a taper from top to bottom to accommodate the handle width so it'll hopefully look more rectangle when complete.

Some questions before I cut out the template to give it the dry run:

Does it look like I gave myself enough room?

For the belt loop, I have it centered on the half. Should it be closer to the handle position?

IMG_2940_zpsf7c30d86.jpg~original
 
My experience with the tandy needles so far is that they are weak. Broke the eye on 3 already trying to pull it through a tight hole. But the hole may have been a bit undersized.
Ricsha That is a great offer.

I'm curious how the needles will hold up?

If breakage won't be an issue I can probably do the same thing to help other members out. The needles were a bit pricey to just get a few.
 
Back
Top