Mosaic Bowie WIB

Joined
Aug 27, 2007
Messages
2,466
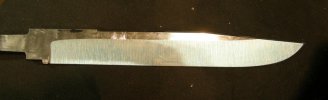
I am very happy to be working on a Big Bowie for Jon Klein, the blade was already forged to shape and surface ground, when I started taking pics so we will start from there.
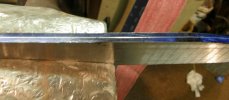
First I mark a center line around the blade
attachment.php


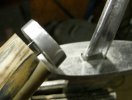
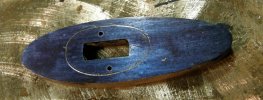
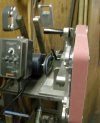
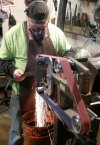
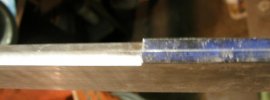
with this jig I grind a bevel to the center line
attachment.php


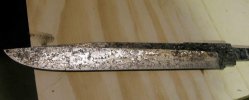
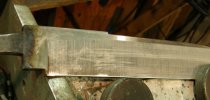
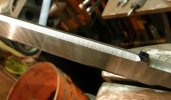
I put a different angle on top of the blade
attachment.php


attachment.php

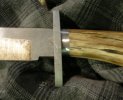
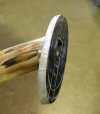
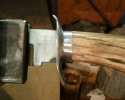
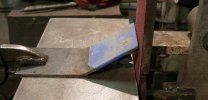
above is the jig I cut the clip with

attachment.php

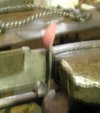
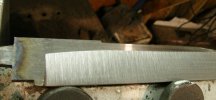
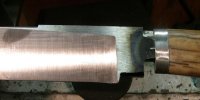
this is the cut from the first jig
 

Attachments

  • kwip1.jpg
    kwip1.jpg
    38.3 KB · Views: 566
  • kwip2.jpg
    kwip2.jpg
    35.9 KB · Views: 567
  • kwip3.jpg
    kwip3.jpg
    19.3 KB · Views: 567
  • kwip4.jpg
    kwip4.jpg
    44.3 KB · Views: 570
  • kwip5.jpg
    kwip5.jpg
    36.1 KB · Views: 565
attachment.php


A little grinding and we are ready to heat treat I only take the grind about half way and as even as I can uneven grinds make my blades want to warp

attachment.php

I fired up my salt pot heated up my parks 50 oil.

attachment.php


Thats what I am looking for full hard on scale

attachment.php


3 hours latter at about 395: it looks good to me

attachment.php


we will have to start on the guard from here .oops
 

Attachments

  • kwip6.jpg
    kwip6.jpg
    21.3 KB · Views: 440
  • kwip7.jpg
    kwip7.jpg
    59.6 KB · Views: 439
  • kwip8.jpg
    kwip8.jpg
    32 KB · Views: 427
  • kwip9.jpg
    kwip9.jpg
    21.6 KB · Views: 417
  • kwip10.jpg
    kwip10.jpg
    31.3 KB · Views: 401
Ya Kevin Jon talked me into doing a big one and I am glad he did this blade is 12 plus
 
attachment.php


you see how I have this pined to the tusk and tusk fits good on the tang.

attachment.php


index marks on top of guard a big help

attachment.php


little bit of this stuff good stuff

attachment.php


knock the guard off with soft but firm tool

attachment.php


pull the pins and drill in about 1/8 of an inch start looking for longer pins
 

Attachments

  • kwip11.jpg
    kwip11.jpg
    34 KB · Views: 362
  • kwip12.jpg
    kwip12.jpg
    32.4 KB · Views: 354
  • kwip13.jpg
    kwip13.jpg
    29.5 KB · Views: 362
  • kwip14.jpg
    kwip14.jpg
    28.5 KB · Views: 356
  • kwip15.jpg
    kwip15.jpg
    24.7 KB · Views: 330
attachment.php


now it all pins together

attachment.php

time to shape it a bit

attachment.php


That looks a little better

attachment.php


Ink and scribe like this

attachment.php


then with a small wheel thingee start cutting but stay off your line
 

Attachments

  • kwip16.jpg
    kwip16.jpg
    21.1 KB · Views: 305
  • kwip17.jpg
    kwip17.jpg
    31.3 KB · Views: 301
  • kwip18.jpg
    kwip18.jpg
    22.7 KB · Views: 296
  • kwip19.jpg
    kwip19.jpg
    56.6 KB · Views: 286
  • kwip20.jpg
    kwip20.jpg
    37.4 KB · Views: 271
attachment.php


oops don't forget to scribe the side

attachment.php

I am going to need to cut closer then that to the line

attachment.php


that looks better

attachment.php


lets give it the S shape

attachment.php


let me see how this looks with the handle
 

Attachments

  • kwip21.jpg
    kwip21.jpg
    34.7 KB · Views: 277
  • kwip22.jpg
    kwip22.jpg
    40.1 KB · Views: 283
  • kwip23.jpg
    kwip23.jpg
    31.6 KB · Views: 273
  • kwip24.jpg
    kwip24.jpg
    30.5 KB · Views: 276
  • kwip25.jpg
    kwip25.jpg
    32.9 KB · Views: 275
attachment.php

that looks funny it dose not flow I need to fix that

attachment.php


thats better

attachment.php


time for some grinding

attachment.php


and some more grinding

attachment.php

and still more grinding But this is my favorite part of making a knife it is when I get to know the knife I think about the life of the knife and try to tell the knife what its job will be. to go out into the world and promote the art of making fine knives. it is the best time i spend with the knife. OK Back to work
 

Attachments

  • kwip26.jpg
    kwip26.jpg
    35.6 KB · Views: 256
  • kwip27.jpg
    kwip27.jpg
    27.6 KB · Views: 259
  • kwip28.jpg
    kwip28.jpg
    35.4 KB · Views: 259
  • kwip29.jpg
    kwip29.jpg
    36 KB · Views: 241
  • kwip30.jpg
    kwip30.jpg
    40.2 KB · Views: 244
Dave I don't know what is going on. first only some of them showed up. then thay all were showing now they are all gone.
 
attachment.php


I need to push this line up and re cut the plunge lines

attachment.php


a friend stopped by and took a pic of me grinding

attachment.php


That looks better
 

Attachments

  • kwip31.jpg
    kwip31.jpg
    35.9 KB · Views: 242
  • kwip32.jpg
    kwip32.jpg
    42.1 KB · Views: 233
  • kwip33.jpg
    kwip33.jpg
    41.5 KB · Views: 233
attachment.php


a little sanding to 400 and we are ready to etch.

attachment.php


fire etch that is this hard where is wrought iron and many folks have ask me how I do it this is how i do it but the same thing can be done in a forge at welding heat.

attachment.php


but it sure is nice and quick with my induction forge.
 

Attachments

  • kwip34.jpg
    kwip34.jpg
    28.9 KB · Views: 233
  • kwip35.jpg
    kwip35.jpg
    34.4 KB · Views: 238
  • kwip36.jpg
    kwip36.jpg
    36.7 KB · Views: 225
Dave that is looking sweet. I too had trouble with the pics but they all seem to be showing up now.
 
Back
Top