-
The BladeForums.com 2024 Traditional Knife is available! Price is $250 ea (shipped within CONUS).
Order here: https://www.bladeforums.com/help/2024-traditional/
You are using an out of date browser. It may not display this or other websites correctly.
You should upgrade or use an alternative browser.
You should upgrade or use an alternative browser.
'No Frills' $75.00 home studio tent/lightbox
- Thread starter SharpByCoop
- Start date


- Joined
- Oct 8, 2001
- Messages
- 12,348
Hi Joss,
The images are clear. Hard to get a pure white background right, but you did good. I don't love the composition, but that is a style preference and subjective anyway. I know you are exploring and enjoying yourself, so keep on it. It took me about 200 images before I got real comfortable..
Lighting improvements are wished for:
Stag bowie: Get more light directed at the lower LH quadrant. I like the texture on the stag, shown with the harder lighting.
Chute: I would want the lighting a bit higher so the highlights are closer to the center than only on the edge. You want to show all three grinds, yes, so maybe even the brightest area of the blade as the flats, and not necessarily the top clip. Same with the vertical shot. It needs lighting on the face, not just coming in from behind. Pay attention to the reflections on the button before you accept it. That's a killer from my perspective.
Just my thoughts. Hope you are enjoying the process!
Coop
- Joined
- Nov 20, 2001
- Messages
- 7,353
Coop,
Thanks for the comments. What I think you're pointing out are some of the limits of the simple tent concept. My light is coming from the back only, and the white reflectors don't do much other than removing hard shadows. I think that ideally, I would need the lights at at least 2 height / distances. I also need a much, much wider diffusing net. The set up I use as a diffusing surface which is not much wider than the piece of board on which the knife sits, which means that the light comes largely from straight behind. Maybe I should try again with also the flash, maybe with a -2 EV adjustment. I think it will still overpower the lights though.
What do you not like with the composition?
One more quick question. I have noticed that my previous multiple exposure pics looked off because the perspective of each exposure was different, and therefore the final pic looked un-natural. This is also something I notice below in Jonathan's Ed Fowler pic for example. So on those pics I tried to not move the pics around too much. Each of the exposure is exactly w the perspectives (or shadows) out of wack?
- Joined
- Oct 8, 2001
- Messages
- 12,348
I'm not convinced of this. Looking at this photo from your setup shows me you can get the light up much higher. The highlights are almost centered, showing me a more overhead lighting.My light is coming from the back only, and the white reflectors don't do much other than removing hard shadows.

The blended insets. It's just an enlargement for one (My personal peeve with insets, and some noted pros also do it, is to simply add an enlargement. No new information or perspective. Yuck.), and they are hazy and vague. Sorry.What do you not like with the composition?
That's a great start. In order for a multiple inset image to look 'plausible', it is imperative that the lighting is all coming in from the same general direction (It's called global lighting). Yes, that's smart.One more quick question. I have noticed that my previous multiple exposure pics looked off because the perspective of each exposure was different, and therefore the final pic looked un-natural. This is also something I notice below in Jonathan's Ed Fowler pic for example. So on those pics I tried to not move the pics around too much. Each of the exposure is exactly w the perspectives (or shadows) out of wack?
Coop
- Joined
- Nov 20, 2001
- Messages
- 7,353
I'm not convinced of this. Looking at this photo from your setup shows me you can get the light up much higher. The highlights are almost centered, showing me a more overhead lighting.
Aaaahhhh... But that wasn't done with this set up. It was done with a hand-held 580 EXII with my DIY diffuser. So yes, the light was coming from a different direction - front and above in fact.
The blended insets. It's just an enlargement for one (My personal peeve with insets, and some noted pros also do it, is to simply add an enlargement. No new information or perspective. Yuck.), and they are hazy and vague. Sorry.
No sorry needed, I asked for the comment. I understand your point.
OK, thanks.That's a great start. In order for a multiple inset image to look 'plausible', it is imperative that the lighting is all coming in from the same general direction (It's called global lighting). Yes, that's smart.
Coop
- Joined
- Dec 2, 1999
- Messages
- 9,910
Joss, I didnt know you had photography in your blood. They look pretty good to me. Im jealous. I wish I had time to learn this part of the business. Heck just reading this thread again will take me a week.
- Joined
- Oct 1, 1999
- Messages
- 6,490
Joss, I think your photography is very good, nice clean work.
Tastes will vary, but IMO, the overall composition is off-balance, stark, with poor use of space. The inserts of the logo aren't done well at all. I would say they're too small and feathered badly.
You have the technical skills needed to do these types of compositions, congratz they're not easy to come by. As Coop said the artistic composition part only comes with time. Time spent studying your compositions. Ask yourself while you're doing these images; what is the main focus of this composition, and are you forcing the viewer's eye to keep returning the subject. Or is the composition taking the viewer's out of the picture?
In my images I try to avoid dead space. I try to fill every part of the the frame with information. I want to keep the viewer's eye moving within the frame. I want there to be depth and levels to my images, and play with perspective. I think it keeps the viewer involved with the subject. Many years of commercial photography taught me that job number one was to make the viewer look, and job number two was to hold their attention as long as you can.

This thread has gone way past basic Lighting
Tastes will vary, but IMO, the overall composition is off-balance, stark, with poor use of space. The inserts of the logo aren't done well at all. I would say they're too small and feathered badly.
You have the technical skills needed to do these types of compositions, congratz they're not easy to come by. As Coop said the artistic composition part only comes with time. Time spent studying your compositions. Ask yourself while you're doing these images; what is the main focus of this composition, and are you forcing the viewer's eye to keep returning the subject. Or is the composition taking the viewer's out of the picture?
In my images I try to avoid dead space. I try to fill every part of the the frame with information. I want to keep the viewer's eye moving within the frame. I want there to be depth and levels to my images, and play with perspective. I think it keeps the viewer involved with the subject. Many years of commercial photography taught me that job number one was to make the viewer look, and job number two was to hold their attention as long as you can.
This thread has gone way past basic Lighting
- Joined
- Nov 20, 2001
- Messages
- 7,353
Phil,
Thanks for your frank feedback. I completely agree that the composition needs work. I need to learn to visualize pre-shoot. This is a area of development for me not just for knife pictures but all my photos.
Can you give me details on how I could improve the feathering? It is another area of development for me to know how to use Photoshop. I know the tools, and I know how to find them in the menues, but not *how* / *when* to use them.
I tend to find your pic a bit busy for my taste, but I can see how there's much empty space in mine.
JD
- Joined
- Oct 1, 1999
- Messages
- 6,490
Phil,
Can you give me details on how I could improve the feathering? It is another area of development for me to know how to use Photoshop. I know the tools, and I know how to find them in the menues, but not *how* / *when* to use them.
I tend to find your pic a bit busy for my taste, but I can see how there's much empty space in mine.
JD
Joss, first of all let me say that my Bose image is one of my busiest images and I was just trying to show you an extreme opposite. Your compositions are going to reflect your taste. Try to balance the main images better within the frame.
Your feathering technique is fine, my objection would be the size of the logo, (it's way too small) and the logo isn't centered.
How and when to use the tools in Photoshop are again part of the creative process. Compositions often start with pre-visualizing with what you want to show in the image. Rough thumbnail sketches on a slip of paper often help. Next, photograph enough different angles of your subject that you allow yourself some other choices, if your original plans don't work out. There should be one image that is the main focus of attention and all other elements should support or reinforce that main subject.
Most important, don't be afraid to try different compositions, don't get locked into one view. Place the main subject first. Try different positions with your inserts, different sizes, different opacity of the layers, maybe even the focus of the inserts. Play, try different things. Take your time, study the image at different sizes. Reverse the image and see how it looks backwards, or upside down. Remove the color and see how the contrast of the image is. After a while you'll know when the image looks right to you. However don't be surprised if some time later on you'll see things you want to change. The perfect composition is when you can't change anything without hurting the image. I've seen perfect compositions, I don't think I've ever made one.
- Joined
- Oct 8, 2001
- Messages
- 12,348
I'm learning here.... :thumbup:
Coop
Coop
- Joined
- Oct 1, 1999
- Messages
- 6,490
Coop, I was thinking we're taking your thread way off track.
There are still so many people trying to get down the basics of good photographic lighting, that all this talk about Photoshop and combining multiple images might be distracting.
I'd like to say that until you can take good sharp photos of a single knife that you really shouldn't concern yourself with doing composites like we're talking about here.
What you may want to do when you're first photographing knives is to cover all of your bases so that if somewhere down the line you do want to do a composition, you'll already have the photos. Try this, lay the subject knife down on the table with the edge toward the camera and the point of the blade on a diagonal to the upper left corner of the picture frame, take the photo. Now rotate the knife so the point is towards the upper right corner, snap, lower right, snap, lower left, snap. Now turn the knife over so the edge is away form the camera, take four more pics pointing at the other three corners. You now have eight images of knife. If it's a folder, I would take . more pics with the knife closed. Some closeups of the logo and any other details will give you lots to choose from if you ever decide to do a composition later.
- Joined
- Oct 8, 2001
- Messages
- 12,348
Agreed. Sounds like we need a new thread for the 'Advanced Courses', such as composition, props, colors, insets, enhancements, etc. The list is endless. Hmmmmmmm......
Coop
Coop
- Joined
- Oct 1, 1999
- Messages
- 6,490
After I had done my Image Editing tutorial http://www.bladeforums.com/forums/showthread.php?t=455896
I had planned to do a tutorial on "How I Do My Illustrations". But, I never got to it. It seemed to me that there were more than enough people having problems getting the basics down, that there might not be enough of an audience to carry it any further. Besides the people that did have an interest would try on their own, and ask for help when and if they needed it. Learning to make selections and working with layers in an image editing program will beyond a doubt add a lot of depth to compositions.
Secondly the list is endless, but basic composition and enhancements should be a part of any critique of photos presented for viewing. Props and background selections for the most part are a distraction. I still feel that if you can't take a good photo of a knife on a plain white background, then you simply can't take a good photo.
- Joined
- May 7, 2006
- Messages
- 3,338
Here is my try with some light and diffusers and reflectors. El cheapo second hand camera to boot.


- Joined
- May 7, 2006
- Messages
- 3,338
Don't let this thread die!

- Joined
- Jun 7, 2007
- Messages
- 2,179
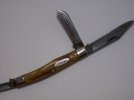
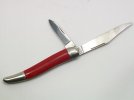
I wish I would have found this thread a week or 2 ago,this is some great information.I built a softbox designed a bit different than Coop's,I'm going to try one like that next.I've been experimenting with lighting and found the floresents that are equivalent to 100w to work the best but I need to work on eliminating shadows and reflections.The first pics of the Case were using the incandesent bulbs,with some changes to the white balance,the Imperial was taken with the flouresent bulbs.I've been trying to bounce the light around inside the box,that is how the DIY I read to build it said to use it.I'm going to build the pvc light bar and difuse it through tissue first to see if that helps.
Attachments
- Joined
- May 7, 2006
- Messages
- 3,338
Just iin case anybody is still looking at this thread.... here is my light box setup:


- Joined
- Feb 17, 1999
- Messages
- 2,914
Could you show this with a knife being photographed? From what I'm seeing, the lights are not being diffused by the material at all and so I don't really see how this works. Do you have some finished results? For a simple task it appears to be a very complicated setup which I'm not sure will do the job you may wish to accomplish.
- Joined
- May 7, 2006
- Messages
- 3,338
I can not help but wonder if we are looking at the same pictures?
The lights shine through two layers of plastic sheeting DESIGNED to diffuse light. In the second picture you see into the box and can see the sandy looking tile I sit objects on to be photographed.
I am not sure what you mean by complicated either? Its a box with one side missing and some lights hung over it.
Here is the results. Camera set on auto and no after image editing at all:
- Joined
- Oct 1, 1999
- Messages
- 6,490
Justabuyer, I like your results, no question about it.
I couldn't figure out your setup either. Normally the light source comes from the back opposite where the camera is, and when you shoot downward at an angle the light source gets reflected into the blade and fixtures of the knife. It seems that you're shooting more straight down on your subjects and what's being reflected is the top of the box by your camera position. Whatever you're doing works, and if it ain't broke, don't fix it.
I couldn't figure out your setup either. Normally the light source comes from the back opposite where the camera is, and when you shoot downward at an angle the light source gets reflected into the blade and fixtures of the knife. It seems that you're shooting more straight down on your subjects and what's being reflected is the top of the box by your camera position. Whatever you're doing works, and if it ain't broke, don't fix it.