-
The BladeForums.com 2024 Traditional Knife is ready to order! See this thread for details: https://www.bladeforums.com/threads/bladeforums-2024-traditional-knife.2003187/
Price is$300$250 ea (shipped within CONUS). If you live outside the US, I will contact you after your order for extra shipping charges.
Order here: https://www.bladeforums.com/help/2024-traditional/ - Order as many as you like, we have plenty.
You are using an out of date browser. It may not display this or other websites correctly.
You should upgrade or use an alternative browser.
You should upgrade or use an alternative browser.
Old fashioned ferrules
- Thread starter Tai Goo
- Start date

Nathan the Machinist
KnifeMaker / Machinist / Evil Genius
Moderator
Knifemaker / Craftsman / Service Provider
- Joined
- Feb 13, 2007
- Messages
- 17,530
Neato Tai. How much time does it take to do that? Can you describe your technique?
I did a little bit of metal spinning back in my collage days. I recall I had to anneal the copper and it was assbackwards from the way you do steel. Does your process require in process annealing? I had to do it quite a bit actually, but I didn't really know what I was doing.
Now you got my gears spinning....
- Joined
- Nov 10, 2010
- Messages
- 79
Yeah you should totally turn this thread into a Tutorial! It would be great!
Tai Goo
BANNED
- Joined
- Apr 7, 2006
- Messages
- 3,806
Yes, I had to anneal the copper ones several times. To anneal the copper I take it up to a red heat and quench in water. The brass tubing was so thin, that I only annealed it once at a black heat, but really couldn't move the brass that much. It was just too thin to do much with.
Basically, I leave a bit of material sticking up over the end of the bar/mandrel and forge it over in several steps, a little at a time. I clamped the mandrel in a vice, so that the tubing would only slide down as far as I wanted. The end of the round mild steel mandrel, can either be flat or dome shaped. Of course you want to start with a good fit between the mandrel and the inside diameter of the tubing. When you hit the tops the sides tend to pucker out a bit, so the sides have to be kept in check with some light planishing (while on the mandrel). You can do that part over a flat anvil, but I used a swage block with a half round depression for better support. The only other trick that helped close the ends up, was to upset the ends of the tubing first, to give the ends a bit more beef and support. You can close the ends up as much as you like, just go a little at a time. I filed these down, but for some knives the forged surface might look even better.
If you start to get cracking around the inside of the holes on top, you need to file them back a bit past any of the cracking before you proceed or go any further.
It doesn't take long to do one, probably about an hour. I dind't actually time myself though.
Last edited:
- Joined
- Mar 12, 2010
- Messages
- 1,013
Please make a tutorial for this. At first I thought you were forging the sides down but I guess you are forging the top over. I take it you are welding the edges?
Tai Goo
BANNED
- Joined
- Apr 7, 2006
- Messages
- 3,806
No welding or soldering on them. Yes, the tops are forged over the top of the mandrel. I didn't take any pix of the process, so I'll just have to try and explain it the best I can.
Maybe next time I do some ferrules, I'll remember to take a few pix.
Maybe next time I do some ferrules, I'll remember to take a few pix.
- Joined
- Feb 28, 2006
- Messages
- 3,494
Cool Tai! I've been thinking about trying to make mild steel ferrules for a draw knife. I wonder if something similar would work tapping tubing down into a dapping block-like depression? Have any suggestions for making steel ones, in addition to working hot?
Tai Goo
BANNED
- Joined
- Apr 7, 2006
- Messages
- 3,806
Phil, it wouldn't be that hard to do these out of steel, pretty much the same way. I'd just try keeping the tops of the ferrules hot with a torch in one hand. It might actually be easier in some ways...
On the copper ones, I did start with a pieces of tubing longer than I needed, because the bottom ends get deformed a bit over the vise jaws. After the forming I just sawed that part off. On the brass one I cut it to size first, annealed it and then just super glued it to the mandrel around the bottom, did the forming in one shot, then heated it up to release it from the mandrel. The main idea is just that you have to be able to support the ferrule on the mandrel with the spacing at the top where you want it.
If you want to experiment with the copper, it's just a piece of 1/2 copper plumbing pipe and a piece of 1/2 inch round mild steel bar for the mandrel.
- Joined
- Jul 13, 2009
- Messages
- 20,478
Cool Tai! I've been thinking about trying to make mild steel ferrules for a draw knife. I wonder if something similar would work tapping tubing down into a dapping block-like depression? Have any suggestions for making steel ones, in addition to working hot?
They call that "deep drawing" you can do it cold.
You can find a bunch of info on that, including charts of dimensions and steps.
Tai Goo
BANNED
- Joined
- Apr 7, 2006
- Messages
- 3,806
If I end up doing more of these kinds of ferrules, Ill probably try making the mandrel out of a ½ bolt with the top cut off and an adjustable height nut at the bottom
see if it helps any.
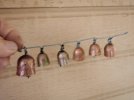
Here's some nice examples from steel. These were made by Ray Richard's grandpa.


Here's some nice examples from steel. These were made by Ray Richard's grandpa.
- Joined
- Aug 13, 2002
- Messages
- 5,703
Thanks for sharing Tai. Another thing on my "to try" list.:thumbup:
Thanks Tai,
Your artistic curiosity and your capacity to think "out of the box' helps all of us. I am particularly grateful.
I am also interested in seeing the stamp marks and learning more about Ray Richards grandpa's knives. I've spoken to ray, met him at the recent show and love his work. Knowing that he carrying on a family tradition is pretty special.
Side note- Tai...you need to make some Koa ukuleles for the same sentimental reason. If you need ideas/plans I can help. It's not too far off from violin making that I presently do and guitar making that many of us have dabbled with.
Dean
This thread will also help me with a commission chisel I am making. It is supposed to function as in the pics...it chisels the floor of a channel that has had the side walls cut by a knife. It's called a purfling pick.
This ferrule approach will help make the piece better looking , especially with engraving on the ferrule.


This ferrule approach will help make the piece better looking , especially with engraving on the ferrule.
Tai Goo
BANNED
- Joined
- Apr 7, 2006
- Messages
- 3,806
I’m thinking it's a cool old fashioned way to construct a simple working knife,… you just don't see guys doing it that much anymore, (probably because of the ferrules). Once we get the ferrules figured out, it's all down hill.
Dean, as a side note the ferrules also have a function other than just looks. They help keep the wood from splitting on the ends, and even if the wood does crack, the ferrules hold it together. In other words, the ends of the wooden handles are carved down and the ferrules are fitted over the ends.
I’m guessing it’s just a nice tight friction fit on the tang to handle, with a dab of cuttler’s rosin (or epoxy) to keep it from ever slipping.
- Joined
- Jun 17, 2001
- Messages
- 5,705
Thanks Tai,
Your artistic curiosity and your capacity to think "out of the box' helps all of us. I am particularly grateful.
I am also interested in seeing the stamp marks and learning more about Ray Richards grandpa's knives. I've spoken to ray, met him at the recent show and love his work. Knowing that he carrying on a family tradition is pretty special.
Side note- Tai...you need to make some Koa ukuleles for the same sentimental reason. If you need ideas/plans I can help. It's not too far off from violin making that I presently do and guitar making that many of us have dabbled with.
Dean
Dean, I'm really looking forward to seeing what Tai ends up in creating. He gets ideas and then goes forward with them. One of the most talented makers I have ever met.
Here's a few pages out of New England's Cutlers book on both my Great Grandfathers and Grandfathers cutlery business: http://www.hawknknives.com/aboutme/newenglandcutlery.html
That's a great piece of history that's in your blood. Do you own some of these knives?
Dean
- Joined
- Jan 18, 2007
- Messages
- 1,976
Tai Goo
BANNED
- Joined
- Apr 7, 2006
- Messages
- 3,806
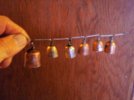
Those are cool. I've made some bells like that,... candle holders, thimbles, shot glasses etc...
While I‘m thinking about, as I remember, for the thimbles and shot glasses I choked the holes all the way down with a guillotine, (no mandrel). On the shot glasses I formed a stem and a wide flange at the bottom so they would stand up. Then, just used a dab of solder to seal the holes. On the thimbles, I sawed the “stems” off, flattened the end over a mandrel and used a dab of solder to seal the spot. Candle holders are similar too.
While I‘m thinking about, as I remember, for the thimbles and shot glasses I choked the holes all the way down with a guillotine, (no mandrel). On the shot glasses I formed a stem and a wide flange at the bottom so they would stand up. Then, just used a dab of solder to seal the holes. On the thimbles, I sawed the “stems” off, flattened the end over a mandrel and used a dab of solder to seal the spot. Candle holders are similar too.
Last edited:
- Joined
- Jun 17, 2001
- Messages
- 5,705
That's a great piece of history that's in your blood. Do you own some of these knives?
Dean
Dean, the knives in the photo that Ita shared our in my billion dollar knife collection.
