Ian,
Very nice work.
BTW why did you chose to place the pin in the center? I seem to like them about at the 1/3 of the way back from the front.
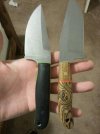
I wanted this one to be nice and sturdy since it is a bit larger for a hunter, so I wanted as much uninterrupted wood between the guard and the pin as aesthetics would allow. Who knows how much it really helps... but it satisfied my OCD, so I guess that is something.
I go a bit higher up the side when I do mine. Maybe that is what you feel is missing in yours? I like your handle by the way.
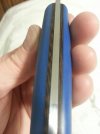
Lousy pic, but you can see the rear handle profile behind the belly here:
I really like those.
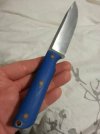
I actually went pretty far up the side, but I might not have gone deep enough. You can maybe see it a bit in the photo I posted below, but the pinky/ring pocket comes about 7/8 up the handle and ends in a soft "corner" which intersects with the round of the top of the handle.
Ian, If I had made that knife and wasn't happy with the lines (the workmanship is really clean!) I'd think about how straight it is along the spine.
The whole knife is kind of straight-line, which I don't see as a bad thing at all for using, but knives are often more satisfying to look at when there's something going on on top as well as on the bottom.
It looks a little straighter than it actually is because of the shadow in those photos, but it does have a bit of curve even in the center, though it is straightest there.
I actually kicked the tang off a bit on this one, if you follow the lines of the ricasso down to the pin (which is centered in the tang).
As far as my preference, I do like things a bit towards the straighter side, but it's a fine line between "gentle curve" and "looks straight".
")
Patrice Lemée;13074839 said:
Ian, I would also suggest trying to get the guard and ricasso the same width. Either by widening the ricasso or my personal choice, taking a bit off the finger cut out of the guard. Like you have it now, it makes the guard a bit look a bit chunky because it is wider then the ricasso.
I share that aesthetic, and it is definitely something I shoot for myself.
When I had this thing profiled out from the block, I thought about squeezing it in a bit, but with the size of the knife I was afraid taking too much from the handle area might make it a bit slim for the overall size of the knife. I'm still happy with it, but don't entirely disagree with you.
I have another blade profiled out from this pattern, so I think on the second one I may do some more tuning in that area. I'm not sure in which way yet though.
Working on this framed coffin handle mini bowie. This ironwood is terrific, shimmers like crazy when finished. Doing sterling silver for all of the hardware besides the guard (416). Frame and spacer are black G10. Don't have the guard cut yet so I just laid a piece of scrap across tang. Need to finish the blade out too (obviously).
I almost forgot how fun setting inlays is. Almost. :/


")