What's going on in your shop? Show us whats going on, and talk a bit about your work!

Xmas gift for other daughter

JiiGB6z.jpg
 
I'm looking to finish the build on my 2BF and heat treat my first knife this weekend . This step has been my biggest concern all along and I have to admit, I'm a little worried that my forge won't get hot enough or that I'll botch the quench temp or something. I'm also worried that I put too thin an edge on my knife and that it will warp or crack. No specific questions right now, just wondering if anyone has any tips or tricks or common first-timer's mistakes I should avoid.

And I have to say, shaping knives is a lot more fun than shaping fire bricks...
 
Worked on this knife for a week. Put the pin in and it tore out the curly maple. So I destroyed it. Ya know for science.
OQdCgTJ.jpg


I was pretty surprised by this 15n20 it bent to almost 90 before it snapped. Before this a smashed it into a stump quite a few times and could still shave with it . And I HT with a 2 brick forge
hPpB4rC.jpg


Before the destructive testing. It was showing some promise.
pmpNYVW.jpg
 
Winters are normally pretty dead for us as we own an exterior cleaning (power washing) business so once the weather gets to freezing, our washing typically stops. So I’ve tore our enclosed trailer all down, removed all the equipment, tanks, hose reels, everyrhing out, replaced the floor, herculined the new floor, and started repairing and repainting the equipping. Sodium hypochlorite is very hard on equipment. Been at this for about three weeks now. We just purchased a new and very large hot wash system so now I’ve gotta start fitting everything back into to 16’ enclosed trailer and somehow find room for this 800 pound new wash system too. It’s fun work and takes a lot of planning to balance the trailer, run all the plumbing to the machines and tanks, and still leave room to work on the equipment and carry extras supplies, parts, ladders, and extras. So that’s what I’ve been doing in ny shop and will be for a couple more weeks. Then it’s time to get out and hustle some work to recoup some of the 10 grand I just dropped on this new hot washer.
Sorry It won’t let me upload pics.
 
Many of us use imgur to upload pics. Its very easy and when you select the link code, use the BB code and it will show the picture without having to click a link.
Thanks Barefoot! After spending the past 22 years as a senior IS analyst, I unfortunately know my way around the digital world all too well. I guess I should have said that this forum wouldn’t allow me to upload images and, I am too tired to put the effort in for external image hosting. Lol
 
Valnut, what happened to your handle is the reason why I try to always drill holes before shaping a handle.
If I need to drill a hole trough material and there's no extra material on the other side that gets removed afterwards, I try and have some backing there to prefent tearout
 
Valnut, what happened to your handle is the reason why I try to always drill holes before shaping a handle.
If I need to drill a hole trough material and there's no extra material on the other side that gets removed afterwards, I try and have some backing there to prefent tearout
Well the hole was drilled but for some reason the hole in the tang and the handle were not lining up. All is well I tested it and learned what tweaks I need for ht on a "batch" I'm working on now.
EVoXFKC.jpg
 
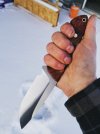
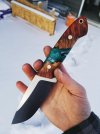
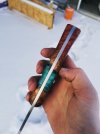
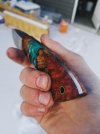
A gift for my dad, and a new model prototype. He has wanted a knife from me since I started making them in April, and I figured Christmas would be a good time to surprise him.

I am pretty happy with the build. This is my first time working with a wood material, so some things I had to experiment with. How do you guys get a nice low grit (220g) finish on the spine, but keep the scales at a higher grit?

I am also having a hard time buffing the material. I have taken it to 1500 grit, and then to a buffer with green compound on it. Low speed and light pressure, but I can't seem to get that pop that I want.

Any advice?

2017-12-23 03.01.33 1.jpg 2017-12-23 03.02.22 1.jpg 2017-12-23 03.03.28 1.jpg 2017-12-23 03.04.08 1.jpg
 
I am pretty happy with the build. This is my first time working with a wood material, so some things I had to experiment with. How do you guys get a nice low grit (220g) finish on the spine, but keep the scales at a higher grit?

Either remove the scales and then finish the spine or very carefully whap sandpaper around something thin and sturdy and have a go over the steel only. Go one direction only
 
Here’s a new AEB-L Gyuto that just went out to a customer the other day. It has my new little retention design for the capture pin on the says. Pretty much just countersunk a magnet(super glued into hole), used a steel capture pin that would go through the hole, and stick to the magnet. The retention is just right. I’m sure design has been used before somewhere, as it’s a pretty common sense, simple fix. But it’s “new” to me.

r7nEzre.jpg


PYHvlDS.jpg


exRAg9y.jpg


gUEYr0t.jpg


0i9cmCA.jpg


g8gPSu6.jpg


TagrEp5.jpg


XxPTJbW.jpg
 
Last edited:
Back
Top