-
The BladeForums.com 2024 Traditional Knife is available! Price is $250 ea (shipped within CONUS).
Order here: https://www.bladeforums.com/help/2024-traditional/
You are using an out of date browser. It may not display this or other websites correctly.
You should upgrade or use an alternative browser.
You should upgrade or use an alternative browser.
WIP-Fikes Jungle Honey - Finished pictures added!
- Thread starter Phillip Patton
- Start date
- Joined
- Apr 12, 2006
- Messages
- 2,506
Love this WIP so much. I really "need" a jungle honey.
I also need to learn to do a Turks head knot. I have a knife that somewhat resembles a jungle honey fighter (much scaled down) that I want to put a Turks head knot on.
This is the animation that I followed to learn how, as directed to by Tai Goo many moons ago:
http://www.ropeworks.biz/archive/Aturkhed.html
Without hyperbole, it took me at least 30 tries to get my first one, and it still probably was messed up. Once you learn to tie a one-strand, which doesn't look like much, you can tie a two-strand by feeding more cord through, following the path of the cord you already tied. An average two-strand takes me a yard of paracord, with a three-strand taking a yard and a half.
Really enjoying the WIP!
Phillip Patton
Knifemaker / Craftsman / Service Provider
- Joined
- Jul 25, 2005
- Messages
- 5,397
Happy Saturday, y'all!
I have finished pics now, which the client has seen, but you all have to wait through some more in-process pics.
We decided to go with a relatively simple leather scabbard. The first step of course to make a paper pattern based on a tracing of the blade. Then the leather pieces are cut out. The front piece has the bottom part of the snap installed, then cement is applied:

This is going to be lined, so each half of the scabbard is two pieces; one thick, and the other thin. The thin piece is cut over sized so it can be trimmed flush with the thick one after they're stuck together.
The back of the sheath is going to have d-rings for attaching straps. Here's how I installed them:


I have finished pics now, which the client has seen, but you all have to wait through some more in-process pics.
We decided to go with a relatively simple leather scabbard. The first step of course to make a paper pattern based on a tracing of the blade. Then the leather pieces are cut out. The front piece has the bottom part of the snap installed, then cement is applied:
This is going to be lined, so each half of the scabbard is two pieces; one thick, and the other thin. The thin piece is cut over sized so it can be trimmed flush with the thick one after they're stuck together.
The back of the sheath is going to have d-rings for attaching straps. Here's how I installed them:
Phillip Patton
Knifemaker / Craftsman / Service Provider
- Joined
- Jul 25, 2005
- Messages
- 5,397
Slots are cut in the back piece:

and the rings pulled through from the inside:

and cement is applied to the mating surfaces of the leather parts:


and the rings pulled through from the inside:
and cement is applied to the mating surfaces of the leather parts:
Phillip Patton
Knifemaker / Craftsman / Service Provider
- Joined
- Jul 25, 2005
- Messages
- 5,397
When the cement is dry enough, the leather pieces are pressed flat:

and the holes punched out the rest of the way:

and the rivets installed:

Honestly, the rivets aren't really necessary, and I'm not going to use them again for this. There's no way those leather pieces are going to get pulled through those slots, especially once the lining is glued on.
and the holes punched out the rest of the way:
and the rivets installed:
Honestly, the rivets aren't really necessary, and I'm not going to use them again for this. There's no way those leather pieces are going to get pulled through those slots, especially once the lining is glued on.
Phillip Patton
Knifemaker / Craftsman / Service Provider
- Joined
- Jul 25, 2005
- Messages
- 5,397
And here the lining is glued on and trimmed to the back piece:

Now back to the front piece. Enough coats of cement are applied:

and the two pieces are pressed together. I use a 3 pound sledge with a rounded and polished face to hammer the pieces together:

Here are the pieces for the welt:

glued on:

The skin sides of the leather that are glued together are roughened up. I use a knife to scrape the surface.
Now back to the front piece. Enough coats of cement are applied:
and the two pieces are pressed together. I use a 3 pound sledge with a rounded and polished face to hammer the pieces together:
Here are the pieces for the welt:
glued on:
The skin sides of the leather that are glued together are roughened up. I use a knife to scrape the surface.
Phillip Patton
Knifemaker / Craftsman / Service Provider
- Joined
- Jul 25, 2005
- Messages
- 5,397
All assembled, with the holes for the stitching punched, and the groove for the thread cut. I used to use a small drill bit to make the holes, but now I use a large needle that I made myself of music wire. I chuck the needle in my drill press and run it at a fast speed and punch the holes.

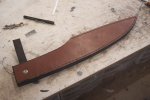
All stitched and dyed:


Then the top half of the snap is located, with the blade in the scabbard. The strap was a bit too thick for the snaps post length, so I countersunk it a little with a Forstner bit:

All stitched and dyed:
Then the top half of the snap is located, with the blade in the scabbard. The strap was a bit too thick for the snaps post length, so I countersunk it a little with a Forstner bit:
Attachments
Phillip Patton
Knifemaker / Craftsman / Service Provider
- Joined
- Jul 25, 2005
- Messages
- 5,397
So, here are the finished pics:


- Joined
- Nov 21, 2005
- Messages
- 3,972
Awesome result, Phillip! Thanks for taking the time for this WIP.
- Joe
- Joe

- Joined
- Feb 27, 2006
- Messages
- 5,191
awesome ") the sheath is excellent too. love how you attached the rings.
the sheath is excellent too. love how you attached the rings.
the sheath is excellent too. love how you attached the rings.