WIP Hydraulic forge press (pic heavy)

My spoils of war wrapping up the week... Far from complete, but it's starting too look like something mechanical rather than an inanimate jumble of steel.

photo111_zpse3415a31.jpg


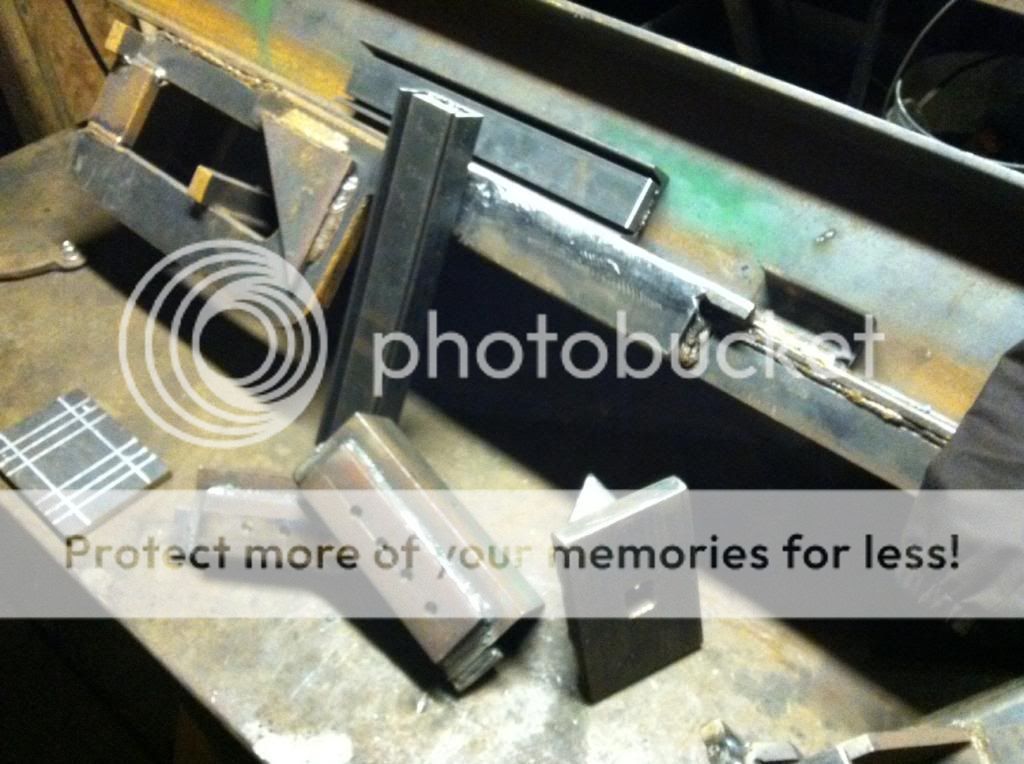
Counterclockwise, starting from the top;

gib bar assembly; Tacked and ready to drill out the bolt holes...

beginnings of a quick change die holder for the slide;

Back/Slidesplates; Frame > Slide - 4140 barstock.... Slide > Gib Bar - RailRoad track (sans webbing)... This should work out well in regards to wear. While I could have gotten away with mild steel, I had the stock laying around and thought it fit the bill...


Slide block mount/assembly... almost there...

photo211_zpsbb7f88d9.jpg


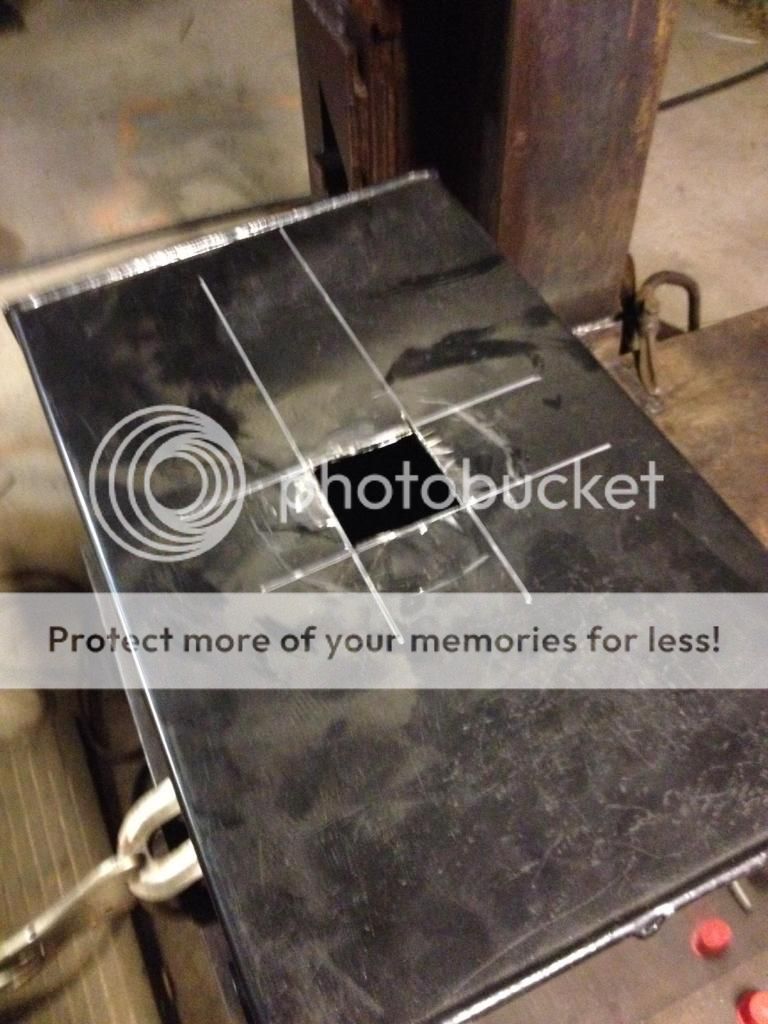
And finally, a cross-section of what my rear adjustment assembly... Telling and showing are two different monsters. I drew out the I beam in soapstone, and hopefully you guys/gals get the drift... Remember the gib bar is still lacking the adjustment hardware. That's next on the to-do list... Basically its function/purpose is pinching in the back of the slide so it's snug against the frame/backing plate.

photo39_zps5d33de50.jpg


Bolt holes that are drilled perpendicular to the web of the beam will intentionally be drill to 1/2" +/- (oversized) to create adjustment slack ; 3/8" Gr. 5 or Gr. 8 bolts...


Bolts that are parallel to the web of the beam will be be drilled and tapped 1/2 Gr. 8... these will adjust the pinch to the back of the slide block, snugging it up...

Here you can also see the 4140/RailRoad track sammiching angle stock... 4140 will ride against the frame while the track will ride against the gib bar...
 
For the audience; Please keep that in mind I'm over-engineering this press on purpose and it's overkill in many ways... From the W8x22 I-beam with 2" thick plate to the slide assembly that's about 40 pounds of steel... per Batson's book this build is by no means minimalistic and I could have gotten away with using half the steel I've welded together.

I don't like 'by the numbers' directions but I do enjoy improving upon them to coincide with my specific wants/needs.

Honest $.02 on the book so far;

Good;
Batson's book is great as far as having all the information in one reference. The resource itself is the pinnacle of hydraulic press information, and one can tailor their press along with Batson's guidance... His book is truly detail-oriented and well-polished outlining the C-frame hydraulic forging press build... The charts, drawings, and tips are priceless.

Bad;
While I'll admit that I'm not the sharpest crayon in the drawer when it comes to reading comprehension and engineering, I'm not out of line in stating that Batson needs to make a lot of edits / revisions. I find myself getting lost in his explanations, he tends to wander and end abruptly on sections of the press that could use a great bit more in the way of explanation. I can deal with misspelled words in reference books like this, even though I have micro-conniption fits when I see them, I understand that the genre of publication doesn't always get the red marker before it goes to print.

Ugly;
Furthermore, had I purchased this book for the H-Frame press, I would have been livid as the drawings are comparable to something my 3 year old would draw... Why have nearly the entire book + 11 pages of highly detailed/professional drawings for a c-frame, which in all reality are modifications to a 24 ton pre-built log-splitter frame, then have H-frame press build thrown haphazardly in the middle of the structural safety factors of a c-frame... a bunch of dark photographs... one poorly detailed drawing expanded lengthwise over 2 pages... Scary thing here is this is the more popular frame amongst knife makers, and is built from the bottom up!!! There are threads on the net and Bladeforums that will provide an individual with more detailed information (efleming's press)... I'm not trying to hurt anyones sales here but +$30 is a lot of coin to drop on a poorly-detailed drawing and dark photographs...
 
The gib bar and channel have been drilled out, and all I'm waiting on as far as hardware is concerned are some 1/2" grade-5 nuts for the backing adjustment. So far so good though, Everything lines up and seems to move according to plan.

Here is the gib bar with 1/2" inch holes bored through.

photo1_zps0f265cac.jpg


with the channel and hardware...

photo2_zps7c9ef5a4.jpg


I got the movement that I'd wished for so the gib operates as planned... However, I might widen the gib holes and back bolt adjustment seat for a lil' more back and forth. Right now I have 1/8" on the gib movement.

[video=youtube_share;zL_d1xchkH8]http://youtu.be/zL_d1xchkH8[/video]


The two places I marked with the bit on each gib bar (where there are no bolts in the channel pic) are where I'm going to place grease fittings. I'm not a seasoned machinist but I've been brainstorming on ways to create less friction between the slide plates. I've drilled 1/2"x 1/2" deep holes in the railroad track to create nooks and crannies for grease and dust. I'm taking this concept from the wear plate on my flypress. While I understand the concept of the wearplate as being a gauge of wear indicator, on the fly press it also seems to catch a lot of residual oil. Hopefully that's the case in it's application on the forge press.
 
I made it to the bottom. Nice Job and I really enjoyed the read. Thank you for doing that. "I'd rather take one to the face than to the Boys." Priceless

James
 
The last couple of weeks I've had a few curve balls that have delayed progress. I had to weld an entire deck on a bush hog and weld on a few D-rings to a trailer. Issues surrounded lack of space rather than lack of time. So, I made the best of things regarding by doing a little decorating... lol

photo113_zpse78ecdd1.jpg


photo311_zpse685b44f.jpg


photo112_zpsabdcb733.jpg


Nothing escaped the wrath of hi-vis paint... hammers, shop broom, C-clamps... My kinda style; Loud and Obnoxious.

The past two days I've been able to get things back on track though... I got the frame off the welding table and flipped it upside-down, this afforded me the opportunity to get some deep penetrating root welds on some of the hard to reach spots I hadn't hit with weld such as the thrust block and anvil block.

I get a sense of comfort when I can dig down into the parent metal and get a nice root pass along with a nice fillet joint... Not being the most experienced welder in the world little cheats like changing the position of the work rather than welding in an overhead position gives me that much more confidence that the weld is good... I'll continue to practice all position welding in another setting where I'm not dealing with so much in the way of immense cyclic load.

photo212_zpsda197b9a.jpg


I tacked up the slide block (forgot to take pics), and everything seems to be in line any ready to rock and roll... I just need to fill in a few more voids with weld and flap-wheel it smooth... Thrust block has a little more in the way of plate right there between the mount and the frame. Also I've got a little overkill planned for the for added frame rigidity. All will be revealed in the next few days.

Here it is vertical waiting for me to finish fabricating feet for the base... Still contemplating wheels... Err.

photo310_zps306c3b48.jpg
 
No wheels....

Front base complete-ish'd: I'm looking to make the press foot-operated from either side. The recessed center of these brake drums looks like the ticket.


photo315_zps7d477367.jpg


photo216_zpsffd97579.jpg


Johnny_5.jpg
 
Thrust block reinforcement....

photo117_zps7a9f372e.jpg


Did I mention overkill?

Hardfacing matrix on the wear side of the gib bar...

photo313_zps403da28b.jpg


Threads for adjustment...

photo214_zps3d0d31da.jpg


gib mounts..

photo115_zps87252ca2.jpg


photo116_zps8ebe3b52.jpg


Tapered slide...

photo49_zpsf7b9b27c.jpg
 
Don't know if any one cares or is interested in this particular build but I figured I'd do a little bump. It's been quite a while since I've had the free time to wrap this project up. Hopefully by the weekend I'll have a video of it running.

For the die plate holder I utilized 5160 1/4" tapered stock. I've read throughout several builds that mild steel tends to wear out quickly, either through abrasion or cold work stress... I weldeded them with Stoody Self Hardening capped over 12018... They line up perfectly... meant to do that!

photo219_zpsfccf0f98.jpg


Coming together with the thrust block... It's super tight... like a super tiger... When I weld the top gap, it will loosen up the top a wee bit..

photo120_zps4e67faea.jpg


I've also decided to extend the base a bit. No good reason other than to make sure this lump has a firm footing... I dropped it the last time I went vertical and it wasn't pretty. A 2x6 that framed the concrete slab caught it... needless to say the area that shouldered the blow turned to pulp.


photo411_zps34909650.jpg


An old anvil stand will be the back stabilizer and mount for the 10 gallon tank...

photo318_zps2a4e5257.jpg


I'm thinking of painting it... something ridiculous.... bright and obnoxious... so it's comfortable in it's new home...
 
My sincere apologies for the delay in wrapping this thing up. I just ran into a couple of forks in the road, but now I'm back at it and ready to wrap this thing up.

As far as reaching that end result is concerned, I've decided to weld the back end of the press to my welding table.

One hiccup that I'am really trying to figure out, which seems to be a simple part has me scratching my head. I've even gone to the local hydraulic supplier to find out where to find one, but they looked at me like I was speaking Mandarin.

The part in Question is called a "Snubber", so any help in nailing down a place where I can find one would be awesomely appreciated!

more to come...
 
Progress has been steady for the past week. Some pictures of initial mock up. I think that it's current position is actually quite conducive to the shop floor plan.

photo329_zps6cb10ff9.jpg


photo420_zps21d99d92.jpg


These are additional accessories that I've put in place to keep contamination to a minimum....


Large breather with a finer filter.... It's a 10 micron filter rather than a 40 micron filter which Batson suggests... I have no means of controlling dust particulates in the shop be it that it's open to the elements. It's also a barn that stalls horses, so there's that too... It wasn't plug and play, but I foresee the ends justifying the means....

photo328_zps1abd9128.jpg


photo130_zps740e5762.jpg


Strainer....

photo231_zpsd7c229fc.jpg


One thing that's of the upmost concern is preventing the contaminants such as weld slag, burrs, shards of drilled steel, and slivers of steel coming off the threads of hydraulic fittings. I'd suggest that when putting everything together you hold these contaminants as a real concern... I went through each fitting with a dental pick, blew out all the hoses, cleaned the tank out twice as many times as I had to. I found a bunch of these little gremlins that would have really done damage had I left it all to chance. A magnet on the tank can only do so much to prevent said damage, so be diligent and meticulous during the initial setup.
 
Here is the back of the press all hooked up and ready to go. You can see the foot print isn't too consuming when it comes to taking space on the welding table...

photo327_zps8dfc4b01.jpg


During assembly I did notice that my pump lacked the 1" barbed "in port" and was actually 1/2" NPT thread.... This is not what was advertised on the specs of what I ordered, but if it works... so be it...
 
photo43_zps1e4d400e.jpg


Here she is in all her glory... Having overcome a confusing detour of wiring the motor correctly....


Now comes the fun part of troubleshooting...


I will follow this up with a video, but here are the symptoms of the malfunctions... Please feel free to chime in if you have any idea....

The cylinder extends but does not retract


Possible issues...

- Contamination... somethings obstructing flow in the valve, lines, cylinder, pump, etc... I've pulled everything apart, looked in all mechanisms for debris and have found nothing...

- Air in the system... I'm currently cycling through the extend and retract without load, but the retracting shaft still needs the help of a hydraulic lift to retract... I don't know how many times I have to do this, but I've extended and retracted the cylinder about 20 times... A real PITA considering the fact I have to use an engine hoist to retract the ram every single cycle. I'm getting a little more movement, but not much and not for long... The ram creeps along for about an inch retracting, but then stops... My next step is to see if it's a valve issue. I'm going to switch the lines going from the valve to the cylinder to see if it changes anything... Hopefully this will narrow down the culprit...

- Bad Valve

- Bad cylinder

- ?????


I'm going to post a video of what I'm experiencing so those in the know can get a bit more of an understanding as to what's going on....
 
Sorry this is in two parts, and at times I talk away from the camera, but I think I've given you a better idea as to the issue from a POV that pictures and words lack.

[video=youtube_share;aBZPFiMrzLA]http://youtu.be/aBZPFiMrzLA[/video]

I learned that I couldn't switch the camera function... lol

so part duex....

[video=youtube_share;FjXffPua8Nk]http://youtu.be/FjXffPua8Nk[/video]
 
Yes u need to switch the hoses and see if the problem stays with retract or ram out starts having the problem then it would be in your valve, one thing to note is if you have a two way cylinder, some cylinders are power lift and gravity down like on a pallet jack, they will still have a vent hose on that end as well, one thing you could have tried is see if the cylinder is bypassing....you would remove the opposite hose on the cylinder from the pressure in hose....if the cylinder is bypassing fluid will come out that end of the cylinder while you are operating the valve...also when trying to troubleshoot hydraulics listen to the pump it will tell you what's going on, one other thing it usually take less than a minute for the system to bleed out the air....you also wont to make sure you are not picking up air in your tank, make sure your pick up is well under the fluid level....
 
Yes u need to switch the hoses and see if the problem stays with retract or ram out starts having the problem then it would be in your valve, one thing to note is if you have a two way cylinder, some cylinders are power lift and gravity down like on a pallet jack, they will still have a vent hose on that end as well, one thing you could have tried is see if the cylinder is bypassing....you would remove the opposite hose on the cylinder from the pressure in hose....if the cylinder is bypassing fluid will come out that end of the cylinder while you are operating the valve...also when trying to troubleshoot hydraulics listen to the pump it will tell you what's going on, one other thing it usually take less than a minute for the system to bleed out the air....you also wont to make sure you are not picking up air in your tank, make sure your pick up is well under the fluid level....

Thanks metalmole!

Rgr, switching hoses is the next step.

Check. 2-way cylinder is correct. I was researching the issue a few nights ago and found out the difference between the two, because my original thought was that the weight of the anvil block (slide) was keeping it from retracting... of course logic took over and I had to remind myself that a 2-way hydraulic pushes and pulls with the same hydraulic force and weight should not be a factor.

I've been at this cycling for a good 2hrs. straight, so I think bleeding the lines would have been accomplished by now...?

I've got a 10 gallon tank filled to less than 1" to the brim, and the intake is way below the surface a good 12-14"

I'll be doing some deductive reasoning now... Whether it's the valve or the cylinder, both have a warranty... I just hate to wait on stuff that's in the mail...
 
...one thing to note is if you have a two way cylinder, some cylinders are power lift and gravity down like on a pallet jack...

There ya go, just flip that thing upside-down and let 'er rip! :D Haha j/k

If I was to make a gentleman's advance at a rolling donut concerning this thing, I would think the problem is with that up/down valve.

Edit: I don't know how the hell you have any hernias left, but that's a brick of a machine you made.
 
Last edited:
switch the two lines going to the cylinder, just one end and see if the cylinder will go up but not down. if it does cylinder is good. if it will still go down but not up probably something wrong with the valve.
 
Also forgot to mention, I would move the pump down or the hyd tank up, sometimes that helps if the pump dosent have to pull the oil up so far...
 
Back
Top