WIP - Hydraulic Press Build

Ken, I respectively hold my ground on this one. This is a slow moving press and cannot be compared to a drop hammer. The action of a press is the force generated between the dies and the reaction is the vertical I beams resisting this force.

The drop hammer would take into the account of how far the hammer drops, the acceleration of gravity (~32feet/s^2), and the weight of the hammer.

Any ineritia caused by the slow moving press would be nominal and would not be enough to worry about considering the flow of the pump and the cylinder size.

There is a common misconception with presses that the forces are all transmitted down to the floor. The fact is that all forces are concentrated between the bottom die and the anchor point that the cylinder attaches.

Brian
 
Brian is correct.

I built the press that I'm flattered has provided Eric with some inspiration on his project. I've operated it for about 9 years.

Mine has set on 5-inch caster the whole time and I'm here to tell you, there is no need to worry about extra loads on caster for a hydraulic press arranged as this.

Force delivered by the ram is contained entirely by the press frame. Inertia-related energy is, for practical purposes, non-existent. There is NO HAMMERING taking place. You're moving a ram carriage (about 30 pounds or so) in a controlled circuit at about 1 inch per second (which sounds fast but it's NOTHING like a hammer). Even on a fast press like this, there is no REAL speed (like a hammer) and NO ENERGY TRANSMITTED BY IMPACT. The action of the press is like kneading dough, not hammering ... squeezing not impact. The force which produces this squeezing is constrained within the press frame.
The press does not 'walk' in use, it does not make the ground thump (like a powerhammer), it just squishes steel.

If this was some type of hydraulic hammer, I too would be concerned about transmitting impact safely to the ground. But that would be some other kind of machine.
 
Last edited:
Hello Joe,

Thanks for the great information. Nothing like feedback from someone that has been using it in practice for 9 years! :p

To all that have posted... I really like all the comments as it is just this type of discussion that helps draw out good useful information that can be carried forward by others.

I love this forum! :thumbup:

Eric
 
Brian/Caswell ----- Thanks for clearing that up. I had believed that we were talking about a machine that actually hammered/forged the metal to desired shape. Now that it's been explained to me , I concur & admit that I misunderstood. Thanks, ken
 
If anyone is interested, there is an short (and I mean short!) example of my press in operation at the very end of a little video I did a while ago demonstrating my pocket clip design. (It's the shot in the upper left corner of a montage screen at the very end.)
I would expect Eric's press will look very much like this in operation:

http://caswellknives.com/In-Line_Video.html

Sorry, you have to get through my whole pocket-clip video to get to this ....
 
Since the misconception has been cleared up, there is no need to go into the physics of it. The press frame is the recipient of the energy of the ram, and it is equalized by the resistance of the movement. No force is actually transmitted anywhere as movement, unless the frame is not robust enough and it bends/breaks.

A good illustration that we can easily do is to sit in out computer chairs ( which probably have wheels), and push our hands together as hard as we can........we didn't move across the floor, did we. Now take both hands and push against the computer desk......we moved across the floor. This illustrates the difference between canceled and reacted forces.
Stacy
 
Did not get to work on the press last weekend due to one son graduating from high school and my other son turning 21. Boy... it was a big weekend. Got a few hours in his weekend.

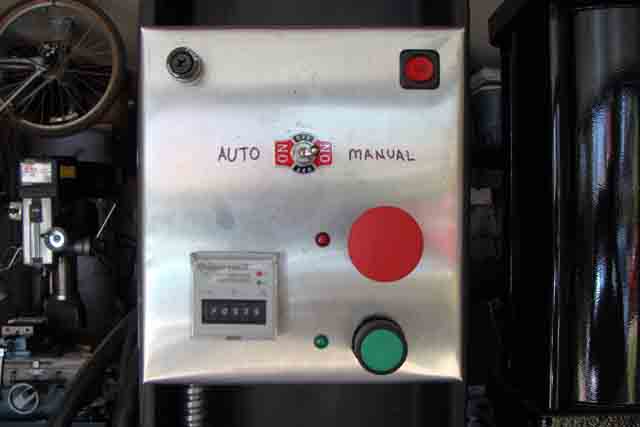
Started in on the electronics that will control the press. Here are some of the basics I wanted to handle when designing the controls.

1. Want main power switch to power control box.
2. Need ability to turn the press on or off with Start/Stop push buttons.
3. Ability to switch between Manual and Automatic mode, controlled by foot pedals.


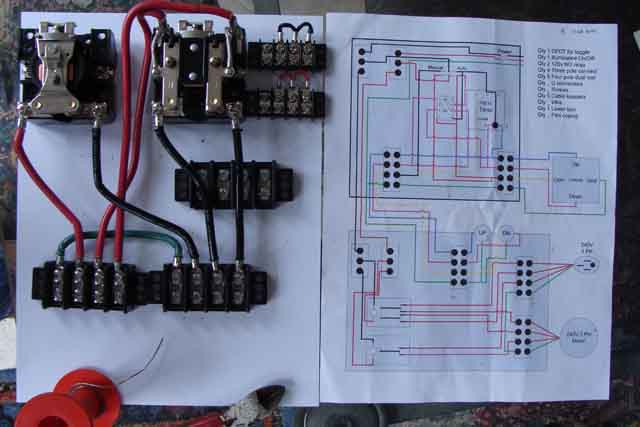
This picture shows my wiring schematic on the right. On the left is the start of the switching that will turn the 3 phase motor on and off. These components will be housed in their own box directly under the press.

PressBuild031.jpg


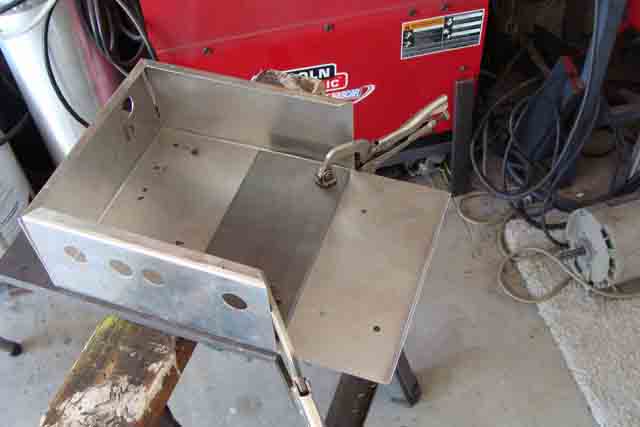
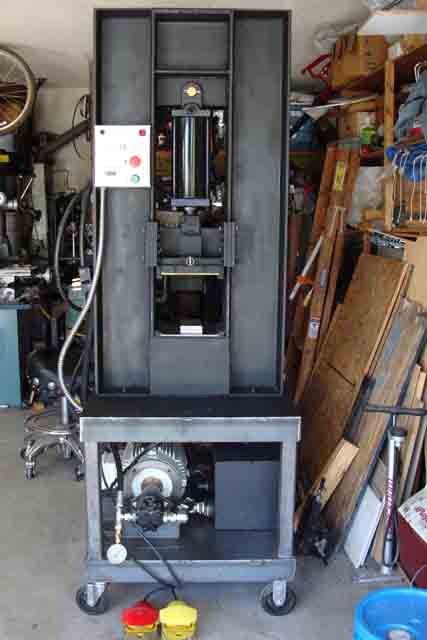
Wires, wires, wires... Here I've fabricated a box to hold the electrical components that will control the press function. Upper right is the main control box power switch, upper left is a fuse holder, center toggle will switch between manual and automatic mode, lower right is the obvious off/on buttons, lower left is the timer that will control ram reciprocation timing when in automatic mode.

PressBuild032.jpg


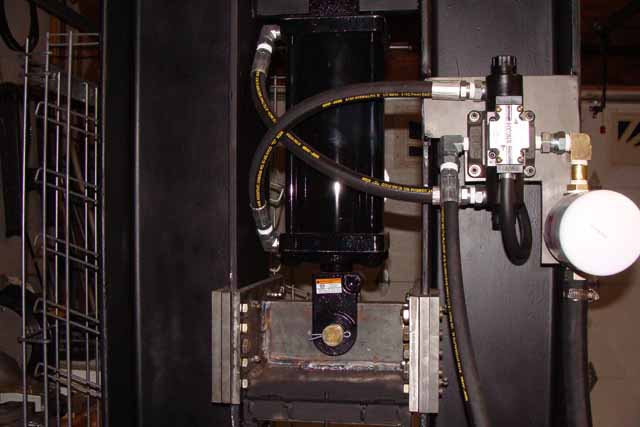
Last pic shows the hydraulic solenoid on the back of the press, all wired up. Now just need to finish the control boxes.

PressBuild033.jpg


Eric
 
You are a wizard, brother. Keep it up! Can't wait to see it in action.

Thanks for posting the WIP this is looking really good !

It's always nice to see a project like this come together. Very nice work!

Thanks guys. It's getting very close. I am half way through a 2 week business trip so, hope to have a little time to progress further this coming weekend. Will keep you all posted on progress.

Eric
 
Well have been gone for two weeks on business so had a few hours to progress since the last time I posted.

Laid out controller box on piece of sheet metal. Drilled all holes and now folding to shape.

PressBuild034.jpg


Relays to control switching for 3 phase power all mounted. Foot pedals connected and working.

PressBuild035.jpg


Control box mounted under press frame.

PressBuild036.jpg


Close up of main control box.

PressBuild037.jpg


All electronics hooked up and working. Just need to add hydraulic fluid and test operation.

PressBuild038.jpg


Man, I am so close here... Have to run off to an event for the rest of the day. Will have to test this evening or later this week. This is killing me... I want to try it now... :grumpy: :D

Eric
 
This will be good!
Whenever I'm at this stage in a project I always expect SOMETHING to pop up-some litle thing that needs to be fiddled with.
When I started mine for the first time I found out really quick that my solenoid valve had a 'closed center' spool in it (rather than an "open center" that allows the fluid to pass through the valve when 'idling'.) My 7.5 HP 3500 RPM motor roared to life then "BANG" stopped instantly with a big "crack sound."
Everything was fine, but I had to wait a week or so for the right spool. :(:p

Take video!!
 
It's WORKING! :thumbup::cool::thumbup:

Got it filled with hydraulic fluid this evening. Both automatic mode and manual mode worked first time! Man am I excited!!! :D:D:D

Here is a video of the press working in manual mode...

http://www.flemingknives.com/imagesPrime/LargePress/ManualPressSample_0001.wmv

Here is a video of the press working in auto mode...

http://www.flemingknives.com/imagesPrime/LargePress/AutoPressSample_0001.wmv

Thank you all for your input during this press build WIP!

I see squishing hot metal in my near future! :p

Eric
 
:thumbup::thumbup::thumbup::thumbup:


Congratulations!:)
 
Hey Eric,

Have you finished writing your damascus layup program yet? I'm just taking a wild guess here, but you sure would be the guy for the job, if you were so inclined. You know, something that will prompt and capture input:

  • how many types of steel? and their dimensions
  • layer layup pattern (alternating steels, etc)
  • length of beginning billet
  • target size of finished billet
  • etc
And the program could return info like: how much steel is needed, how many pieces of each type, beginning billet size and weight, likely finished yield at various sizes, etc

Heck, you probably already have such a program!

All the best, Phil
 
Back
Top