-
The BladeForums.com 2024 Traditional Knife is available! Price is $250 ea (shipped within CONUS).
Order here: https://www.bladeforums.com/help/2024-traditional/
You are using an out of date browser. It may not display this or other websites correctly.
You should upgrade or use an alternative browser.
You should upgrade or use an alternative browser.
WIP Tactical recurve EDC
- Thread starter sulsaMatt
- Start date
- Joined
- Dec 20, 2008
- Messages
- 1,937
Wow Great Job! cant wait till you get it finished!
Jason
Jason
I have a folder that looks just like that!! No kidding!
prolly a junk yard dog they kinda look alike to me
- Joined
- Nov 15, 2008
- Messages
- 44
My overtaxed brain just realized something! That sounds like a khukri...#2 the massive head of a recurve increases the force of contact, which is especially useful in getting those elusive radial and brachial arteries. smashing through tendons and protective tissues as well as putting the cutting edge farther into key recesses. which brings me to
#3 Femoral artery attacks the broad front/narrow back allows you to kind of hook that hard to reach femoral using an outside cut from fencer's grip.
- Joined
- Jan 29, 2007
- Messages
- 199
prolly a junk yard dog they kinda look alike to me
It's kinda inspired by Ken Onion's designs.
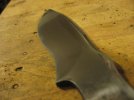
I got the bevels nice and crisp, and now I'm contemplating a choil. Do you think it'll be too much? It really makes sharpening a lot easier.
I'd try ferric dip, but I'm out.
It's kinda inspired by Ken Onion's designs.
I got the bevels nice and crisp, and now I'm contemplating a choil. Do you think it'll be too much? It really makes sharpening a lot easier.
I'd try ferric dip, but I'm out.
your asking the wrong dude lol.
- Joined
- Jan 29, 2007
- Messages
- 199
Scales arrived today... I'm off to the Post office to pick 'em up. All the lines are razor crisp. I have one part on the flat that isn't totally symmetrical (hard to photo without seeing both sides @ the same time) I'm going to draw back the handle, drill and tap it for the scale mounting hardware. Figure out my finish... Pics soon
- Joined
- Jan 29, 2007
- Messages
- 199
It's beveled on both sides, I went to hand rub it and found all kinds of "F"-ups.
Now I'm cranky.
I just read How To Make Knives (Bob Loveless) again, and am all caught up w/ PERFECTION. The only thing I've even been dreaming about is knife making. I had this epiphony that this is what I want for a career. "But the money's no good, just get a grip on yourself"
Doesn't matter, I train w/ knives I make descent designs, Dammit, this is what I'm going to do! I didn't think this would manifest in my WIP thread, but it did. I'll have pics tomorrow of how I hand rub and grind bevels. But the fact remains, This knife is going to be my crown jewel, This will be the beginning of my story... Knife #10 I don't want it to look "janky" I've spent about 8-9hrs a day looking up metallurgy, grinding techniques, forging techniques, and Kevin Cashen's wisdom nuggets. I can make this work. I don't want to "get rich quick" but if I can put food on the table as a fruit of my passion, I would be more than content. The best part is, I have a lovely wife who supports me whole-heartedly. Sorry for the Mid WIP rant, but at least a couple of you should understand.
Erik, the G10 will work just fine. I'm more than greatful.
For the vetrans out there I'm definetly in need of a little guidance. Not just tips and tricks, but encouragement, and criticizms go a long way.
To all those who read this frantic post, thanks for your time.
TekSec
Böse Messer
- Joined
- Dec 8, 2006
- Messages
- 2,933
Matt,
I know what you're saying. And yes, you will have those days / blades. I've actually found sometimes you just have to take the blade, put it aside and work on something else for a bit then go back to it. For what it's worth, I think it looks great and sometimes when you do a piece just for yourself, you just have to accept the flaws and learn from them for future pieces. Either post or email where the issues lie and I'd be glad to try to help you fix (or at least minimize them)! Best of luck and just remember my tag line below.
I know what you're saying. And yes, you will have those days / blades. I've actually found sometimes you just have to take the blade, put it aside and work on something else for a bit then go back to it. For what it's worth, I think it looks great and sometimes when you do a piece just for yourself, you just have to accept the flaws and learn from them for future pieces. Either post or email where the issues lie and I'd be glad to try to help you fix (or at least minimize them)! Best of luck and just remember my tag line below.
- Joined
- Jan 29, 2007
- Messages
- 199
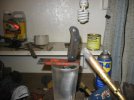
Thanks Erik, I have a bunch of new pics to upload this afternoon. Right now, I'm off to clear my head by cleaning my shop. I'm hoping a nicely organized shop will streamline processes and get rid of that rushed feeling while I search for parts/tools. Like knifemaking Feng Shui. lol. I'll be back later.
- Joined
- Jan 29, 2007
- Messages
- 199
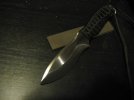
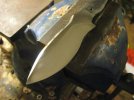
So, I heated the tang to a dull red, w/ the blade in water. This made drilling the pin holes MUCH easier. I then took the blade to the vise and using a fine tooth file wrapped in 600gr, began rubbing out the finish. so far so good. Until I found a deep grind mark in the primary bevel on the obverse side!!
It appears as a dark curve toward the ricasso. hard to photograph.
In trying to fix it, I felt like I was really only making things worse. So I hit it on the polishing wheel charged w/ green compound and Viola! Now I'm ready to tackle the scales.
Thanks for the advice, Erik this certainly was a learning experience...
Attachments

- Joined
- Jan 29, 2007
- Messages
- 199
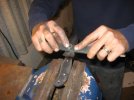
So I tried cutting the g10 w/ a scroll saw, ate two blades, dull hack saw...nothin', moved to hand saw... taking forever, jigsaw... no time at all (lesson learned. first time using g10) I took my scribe and traced the knife on the g10 and scribed inside the boundry line the word "in" so as to not go mucking up the exposed side. clamped blade and scale to drill press banged out the holes on both sides (counter bored)
I had to trim down my 8-32 button heads so I threaded on a chaser nut and chucked the whole thing up in a vice and used a coarse bastard mill file to shorten them checking fit about every 10 strokes (for the first one anyway)
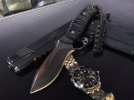
I did use a handsaw to rough cut the excess scale material. The rest was done w/ the grinder and a 60gr. belt (oh yeah and a facemask G10 = nasty stuff) once I got the profile clean I went ahead and tapped in the thong tube and countersunk the ends giving a nice flare look.
I took the scales off the blade and clamped 'em together making sure the holes line up perfectly and added the contour where they meet the ricasso. I felt that this also came out well. w/ the scales now off the knife, I made the serrations in the gripping surface using the very corner of my 8" bench grinder. I just put a new wheel on it which allowed for some very fine, very crisp ridges. I've liked this look since the first time I saw it.
I hit the scales for a bit on the buffer charged w/ brown tripoli compound (recommended for thermosetting plastics ie bakelite) which polished the grey back to black.
and now I need a sheath.
I did not epoxy on the scales because I am not really happy w/ the finish of the knife, It'll probably come down to shot peening or parkerizing, maybe still ferric chloride, I dunno, I would much pefer a subdued finish and if it hides a couple grinding SNAFUS all the better.
Your opinions please...
I had to trim down my 8-32 button heads so I threaded on a chaser nut and chucked the whole thing up in a vice and used a coarse bastard mill file to shorten them checking fit about every 10 strokes (for the first one anyway)
I did use a handsaw to rough cut the excess scale material. The rest was done w/ the grinder and a 60gr. belt (oh yeah and a facemask G10 = nasty stuff) once I got the profile clean I went ahead and tapped in the thong tube and countersunk the ends giving a nice flare look.
I took the scales off the blade and clamped 'em together making sure the holes line up perfectly and added the contour where they meet the ricasso. I felt that this also came out well. w/ the scales now off the knife, I made the serrations in the gripping surface using the very corner of my 8" bench grinder. I just put a new wheel on it which allowed for some very fine, very crisp ridges. I've liked this look since the first time I saw it.
I hit the scales for a bit on the buffer charged w/ brown tripoli compound (recommended for thermosetting plastics ie bakelite) which polished the grey back to black.
and now I need a sheath.
I did not epoxy on the scales because I am not really happy w/ the finish of the knife, It'll probably come down to shot peening or parkerizing, maybe still ferric chloride, I dunno, I would much pefer a subdued finish and if it hides a couple grinding SNAFUS all the better.
Your opinions please...