Yanagi-ba BBQ - WIP

Stacy E. Apelt - Bladesmith

ilmarinen - MODERATOR
Moderator
Knifemaker / Craftsman / Service Provider
Joined
Aug 20, 2004
Messages
37,781
Stacy Apelt - WIP - Yanagi-ba

This project is a smaller Yanagi style blade for general kitchen slicing chores.
Yanagi means “willow” in Japanese, so a yanagi-ba is a “willow blade knife”. This describes its long, slender shape with a pointed tip.
Here is an excellent photo of one:
http://zknives.com/knives/knimgtmpl...ves.com/knives/kitchen/aritsugu/artgwpy02.jpg

The project will entail making the blade form a san-mai billet with a center core of 52100, and outer segments of 1095 and pure nickel damascus.
You can make the same blade in mono-steel, or regular damascus, and have a very nice knife. You can use any high carbon knife steel, or CPM-S35VN in stainless.

The blade will end up about 1.25” wide and have an edge length of 7”. The handle will be 5” long.

The blade will be single bevel “Chisel Grind“, or Kata-kiri-ha .
The back will be ground in a shallow hollow grind, and the front a single bevel rising half way up the side. I will do almost all the shaping by stock reduction.

The handle will be an assembled two-tone octagon shape. More on that later.

Lets get started:
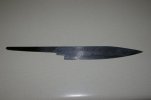
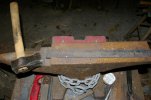
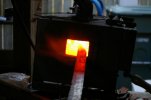
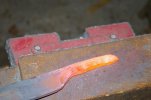
The billet was a bit too narrow for this project, so I pulled down the edge a bit to widen it. While the forge was on, I drew out the tang and roughed in the bevels and distal taper. This could have been cut from a wider billet without forging.

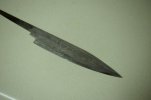
The basic profile was roughed in on the grinder, using a 60 grit Blue Zirconia belt. These belts will really hog steel, but also leave a surprisingly smooth surface.
The tip is placed about the center line. The bevel is only roughly ground to set the angles.

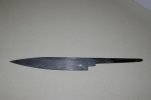
The back will need to be hollow ground. I would normally do this on a 48” radius platen, but later on I will show a trick on making a larger radius with a smaller wheel.

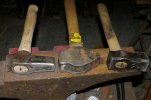
I shaped the tang to a taper, then refined all grinds with the same 60 grit belt. This is where we will stop grinding. The rest will be by hand.

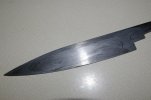
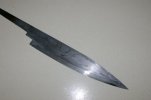
I etched the blade to show the pattern. The surface is 60 grit right now.

I have a large Burns Supper I am in charge of, so I won’t get any more done for about two weeks. More to come after Burns Night is over.
 

Attachments

  • Yanagi-ba WIP 001.jpg
    Yanagi-ba WIP 001.jpg
    43.9 KB · Views: 253
  • Yanagi-ba WIP 002.jpg
    Yanagi-ba WIP 002.jpg
    39.8 KB · Views: 343
  • Yanagi-ba WIP 003.jpg
    Yanagi-ba WIP 003.jpg
    57.8 KB · Views: 266
  • Yanagi-ba WIP 004.jpg
    Yanagi-ba WIP 004.jpg
    52.5 KB · Views: 293
  • Yanagi-ba WIP 005.jpg
    Yanagi-ba WIP 005.jpg
    45.6 KB · Views: 296
Last edited:
Photos of the forging
 

Attachments

  • Yanagi-ba WIP 008.jpg
    Yanagi-ba WIP 008.jpg
    66.2 KB · Views: 317
  • Yanagi-ba WIP 009.jpg
    Yanagi-ba WIP 009.jpg
    61.2 KB · Views: 312
  • Yanagi-ba WIP 011.jpg
    Yanagi-ba WIP 011.jpg
    26.2 KB · Views: 300
  • Yanagi-ba WIP 012.jpg
    Yanagi-ba WIP 012.jpg
    45.2 KB · Views: 334
  • Yanagi-ba WIP 013.jpg
    Yanagi-ba WIP 013.jpg
    49.7 KB · Views: 334
Last edited:
I am soooo stoked to see how this turns out! My heart fluttered a bit when I saw "Yanagi-ba".

Regarding the 60 Blue Zirconia, is this one of the faster belts that you have used? How would it compare to a ceramic belt in terms of how fast it grinds and how long it lasts? Thanks!
 
Very cool, Stacy! Looks like a super useful blade around the kitchen. Thanks for going through all this trouble to put this together and sharing it!
 
Awesome! Thanks for sharing.

Are both sides tapered towards the edge before the chisel and back hollow grind is done?

The San Mai looks great, nice profile!
 
This will be good. I want to see pics of that hollowed back! And then some pics of fancy sashimi cut with it... actually you can just go ahead and send me the knife when you are through with it, I'll cut my own sashimi. Thanks.
 
Since Portland (I mean Salem) gets the knife ;) I'd say, send me the sashimi...but that wouldn't work. :barf: I'll just follow this WIP thread instead. Not that I want to learn Japanese bladesmithing and cutlery though (I have all I can do with western cutlery culture) but I am always thrilled to see new stuff.
 
I find the blue Zirconia belts about the fastest for clean removal. The ceramic and other similar belts ( Blaze,Cubitron, etc.) are great for hogging, but the Blue Zirc belts give you rapid removal with a smooth finish ....even at 60 grit.
If I handed the blade to you right now, you would think I had don it with a 220 grit belt.
They last well. I am one who believes on changing belts before they get worn out, so I don't know how long they would last if you ground till they were used up.

The blade as it is right now could be sharpened on both sides and used as a regular slicing knife. This would be called a Gyuto - which is the name for a Japanese-Western style double bevel utility knife. The name means "Cow Blade" which is analogous to "Butcher Knife" in English. I regularly make this knife, as it is more popular in the American kitchen. It is also easier to grind :)

The hollow back , called Urasuki, and front single bevel are being done in this project since so many folks have been interested in this type of grind lately.

You can leave the back flat and the knife will work nearly as well. If you plan on using this knife for general kitchen chopping and cutting chores, and want a stronger edge, leave the back flat and put a very small 5 degree micro-bevel on the back. This makes the edge tougher.

I'll also post my warning note that accompanies these style knives when I give or sell one ( feel free to use this):
This knife has a Japanese style blade. It is probably sharper than most any knife you have used.
When first using it, be extremely careful of the direction of the cut and where your fingers and hands are placed. You may not notice a cut until it hits bone! It takes less force to make the cut, so until you get the feel of this knife, cut slow and be deliberate. With time, you may learn to cut like Martin Yan, but unless you want to be known as "Four Fingers Fred", go slow.
Use soft wooden cutting boards, and avoid slicing past the food and into the board.
When done cutting, rinse and wipe the blade off, and set aside with the edge and tip facing away from you. Wash and dry by hand - NEVER PUT IN A DISHWASHER. Store with a blade cover, or in a knife block.
 
Dumb question here. But what makes it so sharp? Is it the chisel grind and overall blade geometry or something else? We are talking scary sharp here or crazy sharp?
 
The chisel grind grabs the material and slices straight in. A double bevel has to "split" the material. The edge angle is usually lower,too.

The billet was part of a large order done by an ABS mastersmith. He was having some personal problems and got behind on orders. I was not in a hurry, and it took almost two years, but I was fine with it. I knew he needed money, so I paid him in advance. The order ( to make five matching wakizashi) was for five 24" long pieces of san-mai, with a seven layer 52100 core, and seven layer damascus sides of 1084 and 15N20. By the time he got caught up enough to making the billet, he made it with 1095 and nickel sides and a plain 52100 core. He evidently had some problem with the billet slipping sideways while reducing it, and the $1200.00 order came out with the core running a bit diagonal. I could have made his life worse by sending it back, but instead decided to make lemonade from lemons. I am using it for Japanese style single bevel blades.
 
So basically the chisel grind reduces the drag causing the blade to glide through the item being cut. Never been a big fan of chisel grinds, but it turns out that since I'm left handed I have been using them wrong the whole time. Thanks.

I'm really looking forward to see how you make this. Who knows, maybe I'll give it a try to eventually. With the grinds on the correct side for me. :)
 
This will be a great build. Thanks Stacey.

I am one of those who "Love" chisel grinds for most of my knife work. If I needed to skin a deer then something else would be better. But in the kitchen and out in the shop as well as self defense blade I just are drawn to them.

When you are done Stacey I think I will be inspired enough to attempt one.

Thanks
 
Thank you for posting this WIP Stacy.
It will be lots of fun to see this knife evolve.
It looks to me like the profile will make this a really handy knife for the kitchen.
 
Mark, Stay tuned for the wood project on the handle.

Talesin,
They can be made left of right handed. The bevel goes on the hand side. The edge goes straight into the material, and the bevel rolls it away from the blade. If you use a right handed blade for a left hand cutter, the edge will try and push the knife out of the cut, giving tapered slices and more difficult cutting.

To imagine how effective this type of cutting is, think of a woodworking plane on a piece of oak. One stroke, and the edge bites straight into the wood, making a long and even curl. Now, try and imagine how poorly that plane would cut if the edge was double beveled !
 
Yea I figured out I was using them wrong when I did a little research on the yangiba. I saw a couple of cutlery sites that offered left handed versions. I wanted to smack myself for not realizing something so simple.
 
got to point something out here that the chisel grind does not make the blade any "sharper " it is how ever greatly useful at making nice thin slices as the thin slice deflects from the blade as its being cut
if you take that same blade and say cut into the middle of the meat it too would wedge (15degrees is always 15 degrees be it ground on one side of the blade or as 7.5 +7.5 double bevel) not only will the blade wedge jsut as much as a 7.5+7.5 but it will also tune in the cut

a plane makes such nice curls cause as it is made it has a depth stop on the cut els the plane woudl dive into the wood more till it too would wedge
 
I've been thinking about the 48" hollow grind. That's such a mild hollow I've been thinking about other ways of achieving it. The idea I want to try is to make a sanding block with a 24" radius (48" hollow grind) and use some heavy sandpaper to hand grind the back hollow. Maybe a sen could even be built to achieve this type of hollow.

Just pondering. Can't wait to see what you do.
 
the chisel grind does not make the blade any "sharper "
if you take that same blade and say cut into the middle of the meat it too would wedge (15degrees is always 15 degrees be it ground on one side of the blade or as 7.5 +7.5 double bevel)

Thanks Butch -- I was puzzled by that :)

Stacy: nice lemon-aid! :)
 
Back
Top