I'll post the photos later, but here is the text of the handle project:
The handle will be a composite assembly of ebony and curly koa. I am doing it also in walnut and ebony for the demo shots.
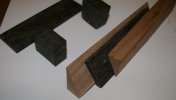
The handle starts with a rectangular block of the chosen material.For this project, it was 5X1.25X.75". Take a 6X1.5X1.5" piece of contrasting wood, ebony in this case, and cut two 1/2" blocks off. Then slice the rest into .20" thick scales. Sand them smooth at 120 grit. You will use the two end blocks and two of the scales. You can change the thickness to suit your likes.
A safety note and general knifemaking tip:
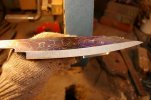
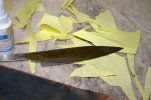
Tape the blade up well to protect you from the very sharp edge, and to prevent scratching or marring the polished blade. All that needs to be exposed is the ricasso area. On a really sharp and pointed knife, putting on an edge guard before taping up makes it safer. Take a suitable length of the plastic channel that comes on a new band saw blade, and slip it on the edge. Tape the blade up with this in place.
Never do the handle work on a sharp knife blade without taping it up.
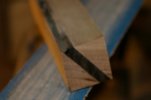
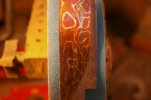
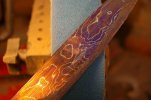
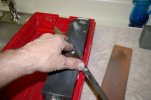
Take the block of handle wood, and cut it on the diagonal. Flatten at 120 grit, and laminate one of the ebony slices in the cut. Medium thickness CA works excellent for this. When dry, sand the surfaces smooth. Now, cut again on the other diagonal. Laminate in the other ebony slab. You will end up with a block of wood with an ebony X showing on the ends, and ebony running down the corners. Clean this assembled block up on the flat platen, and square the ends at 120 grit. Square the ends of the two ebony blocks,too. The handle block should have ebony showing on the corners. Grind the sides to get it even and looking symmetrical. Leave some to take off later, when finishing the handle.
The handle construction is done in these steps.
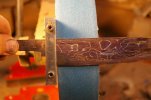
1) Carefully drill, file, and fit one of the ebony blocks to the tang, making it as perfect a fit as possible. The slot is cut just like fitting a guard. The only place that needs to be tight is the outer face of the slot. The back side can be relieved to allow for easier fitting and alignment.
2) Drill the main handle block to fit the tang and butt up against the ebony bolster. Make any adjustments needed to assure a perfect flush fit.
3) Fit the other ebony block to the butt end, assuring it is straight and a good fit.
4) Glue the butt block in place, and when cured, sand flush along the sides. Drill two 1/16" holes at 3 and 9 O'clock. They should be centered and about 1/2" apart. These will be for pins to strengthen the joint. Use the metal of your choice to install pins into these holes, and glue in with slow set CA or epoxy. Trim flush. I like copper or nickel silver. When the glue is cured, trim the pins flush with the handle, and check that all is fairly square. Just get it close for now.
5) Place the front bolster block on the tang, and slipping the handle up snug to it. Apply a tiny drop of CA at the joint on the two sides. It should penetrate just enough to hold the parts together and allow removal of the temporarily assemble handle. Drill two 1/16" holes, matching the pin holes in the butt.
6) Apply a few drops of acetone or debonder to the drops of CA, wait a minute, and give the bolster a tap...it should pop off. A sharp knife blade may be needed to aid in this. Sand or scrape off any CA that is on the mating surfaces.
7) Glue the pins in the bolster so they stick out enough to go into the handle holes. Trim the outer ends of the pins flush. Sand and buff the front of the bolster block.
8) Slip the bolster block back on the tang, and slip on the handle, inserting the alignment pins. Grind the excess boster wood so it is close to flush with the handle.
Decide where you want the handle rivet pin to be, and use a small drill bit to make a hole through the handle and press enough against the tang to make a mark. Disassemble the handle and drill out the tang to make an oversize hole for the rivet you plan to use. A mosaic rivet looks good here. Drill the handle to accept the chosen rivet. Re-assemble and test fit the rivet. If all is good, you are ready to assemble the handle.
9) Mix up some slow set epoxy, and tint it black. Tape over the rivet holes on the handle side. Drizzle some epoxy into the handle block tang hole. Apply a small amount on the bolster block slot, and put a small amount on the tang at the ricasso.
Slide the bolster on the tang, seating it snug to the ricasso shoulders. Slip on the handle and align the pins. Press together snugly. Wipe off any squeeze-out. Remove the tape, and install the mosaic rivet, making sure it is "clocked" to make the pattern straight. "Clocking" is assuring that all the rivets are turned the same way, and that they are properly aligned with the vertical axis ( 12 to 6 O'clock). Nothing looks worse on a nice knife than a mis-aligned mosaic rivet.
TIP:
A tip for clocking mosaic rivets easily when things are covered with epoxy is to cut a small slot like a screw head in the rivets before assembly. Make the slot run from 12 to 6 on the rivet pattern. This will easily allow you to turn the rivet straight in a few seconds while assembling the handle.
10) Clamp the handle tightly against the ricasso shoulders, wipe off any squeeze-out, use a paper towel with acetone to remove epoxy from the ricasso...... set aside to dry.
When the epoxy pot is just starting to gel, wipe off any remaining squeeze-out at the ricasso. When the epoxy pot is just set, but not hard, clean up the bolster and ricasso with acetone again, and let cure overnight while clamped.
Grind the bolster flush with the handle block.
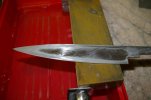
At this point the handle will be a rectangle of wood with ebony front and back pieces, and ebony stripes running down the corners. If you wish to taper the handle from back to front, do so in small steps. Taper a bit from top to bottom, and then bring it back to alignment by tapering a bit form the sides. Once the rectangular shape ( tapered or squared) is right, the ebony strips should perfectly bisect the corners. Carefully flatten the corners at 45° to make the handle now have an octagonal shape. Refine any details that need it, and finish the sanding up to 1000 grit or more. The handle can be sealed with a good quality oil finish, or your own favorite technique. If the wood used was stabilized, all you should need to do is sand to a high grit and buff with a soft cloth or 0000 steel wool.
If the wood you used is un-stabilized, applying sanding sealer at 800 grit and sanding it away a few times will greatly enhance the look of the handle. Even with stabilized wood , this can made for a smoother and easier to polish surface.
NOTE:
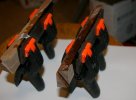
In the second photo, I put the other diagonal cut piece behind the piece being glued to the ebony. This makes it clamp straight. After the CA dried on the one piece, the second diagonal was then glued on the ebony as in photo 3.

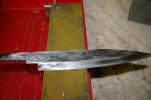
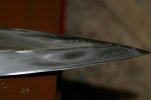
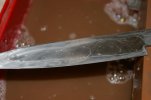
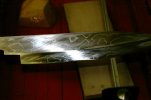
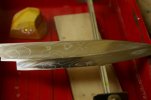
 That layered steel is some good looking material and I like what you are doing with it.