-
The BladeForums.com 2024 Traditional Knife is available! Price is $250 ea (shipped within CONUS).
Order here: https://www.bladeforums.com/help/2024-traditional/
You are using an out of date browser. It may not display this or other websites correctly.
You should upgrade or use an alternative browser.
You should upgrade or use an alternative browser.
Yanagi-ba BBQ - WIP
- Thread starter Stacy E. Apelt - Bladesmith
- Start date
- Joined
- Sep 27, 2007
- Messages
- 7,680
Wow, just checked in on this one. Stacy, that handle is dynomite!! Really is looking nice.
Thanks Stacy!
Thanks Stacy!
Stacy E. Apelt - Bladesmith
ilmarinen - MODERATOR
Moderator
Knifemaker / Craftsman / Service Provider
- Joined
- Aug 20, 2004
- Messages
- 38,594
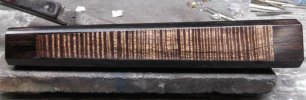
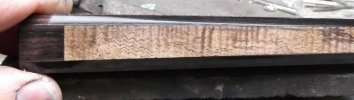
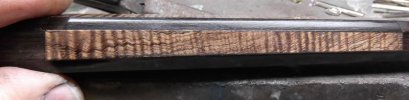
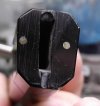
I cleaned up the handle a bit more. It is just about ready for assembly now.
Four side views.
This is only a 400 grit sanding without any real attention to getting it perfect. Even though the curly koa looks good now, it will look like 3D when sanded to 8000 grit.
BTW, I have been using the term "ebony" when referring to the dark wood. On the other handle in the beginning shots, I was using ebony. On this handle ,I used African Blackwood, as it matched the grain and tone of the koa better.
Attachments

Last edited:
Stacy E. Apelt - Bladesmith
ilmarinen - MODERATOR
Moderator
Knifemaker / Craftsman / Service Provider
- Joined
- Aug 20, 2004
- Messages
- 38,594
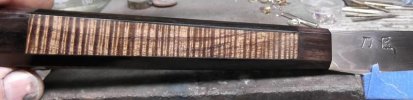
Front ,back, and on the blade.
A little hand sanding and then I will fill the handle hole with black dyed epoxy. I will slip the bolster on the tang, and apply some epoxy on it. Then I will slide the handle on and mate the pins to their holes. After wiping off the squeeze-out , I will clamp it and let dry. After about an hour, I'll re-wipe the squeeze-out, and check that all is aligned properly. If all is well, I'll let it cure for 24 hours. Then it will be some touch up sanding on the grinder at 400 grit........ and the final hand sanding to 8000 grit.
A little hand sanding and then I will fill the handle hole with black dyed epoxy. I will slip the bolster on the tang, and apply some epoxy on it. Then I will slide the handle on and mate the pins to their holes. After wiping off the squeeze-out , I will clamp it and let dry. After about an hour, I'll re-wipe the squeeze-out, and check that all is aligned properly. If all is well, I'll let it cure for 24 hours. Then it will be some touch up sanding on the grinder at 400 grit........ and the final hand sanding to 8000 grit.
Attachments
Last edited:
- Joined
- Dec 7, 2008
- Messages
- 7,187
Looks like it is really close to completion.
This is going to be a really cool kitchen knife Stacy.
It has been a fun and informative thread.
This is going to be a really cool kitchen knife Stacy.
It has been a fun and informative thread.
Stacy E. Apelt - Bladesmith
ilmarinen - MODERATOR
Moderator
Knifemaker / Craftsman / Service Provider
- Joined
- Aug 20, 2004
- Messages
- 38,594
Just a few more touch ups and it is ready to ship.
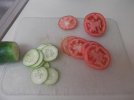
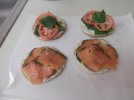
The main thing about such a knife is not how good it looks, but how good it cuts.
I sliced up a tomato and some cucumbers. Since I had the sliced veggies, I made some bagels and lox.
The main thing about such a knife is not how good it looks, but how good it cuts.
I sliced up a tomato and some cucumbers. Since I had the sliced veggies, I made some bagels and lox.
Attachments
- Joined
- Dec 15, 2009
- Messages
- 1,008
Thank you for this WIP Stacy, truly masterful.
- Joined
- Dec 7, 2008
- Messages
- 7,187
Wow Stacy!
That is one Sleek and Beautiful Kitchen Knife.
I love it.
That is one Sleek and Beautiful Kitchen Knife.
I love it.
Stacy E. Apelt - Bladesmith
ilmarinen - MODERATOR
Moderator
Knifemaker / Craftsman / Service Provider
- Joined
- Aug 20, 2004
- Messages
- 38,594
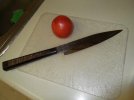
The camera angle makes the blade look shorter than it is.
OAL is 14"
Blade 8"X 1.3"
Handle is 6" long and 1"X.75" the butt, .75"X.50" at the bolster.
The knife balances well , and feels very light in the hand. Weight is 145 grams.
Glad you like it Mark. I'll be doing the final things this weekend and ship it out Monday or Tuesday.
OAL is 14"
Blade 8"X 1.3"
Handle is 6" long and 1"X.75" the butt, .75"X.50" at the bolster.
The knife balances well , and feels very light in the hand. Weight is 145 grams.
Glad you like it Mark. I'll be doing the final things this weekend and ship it out Monday or Tuesday.
- Joined
- Jan 2, 2006
- Messages
- 564
Stacy,
I didn't really understand your plan for the handle at first and didn't
like it. In the finished form, however, it is beautiful. Thank you for
sharing your process. Very nicely done.
Bill
I didn't really understand your plan for the handle at first and didn't
like it. In the finished form, however, it is beautiful. Thank you for
sharing your process. Very nicely done.
Bill
Stacy E. Apelt - Bladesmith
ilmarinen - MODERATOR
Moderator
Knifemaker / Craftsman / Service Provider
- Joined
- Aug 20, 2004
- Messages
- 38,594
Well, I'm getting ready to box it up for Mark. Below is the text of the paperwork that accompanies the knife:
Yanagi-ba (Willow Leaf Blade)
The Yanagi-ba is the standard fine slicing knife used by Japanese chefs. It is a type of sashimi knife, often wrongly called a sushi knife. Sashimi is raw fish, sushi is the fish placed in or on rice. It is used for slicing softer foods, fish, meats, and vegetables. Cutting hard objects or against bone may damage the very fine edge. A soft cutting surface is also important to protect the delicate edge.
Stacy Elliott Apelt, FSA-Scot “Bladesmith”
_____________________________Date_________
Blade length 8“; Handle 6”; OAL 14”
Notes: Handmade for Mark Farley
The blade is hand forged damascus made with a core of several layers of 52100 , and sides of 1084, and pure nickel. The handle is made from Curly Koa selected by Mark Farley, and African Blackwood.
ABOUT YOUR KNIFE
The makers mark is the Kanji Mark for Stacy Elliott Apelt, who goes by “Bladesmith” and the characters read “Blade Maker”. The tang, under the handle, is marked with his name and the date of manufacture.
This is a quality slicing knife. It is very sharp. Use Extreme Caution when handling and using this knife. When done with cutting, rinse and carefully wipe the blade. Set safely aside to avoid accidentally touching the sharp blade. Wash and dry as soon as possible. NEVER wash in a dishwasher.
The blade will stay sharp for a long time when used properly. It can be re-sharpened by hand if needed. Sharpen by hand on a flat, fine grit water stone. Tip - place a strip of tape on the upper flat surface ,with the edge along the bevel junction. Sharpen the bevel as one flat surface. Turn the knife over and flatten the back with a few strokes on the stone. Do not lift the blade, but keep flat to the stone. Strop the edge to remove the wire. This edge is very thin at about 7°. Go back to the stone and give the edge a micro-bevel on the front side. Use an angle of about 12-15 degrees, and only one or two strokes. You do this by lifting the spine about 1/16” to 1/8” higher than the previous sharpening step. Strop again. This makes a stronger edge.
I will be glad to re-sharpen the knife, or repair the edge, if needed.
- Joined
- Dec 7, 2008
- Messages
- 7,187
I am going to have to make a special cutting board just for this knife.
Based on the size and profile I am betting this will become the most used knife in my kitchen.
.......and the best looking, by far!
Thank You Stacy.
This was a lot of fun.
Based on the size and profile I am betting this will become the most used knife in my kitchen.
.......and the best looking, by far!
Thank You Stacy.
This was a lot of fun.
Stacy E. Apelt - Bladesmith
ilmarinen - MODERATOR
Moderator
Knifemaker / Craftsman / Service Provider
- Joined
- Aug 20, 2004
- Messages
- 38,594
Thanks, Mark...it was fun for me,too.
Thank you chaps for all the kind words. Now lets see some Yanagi-ba knives made.
Thank you chaps for all the kind words. Now lets see some Yanagi-ba knives made.
- Joined
- Feb 7, 2006
- Messages
- 1,327
Stacy, i will take you up on that ") I will start a yanagi this week!!!
I will start a yanagi this week!!!
I will start a yanagi this week!!!- Joined
- Dec 7, 2008
- Messages
- 7,187
I made a new cutting board to use with this knife.
I plan on using the knife a lot, so it will get the care it deserves.

I plan on using the knife a lot, so it will get the care it deserves.
Inspiration strikes again. After rereading this thread, I started back on my gyuto conversion from a French chef's knife. Its a really old blade, and was found outside after about years. Today I managed to taper the stick tang, laminate the collar, and sand flat the front of the handle block. The whole handle is mahogany, with the collar a 0, 90, 0 orientation laminate, with each layer about 1/4" thick. This is the only way I can figure to keep it from splitting when I slide it down the tang. I only tapered the tang enough to get the collar to slide down without hanging up. Later tonight or tomorrow I'll drill out the collar and give it a test fit. I also filed very small shoulders on the tang as a stopping point. Filing hardened steel isn't fun. This blade is just soft enough to file a little bit. I have another just like this to do. Hopefully the next one will be even better. Thanks for the handle tips Stacey.