-
The BladeForums.com 2024 Traditional Knife is available! Price is $250 ea (shipped within CONUS).
Order here: https://www.bladeforums.com/help/2024-traditional/
You are using an out of date browser. It may not display this or other websites correctly.
You should upgrade or use an alternative browser.
You should upgrade or use an alternative browser.
Yanagi-ba BBQ - WIP
- Thread starter Stacy E. Apelt - Bladesmith
- Start date
")
- Joined
- Jun 29, 2009
- Messages
- 942
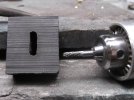
Really looking forward to seeing the pics that go along with the tutorial! This is a very timely thread for me, currently trying to build up the nerve to work on the 2 japanese style knives (santoku and gyuto) that I've had profiled for a couple weeks now... Using 1095 and the tip keeps warping slightly at the tip (on both) on quench and I'm not able to correct them during temper - I only mention this because I just got some aluminum blocks to use Stacy's tip of clamping between aluminum as part of the quench.
Enough rambling - anxious to see the progression of this thread!
Enough rambling - anxious to see the progression of this thread!
Stacy E. Apelt - Bladesmith
ilmarinen - MODERATOR
Moderator
Knifemaker / Craftsman / Service Provider
- Joined
- Aug 20, 2004
- Messages
- 38,594
I find that the tip on asymmetrical blades will warp regardless of what you try when using 1095. I usually straighten a bit over the needed amount during the quench, and it seems to counter-correct to nearly straight in tempering. If the blade tip is still a bit off when cooled down after tempering ( which is common) then I heat it back up to 400F and after about 30 minutes, take it out and stick the tip in a slotted board that is clamped in the vise ( or I just use the spaces between deck boards). I then grab the blade body - NOT the tang - and bend the tip back fairly hard ( wearing HT gloves). I often feel that I will break the blade, but it only happens rarely. It is amazing how far these blades will flex before breaking. Anyway, bend a little, check, bend a little more, check..... And after about 30 seconds of adjusting, place back in the tempering oven for about ten minutes. Take out and check again, and re-adjust as needed. If the blade seems to re-warp when it cools off, slightly over correct the warp while at 400F, and see if it straightens up when cooled.
BTW, when you check for warp, you need a good flat surface. The bench top, anvil, piece of steel, or a board may not be accurate. Use a granite surface block, or a known flat piece of thick metal that you have checked on a surface plate.
BTW, when you check for warp, you need a good flat surface. The bench top, anvil, piece of steel, or a board may not be accurate. Use a granite surface block, or a known flat piece of thick metal that you have checked on a surface plate.
Stacy E. Apelt - Bladesmith
ilmarinen - MODERATOR
Moderator
Knifemaker / Craftsman / Service Provider
- Joined
- Aug 20, 2004
- Messages
- 38,594
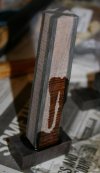
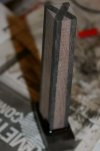
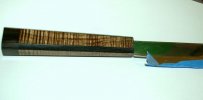
Here are some of the photos. Notice how the curly koa handle is already tapered a bit. You grind the sides to make the ebony even and then go from there. At this point the end block is glued on and the sides are evened up. I will grind off the excess butt material, drill the tang hole out, and fit the front ebony tomorrow.
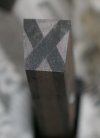
A you can see, when gluing up the second ebony piece I did not get the two diagonals quite lined up.... and one leg of the "X" is a little shifted. This isn't really a problem, as the sides will be tapered to make all square again. It has to be off a lot to matter. In a perfect job, it makes a perfect "X".
A you can see, when gluing up the second ebony piece I did not get the two diagonals quite lined up.... and one leg of the "X" is a little shifted. This isn't really a problem, as the sides will be tapered to make all square again. It has to be off a lot to matter. In a perfect job, it makes a perfect "X".
Attachments


Last edited:
Stacy E. Apelt - Bladesmith
ilmarinen - MODERATOR
Moderator
Knifemaker / Craftsman / Service Provider
- Joined
- Aug 20, 2004
- Messages
- 38,594


- Joined
- Dec 7, 2008
- Messages
- 7,187
Stacy,
I have never seen anyone do a handle like this before.
Looking great!
I can't wait to see it all come together.
I have never seen anyone do a handle like this before.
Looking great!
I can't wait to see it all come together.
Stacy E. Apelt - Bladesmith
ilmarinen - MODERATOR
Moderator
Knifemaker / Craftsman / Service Provider
- Joined
- Aug 20, 2004
- Messages
- 38,594
Thanks, Mark.
This will be a really unique handle. I have been playing with composite handle construction, and this style seemed perfect for Japanese knives.
One of my favorite constructions methods makes interlocking loops (Celtic Knot) in the center of the handle. People look at it and can't figure out how it is done. For a three loop construction, it is merely cutting at an angle; laminating in a strip of contrasting color wood; turn/grind down the excess; rotate 120° and re-cut; laminate in another strip; Rotate and repeat.
When I get the time, I'll do a tutorial on that system. It takes a little setup, but is really simple after the jig is made.
Stacy E. Apelt - Bladesmith
ilmarinen - MODERATOR
Moderator
Knifemaker / Craftsman / Service Provider
- Joined
- Aug 20, 2004
- Messages
- 38,594
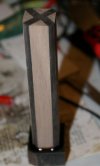
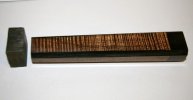
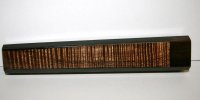
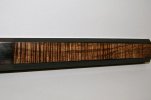
OK, I drilled out the handle and beveled the corners. It isn't 100% final shape, but it is near it. I will do the last 5% after the front ebony bolster is installed. It is starting to show the wood activity now that it has a 400 grit sanding.
Attachments
- Joined
- Dec 7, 2008
- Messages
- 7,187
OOOOOH Baby!
Sorry, couldn't help myself.
Sorry, couldn't help myself.
Agreed, that is nice!OOOOOH Baby!
Sorry, couldn't help myself.
Stacy E. Apelt - Bladesmith
ilmarinen - MODERATOR
Moderator
Knifemaker / Craftsman / Service Provider
- Joined
- Aug 20, 2004
- Messages
- 38,594
I thought those photos would get your attention, Mark.
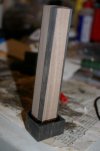
You can now see that the effect is an inlaid curly koa panel on each face...framed in Gabon ebony. The effect is quite complex looking, but fairly simple in execution.
You can now see that the effect is an inlaid curly koa panel on each face...framed in Gabon ebony. The effect is quite complex looking, but fairly simple in execution.
- Joined
- Oct 13, 2011
- Messages
- 377
That is just amazing Stacy.
- Joined
- Feb 7, 2006
- Messages
- 1,327
Stacy, that is pretty awesome! I make 99% wa handles and i am going to try this for sure...
Stacy E. Apelt - Bladesmith
ilmarinen - MODERATOR
Moderator
Knifemaker / Craftsman / Service Provider
- Joined
- Aug 20, 2004
- Messages
- 38,594
I'm glad you guys are liking this build. I draw up all sorts of things, and make a lot of them, but don't always get to share the ideas.
Try this WIP handle out and you will see how you can make your own stunning handles.
If you aren't up to making the blade, Jantz ( and others) sells Japanese blades ready for handles in VG-10 san-mai:
http://www.knifemaking.com/category-s/42.htm
http://www.knifemaking.com/category-s/45.htm
For $50-250 in a blade and some wood ( plus a few weekends) you can make yourself a high quality Japanese knife worth three times the cost. Start building you "Ultimate Dream Knife Set" by making one every two months. By this Christmas you will have a six piece Chef's set, and be the envy of all your culinary friends. Just get all the wood at one time, so the handles will be matching. You can set up the handle blanks as a group build, and add the blades as you purchase ( or make) them. HD-801;802;804;805;806;808 ($35 to $180)
Some wood suggestions are :
The panels - Curly anything; Stunning tightly figured/burl woods; Bold colored woods
The frame - Ebony; Blackwood; Paduak; Purpleheart; Walnut; Holly (for a white frame)
Ideas:
Lets say they are tearing down the old homestead built by your ancestor in 1806 ( or your favorite bar, a shipwreck,... any piece of historic or sentimental wood). Get a plank of wood from the demolition and have it stabilized( and possibly dyed). Make this handle with the sentimental wood as the panels. It will become family heirlooms if you make matching turkey carvers, with the 1800's cabin wood as the handle panels, for Christmas gifts to the relatives. The harder ebony frame will make the handle wear well, and the stabilization will make the old wood last, as well as shine.
- Joined
- May 18, 2009
- Messages
- 1,831
I'm going to do just that! Really appreciate the time you put into threads like this, thanks.
I'm glad you guys are liking this build. I draw up all sorts of things, and make a lot of them, but don't always get to share the ideas.
Try this WIP handle out and you will see how you can make your own stunning handles.
If you aren't up to making the blade, Jantz ( and others) sells Japanese blades ready for handles in VG-10 san-mai:
http://www.knifemaking.com/category-s/42.htm
http://www.knifemaking.com/category-s/45.htm
For $50-250 in a blade and some wood ( plus a few weekends) you can make yourself a high quality Japanese knife worth three times the cost. Start building you "Ultimate Dream Knife Set" by making one every two months. By this Christmas you will have a six piece Chef's set, and be the envy of all your culinary friends. Just get all the wood at one time, so the handles will be matching. You can set up the handle blanks as a group build, and add the blades as you purchase ( or make) them. HD-801;802;804;805;806;808 ($35 to $180)
Some wood suggestions are :
The panels - Curly anything; Stunning tightly figured/burl woods; Bold colored woods
The frame - Ebony; Blackwood; Paduak; Purpleheart; Walnut; Holly (for a white frame)
Ideas:
Lets say they are tearing down the old homestead built by your ancestor in 1806 ( or your favorite bar, a shipwreck,... any piece of historic or sentimental wood). Get a plank of wood from the demolition and have it stabilized( and possibly dyed). Make this handle with the sentimental wood as the panels. It will become family heirlooms if you make matching turkey carvers, with the 1800's cabin wood as the handle panels, for Christmas gifts to the relatives. The harder ebony frame will make the handle wear well, and the stabilization will make the old wood last, as well as shine.
- Joined
- Dec 7, 2008
- Messages
- 7,187
I am not being impatient waiting for the next installment.........am I?
You could always stay home from the store and let your harem run the place.
Just an idea.
You could always stay home from the store and let your harem run the place.
Just an idea.
Stacy E. Apelt - Bladesmith
ilmarinen - MODERATOR
Moderator
Knifemaker / Craftsman / Service Provider
- Joined
- Aug 20, 2004
- Messages
- 38,594
More progress ( done at work).
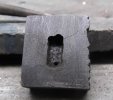
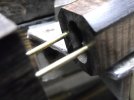
Drilling the starter holes in the ebony bolster.
Removing excess from the back side.
Connecting front side to make rough opening.
Using a small flat file to clean up slot.
Close fit. The epoxy will make this joint invisible when done.
Drilling the starter holes in the ebony bolster.
Removing excess from the back side.
Connecting front side to make rough opening.
Using a small flat file to clean up slot.
Close fit. The epoxy will make this joint invisible when done.
Attachments
Stacy E. Apelt - Bladesmith
ilmarinen - MODERATOR
Moderator
Knifemaker / Craftsman / Service Provider
- Joined
- Aug 20, 2004
- Messages
- 38,594
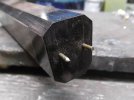
Now we will start fitting the pieces together.
Apply two small dots of CA on the joint sides....just enough to hold it together.
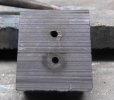
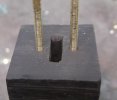
Drill and fit the pins on the back ebony butt cap.
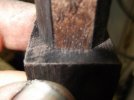
After drilling the front pin holes, use a scalpel to pop the bolster and handle apart. Juts a slight rap with a small hammer and it pops right apart.
See how the pins will allow exact re-alignment when assembling it later.
Apply two small dots of CA on the joint sides....just enough to hold it together.
Drill and fit the pins on the back ebony butt cap.
After drilling the front pin holes, use a scalpel to pop the bolster and handle apart. Juts a slight rap with a small hammer and it pops right apart.
See how the pins will allow exact re-alignment when assembling it later.
Attachments

Last edited:
Stacy E. Apelt - Bladesmith
ilmarinen - MODERATOR
Moderator
Knifemaker / Craftsman / Service Provider
- Joined
- Aug 20, 2004
- Messages
- 38,594
Final shots of the front bolster and alignment.
The pins fit into the holes in the handle and will allow easy re-insertion with no issue of the handle being off center when the final glue-up is done.
Shot of how closely the two fit together with the pins in the holes. When final glue up is done, this should be a perfect line.
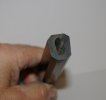
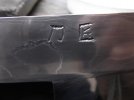
A couple blade shots. - First is the makers mark - Bladesmith ( kanji = Blade maker). Second is who the knife is for.
The pins fit into the holes in the handle and will allow easy re-insertion with no issue of the handle being off center when the final glue-up is done.
Shot of how closely the two fit together with the pins in the holes. When final glue up is done, this should be a perfect line.
A couple blade shots. - First is the makers mark - Bladesmith ( kanji = Blade maker). Second is who the knife is for.
Attachments
Last edited:
- Joined
- Dec 8, 2005
- Messages
- 1,239
This is some good stuff Stacy, thanks for taking the time to put this together.