Advice need on what angle to put on the frame lock

No one here can verify that you are any sort of engineer, gunsmith, knife fighter extraordinaire, or anything else. A quick search of this site shows I've made numerous folders.
I am not showing off, if you have a question, I'll try to answer, UNLIKE YOU JUST BS AND OFFER NOTHING. You want to talk gun smithing, we can. I promise, I will answer if I know, if I don't know, I will say I don't know. I won't be like you that giving all the BS and not answering anything.
Two WHOLE knives? Got any pics?

Then you should be able to answer your own questions on lock angle.
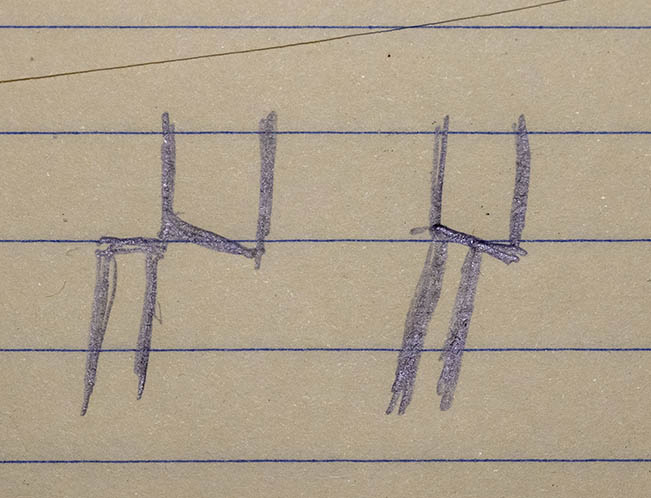
I posted picture after I worked on the liner in post #17. You don't read and you just BS. Yes, I answer my question that the diagram (b) is the correct way.
So what? No one can verify that and even if it's true, it has nothing to do with knife lock up.
Prove it. Got any pics of knives you've made? If it's so easy, why are you struggling with lock up questions?
I am not struggling, I did it, I expect people here to have the knowledge and give their experience.
I already addressed your false claims. Like a negative angle lock will come unlocked with pressure. That is blatantly and demonstrably false. Or "frame locks are better". Highly subjective and not necessarily true. There are a lot of variables. Variables you can't identify or explain.

Right way for WHAT? There is usually more than one "right" way in anything with knives. Again, it comes down to other details.
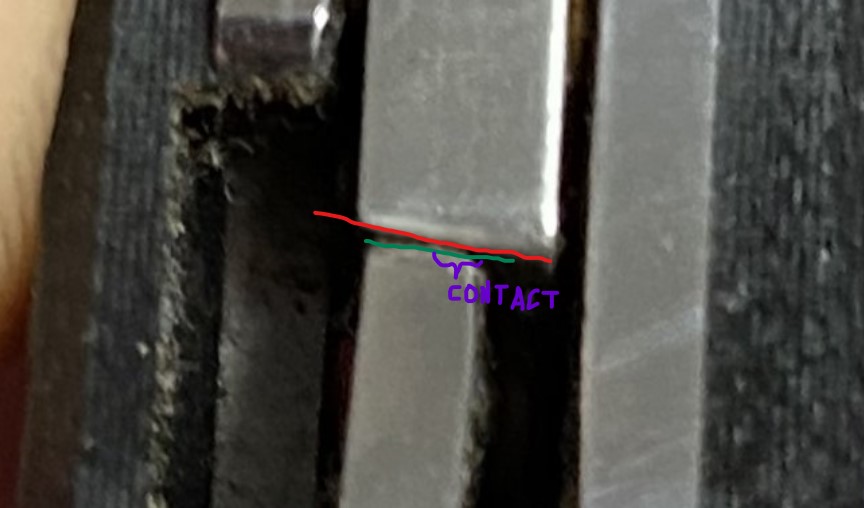
I can tell you I look at the liner lock of a few knives that have not been touched, they all have the angle like in (b) of the first post. Do it the opposite way at your own risk. Don't cry if the blade collapse on your finger.
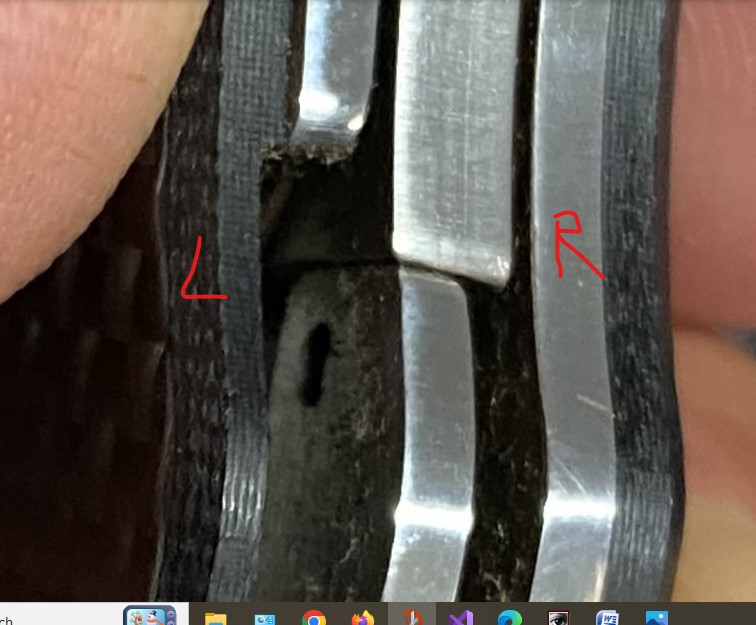
Frame lock is better if you hold your knife tight as it WILL push the liner lock towards the right more and further secure the blade. I don't think you get this simple idea because you NEVER even think of this.

You don't practice knife fight, that's why you never experience that when you swing or thrust the knife, occasionally the liner lock is pushed to the right and loosen the blade a little and it starts rattling. I can feel it. I know and YOU DON'T.

You address my false claim? So what is the right way? You never answer.

You don't want to waste your time explaining, but you write such a long response. I don't believe you know any of the answer. You just keep BS because I call you out. You don't know how to get out of this. SIMPLE, you think I don't know and I was wrong, just explain. Then I will stop calling your BS. I would assume people here in the Tinkering and modification section will know more than me!!!

To be more specific, if you explain why you said in post #47, I would go away and stop calling you fake. No need to answer post #1, I got the answer no thanks to here.
 
Last edited:
heres an old article with input from Michael Walker the guy who modernized the liner lock and frame lock early version concepts. it mentions angles as in not being one that works universally rather each one has to be determined per knife to do it right. yeah i know you're on framelocks, but they function the same as liner locks in lockup setup......


regardless, worth the read.....

now if you really want a folder to be the strongest its a Demko tri-ad lock. nothing can beat it for the price points...some other designs come close but nothing production has beat it yet.......
 
Guys, I never claim I know knives. I am new, I posted questions to get expert opinions here. I am experimenting along the way. I wrote my opinions and I expect people to rebut if they disagree.

I can tell you, J doyle Does NOT know anything. He came on ranting and ranting. You see any suggestion and resolutions from him? No!!! I won't be here much, but obviously he's been here and people must be listening to him. DON'T. You see the conversation, he trash talk, SHOW NOTHING. Can't even answer the basic question I challenged him. Take is as the sign. I'll be gone, you guys are still here, be careful............................

Good luck.
 
One of the issues of messing with a frame or liner lock, is that you have to account for lock flex in proportion to the angle, the lock's sprung tension, the lock interface and surface area, whether or not there is a stop pin or if the tang is used as a blade stop, the amount of blade play potential up/down-left/right, pivot slop, and probably more variables I am missing.

I prefer the lock bar interface to have as much contact as it can with the tang, and for the lock to have as little angle as possible.

The GB 1 is a great example of how I personally prefer a liner lock to be made. Sorry for the pocket lint.
A60D1D5B-0978-41CE-B040-58BC73B1EB14.jpeg7A8BDB32-F322-4F23-A7DC-5B1F66DC59E8.jpeg1191E210-38AD-4298-9787-B54860B38493.jpeg
 
Last edited:
One of the issues of messing with a frame or liner lock, is that you have to account for lock flex in proportion to the angle, the lock's sprung tension, the lock interface and surface area, whether or not there is a stop pin or if the tang is used as a blade stop, the amount of blade play potential up/down-left/right, pivot slop, and probably more variables I am missing.

I prefer the lock bar interface to have as much contact as it can with the tang, and for the lock to have as little angle as possible.

The GB 1 is a great example of how I personally prefer a liner lock to be made. Sorry for the pocket lint.
View attachment 1994574View attachment 1994575View attachment 1994576
This is a discussion, you show me what you have, and give me your opinion.

Actually I looked at you pictures carefully. Two of your pictures agree with my finding. The angle of the liner is not extreme as my drawing in (b) of the first post. BUT the idea is in agreement.......That the contact is on the left side and you can see a tiny gap on the right as shown:


You can see I draw the line of the Tank in RED, the surface of the liner in GREEN and contact point in PURPLE. The contact is on the RIGHT side like my conclusion.

It is good that the whole width of the liner is under the tank. I saw some knives it's only like 3/4 way in. The more important thing is NOT the position AFTER you deploy the blade in normal way. Try moving the liner to the RIGHT and let it go and see where it stop. You'd be surprise it does NOT return as deep under the tank as if you just deploy the blade. That is one thing I have not yet talked about so far before getting into all the argument. That's also I spend the time to work on. Mostly by bending the liner out a little. It's a balance between how strong the liner push to the right vs ease of deploying the blade. If you bend too much, it's harder to flip the blade open because of the stop build into the knife that you need to push the flipper tap much harder to deploy the blade.

I did examine two knives after I initially posted the thread. I looked at the wear mark on the surface of the liner lock. The wear area is on the left EXACTLY at the part shown in PURPLE on the left of the liner lock. That's why I know that's the correct way.

If you grind the the liner to follow the angle of the tank or even more slanted to the LEFT, imagine something sliding down on a slope, it's easier to slide. You want to make the contact point smaller so you get more pressure in the small area(under PURPLE) and create more friction. This is how I look at it and decide to grind it like (b). Of cause the drawing of (b) is EXAGGERATED. In the real liner, it's just very slightly slanted.

Good that you show the picture, this further confirm my reasoning.

Thanks
 
Last edited:
Well now you have me curious. How do you differentiate the GB1 from other liner locks?
To me it has to do with the thickness of the liner. The vast majority of liner locks would be too thin/flimsy if you removed the scales. The GB1's liner is so hefty that it looks like it could be a standalone knife if you removed the cf scales.
 
This is a discussion, you show me what you have, and give me your opinion.

Actually I looked at you pictures carefully. Two of your pictures agree with my finding. The angle of the liner is not extreme as my drawing in (b) of the first post. BUT the idea is in agreement.......That the contact is on the left side and you can see a tiny gap on the right as shown:


You can see I draw the line of the Tank in RED, the surface of the liner in GREEN and contact point in PURPLE. The contact is on the left side like my conclusion.

It is good that the whole width of the liner is under the tank. I saw some knives it's only like 3/4 way in. The more important thing is NOT the position AFTER you deploy the blade in normal way. Try moving the liner to the RIGHT and let it go and see where it stop. You'd be surprise it does NOT return as deep under the tank as if you just deploy the blade. That is one thing I have not yet talked about so far before getting into all the argument. That's also I spend the time to work on. Mostly by bending the liner out a little. It's a balance between how strong the liner push to the left vs ease of deploying the blade. If you bend too much, it's harder to flip the blade open because of the stop build into the knife that you need to push the flipper tap much harder to deploy the blade.

I did examine two knives after I initially posted the thread. I looked at the wear mark on the surface of the liner lock. The wear area is on the left EXACTLY at the part shown in PURPLE on the left of the liner lock. That's why I know that's the correct way.

If you grind the the liner to follow the angle of the tank or even more slanted to the LEFT, imagine something sliding down on a slope, it's easier to slide. You want to make the contact point smaller so you get more pressure in the small area(under PURPLE) and create more friction. This is how I look at it and decide to grind it like (b). Of cause the drawing of (b) is EXAGGERATED. In the real liner, it's just very slightly slanted.

Good that you show the picture, this further confirm my reasoning.

Thanks
I am not sure my pics are telling the whole story. The tang and lock bar interface does have very close tolerances: here are a few more pics.

Also, I need a bit of help understanding what is right and left by your definition. I see contact on the right and the small gap on the left.78F3E850-68D3-43FB-A2A9-BA4A3A5D6B5B.jpeg
 

Attachments

  • AE4BB03E-3541-4082-9E01-DCB99A760A63.jpeg
    AE4BB03E-3541-4082-9E01-DCB99A760A63.jpeg
    57.4 KB · Views: 1
  • C3BECA7C-7A46-46F9-9477-F45717C2D3A1.jpeg
    C3BECA7C-7A46-46F9-9477-F45717C2D3A1.jpeg
    57.8 KB · Views: 1
Regarding lock geometry ... I'm not a knife designer or maker, but looking at the knives in my collection, it seems like the most common geometry has the lock bar cut straight across and the lock interface on the blade is angled to match the angle of the lock bar when the knife is in the open position.


That's how it is on my Koenig Arius, Sebenza, and most of my other frame locks. There are a few others that are similar, but that have a curve on the show side half of the lock interface. I guess the idea there is to prevent the lock bar from walking past the blade.
 
I am not sure my pics are telling the whole story. The tang and lock bar interface does have very close tolerances: here are a few more pics.

Also, I need a bit of help understanding what is right and left by your definition. I see contact on the right and the small gap on the left.View attachment 1994635
Ha ha, it is literally the left of the picture or the right side of the picture. Here is the picture I labeled L for left and R for right.
 
Regarding lock geometry ... I'm not a knife designer or maker, but looking at the knives in my collection, it seems like the most common geometry has the lock bar cut straight across and the lock interface on the blade is angled to match the angle of the lock bar when the knife is in the open position.


That's how it is on my Koenig Arius, Sebenza, and most of my other frame locks. There are a few others that are similar, but that have a curve on the show side half of the lock interface. I guess the idea there is to prevent the lock bar from walking past the blade.
Yes, that's how it should be, The liner is cut straight and the bottom of the blade is slanted down from LEFT to RIGHT in the drawing. So if a straight level liner touching the slanted bottom of the blade, the left side of the liner surface it the point of touching the bottom of the blade like what I've been talking. Drawing (b) in my first post is greatly exaggerated. The idea is the same.
 
I am not sure my pics are telling the whole story. The tang and lock bar interface does have very close tolerances: here are a few more pics.

Also, I need a bit of help understanding what is right and left by your definition. I see contact on the right and the small gap on the left.View attachment 1994635
BTW, you got some seriously nice macro pictures. I was a photographer before also. It's NOT easy to take such clear picture for small object. I still have nice camera, but no macro lens. Well I did not put much effort in taking my picture, but NOTHING LIKE YOURS.

Ha ha, don't tell me you use your smart phone!!!! I know now a days, those stupid smart phone can take good pictures. I never try to take that close up, I still use my Nikon D7000 to take those pictures. I have better older film cameras, but who use those anymore!!!
Thanks. I used my older IPhone 11 Pro Max, which still works pretty good.
 
Thanks. I used my older IPhone 11 Pro Max, which still works pretty good.
Damn, those smart phones are going to put real camera out of business. I have to try mine. I already use the smart phone to take regular pictures already, never try close up pictures yet.
 
Back
Top