Crosscut Saw Thread

You can see the difference of cut in dry wood if you stay tuned up to the end if the film. The saw is more of a pleasure to use for cutting round and still green wood.

[video=vimeo;40409318]http://vimeo.com/40409318[/video]

E. DB.

Your a busy man Ernest. Very nice videos.:thumbup:
 
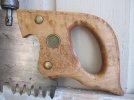
Picked this up recently, and wondered if anyone could shed light on the unusual shape of the blade. I'm used to them having more backbone, this one tapers down a lot at the tip. It is for some special purpose? It's an Atkins, if the button is anything to judge by. I made a new handle and stuck that on it, now I just need to finish my single man saw vise and file it.

IMG_2589.jpg

IMG_2598.jpg
 
.... wondered if anyone could shed light on the unusual shape of the blade. I'm used to them having more backbone, this one tapers down a lot at the tip. It is for some special purpose?

It's a one-man felling saw. The shallow spine is make room for the wedge to come in behind it.
 
Hm. Makes sense. Cool. Seems like that would be no fun. Hard to get much bite without gravity or a partner...
 
I've got a Simonds 223 with the same shape. Plenty stiff, since the steel is very good. See link for some pictures;

http://www.crosscutsawyer.com/viewtopic.php?f=12&t=434

This is the saw running below. cuts very good. No problems with the shape at all. I wouldn't be falling trees with a saw this small unless I had to, but for bucking being able to get a wedge in quick is also real important.

[video=youtube;-MHPAtd808U]http://www.youtube.com/watch?v=-MHPAtd808U[/video]
 
Picked this up recently, and wondered if anyone could shed light on the unusual shape of the blade. I'm used to them having more backbone, this one tapers down a lot at the tip. It is for some special purpose? It's an Atkins, if the button is anything to judge by. I made a new handle and stuck that on it, now I just need to finish my single man saw vise and file it.

View attachment 343117

View attachment 343118

Very nice VA :cool:
I've seen those, but don't have one... Yet ;)
 
If I ever ran into one before I couldn't remember it. Making the new handle was actually a lot of fun, used a combination of curves from the old handle and a disston one. Has a pretty pleasing feel to it, though some of the counter sink holes got off just a bit, which kind of pissed me off. Oh well though, overall it turned out pretty good for a first go at it.
 
Here's a photo of my makeshift saw vise. I'd love to have a real one but it just isn't practical for me to give up that much shop space for something I'm only going to use maybe once a year. So I just ripped a block of wood in half at a 25° angle and hot melt glued the halves to the jaws of my vise. Then I propped up the loose end of the saw with a runoff stand. It works OK but I have to keep repositioning the saw to keep the work close to the jaws. I tried 15° blocks first and that wasn't nearly enough tilt. 25° was OK but I might try 30° or even 35° next time.

Saw%20vise1.jpg


Here are some freshly sharpened teeth. The teeth facing the other way still have their flat spots from the jointing process.

Saw%20vise2.jpg


This saw needed some serious jointing. It took me over 5 hours to go through the whole sharpening process on this 48" saw. I hate to think how long my 90" will take. I've still got the saw apart for refinishing the handle but I'll post another pic once it's finished and put back together. It cuts like a dream right now. Helluva lotta work but worth it.
 
I was filing saws for about 4 bucks an hour last year. I remember one badly rusted simonds saw which was particularly tedious. That simonds steel is tough stuff.
 
Yeah, there is more value in the work put into sharpening an old saw then there is in the saw itself. Dolly Chapman charges $9.00 to $40.00 per foot of saw depending on condition. That's actually very reasonable.
 
I was doing full restoration, cleaning, straightening, etc for 20 or 25 bucks a saw. Some folks around here know I'm a sucker for anything to do with hand labor and metaphysics.
 
Here's a photo of my makeshift saw vise. I'd love to have a real one but it just isn't practical for me to give up that much shop space for something I'm only going to use maybe once a year. So I just ripped a block of wood in half at a 25° angle and hot melt glued the halves to the jaws of my vise. Then I propped up the loose end of the saw with a runoff stand. It works OK but I have to keep repositioning the saw to keep the work close to the jaws. I tried 15° blocks first and that wasn't nearly enough tilt. 25° was OK but I might try 30° or even 35° next time.

Saw%20vise1.jpg


Here are some freshly sharpened teeth. The teeth facing the other way still have their flat spots from the jointing process.

Saw%20vise2.jpg


This saw needed some serious jointing. It took me over 5 hours to go through the whole sharpening process on this 48" saw. I hate to think how long my 90" will take. I've still got the saw apart for refinishing the handle but I'll post another pic once it's finished and put back together. It cuts like a dream right now. Helluva lotta work but worth it.

That's a nice idea Pegs. I've got to rig something up for myself.
 
Picked up this saw yesterday at a garage sale and I know nothing about saws but would like to learn. The blade is 3 1/2 feet long, is marked "Superior" on the button on the handle, is perfectly straight and to my eye has no damage to any teeth.

Is this a crosscut saw? (told you I know nothing :-))
I will clean it up and so forth but then what do I need to do to get it to be usable? And who works on these saws anymore or where can I learn? I'm not giving up my chainsaws but I would like to have a usable crosscut saw for fun and for emergencies.


Thanks Steve
 
Col,
That is a one man crosscut saw, Champion tooth pattern. The link below takes you to the Forest Service manual on taking care of them. It's not all gospel but it's all pretty sound, especially for a beginner. Then you need to find a couple different kinds of files, a proper hammer or two, a jointer, probably a set of feeler gauges, and a pin gauge. Or something like that... And you'll need to build or improvise a vise too. It can take a fair bit of different hardware to get them sharp but if you enjoy tedious repetitive work with a low tolerance for error you'll love it. :-) I do. Check out the book and you'll have a better feel for it.
www.fs.fed.us/eng/pubs/pdfpubs/pdf77712508/pdf77712508dpi72.pdf‎
 
Thanks VintageAxe - I downloaded the Forest Service Manual and will have time to look at it today or tomorrow. Also searching on Craigs List to see if anyone near here works on these old saws. I see an adventure before me! :-)
 
.......but if you enjoy tedious repetitive work with a low tolerance for error you'll love it. :-)

I see you've done this before. :D

Professional saw filers will do the job for you. Typical cost ranges from $10-$40/foot, depending on condition. They will certainly charge you for cleaning so be sure to at least do that part yourself.
 
Got these practically for free the other day. 42" (in great shape) and 6 ft. (unusable)

tumblr_mqwzv7DUWl1r2ttnqo1_500.jpg

tumblr_mr1l4e0Z6G1r2ttnqo1_1280.jpg

This will be a nice upgrade from my bow saw once I sharpen it up and get some handles on it.
 
Last edited:
So, I found a maker's stamp on my one-man crosscut. It's a pretty elaborate etching but very faint and practically invisible. About the only things I could make from it are what appears to be a picture of an Eagle inside an oval. Below the eagle, it says "Established 1857" and towards the bottom it looks like "No.190" There's a bunch of other words but I've been staring at it for the past 2 days and I can't make any of it out because of the blotchy discoloration in the steel.

After some research, I came up with a few possible makers. [All founded in 1857]
Oldham Saw Co. -West Jefferson, NC
Cocker Saw Co. -Lockport, NY
E.C. Atkins & Co. -Indianapolis, IA
Johnson & Conaway (a division of Disston) -Philadelphia, PA

Of course, I can't confirm any of those without a photo of the stamp to match it to.

It's not much to go off of, but that's all I have so far. I can sortof see the whole etching, but it's too camouflaged by the discoloration in the steel to decipher the rest. Figured I'd put it out there in case any of that that sounds familiar to anyone.
 
Back
Top