-
The BladeForums.com 2024 Traditional Knife is available! Price is $250 ea (shipped within CONUS).
Order here: https://www.bladeforums.com/help/2024-traditional/
You are using an out of date browser. It may not display this or other websites correctly.
You should upgrade or use an alternative browser.
You should upgrade or use an alternative browser.
Ford Mustang knife ideas?
- Thread starter SDS
- Start date
Stacy E. Apelt - Bladesmith
ilmarinen - MODERATOR
Moderator
Knifemaker / Craftsman / Service Provider
- Joined
- Aug 20, 2004
- Messages
- 38,685
You mix the two parts and pour it into the cavity or mold ( the open area in the handle, in this case). It cures and becomes hard acrylic plastic.It is the same stuff that you see with bugs and scorpions cast in it. Most craft/hobby shops sell it, and some of the knife supply catalogs sell it too.
Many fancy bar tops and restaurant tables( the ones with shells and sand,etc.) are simply poured with casting resin. The edge is taped with a good stiff tape to make a lip to hold the resin while it is curing.Once cured you just sand to finer and finer grits and switch to a plastic polish.
Stacy
Many fancy bar tops and restaurant tables( the ones with shells and sand,etc.) are simply poured with casting resin. The edge is taped with a good stiff tape to make a lip to hold the resin while it is curing.Once cured you just sand to finer and finer grits and switch to a plastic polish.
Stacy
- Joined
- Feb 28, 2006
- Messages
- 3,494
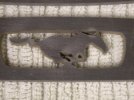
What a trip you guys. I'm glad to see you considering encasing the cutaway in the handle. I was worried about it being open cause the nose and tail could be possible snag points. If you don't encase it, you might want to consider having them touch the sides like the hooves, ear and mane do.
Good idea to practice casting the acrylic. The two challenge areas I have had are bubbles and cure out. Buffing it clear and smooth can be a bit tricky too. Don't get it hot while buffing or you'll either impregnate/contaminate the surface (use really clean wheel) or melt it a bit. I'm making it sound harder than it is. Obviously it's not that hard or there wouldn't be so many coins, bugs and shells in the stuff!
Another idea. Could David additionally cut the shape out of your scale(s) so you could inlay one or both sides on the handle? It'd make a different kind of look.


greatlakeswaterjet
I really hate bladeforums. Which is why I still co
- Joined
- Oct 8, 2007
- Messages
- 1,326
")
Getting the little emblems may be a chore in itself. Guess I'm going to have to hit some of the salvage yards although I would guess any mustangs have been pretty much stripped bare.
SDS
http://www.dallasmustang.com/page/p...=0&max=15&orderbyasc=description&orderbydesc=
- Joined
- Feb 28, 2006
- Messages
- 3,494
There are over 400 mold & trim parts for the mustang listed on eBay. I bet there's other stuff too.
http://motors.shop.ebay.com/_Car-Tr...1QQ_pcatsZ33637Q2c6030Q2c6028Q2c6000QQ_ssovZ1
http://motors.shop.ebay.com/_Car-Tr...1QQ_pcatsZ33637Q2c6030Q2c6028Q2c6000QQ_ssovZ1
- Joined
- Jan 15, 2006
- Messages
- 758
Good idea to practice casting the acrylic. The two challenge areas I have had are bubbles and cure out. Buffing it clear and smooth can be a bit tricky too. Don't get it hot while buffing or you'll either impregnate/contaminate the surface (use really clean wheel) or melt it a bit. I'm making it sound harder than it is. Obviously it's not that hard or there wouldn't be so many coins, bugs and shells in the stuff!
Wave a propane torch over the resin while it is still liquid. This heats the air in the bubbles, they rise to the surface and burst.
- Joined
- Oct 22, 2007
- Messages
- 1,389
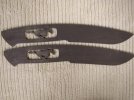
I got the blanks from David at Great Lakes Waterjet today and now I'm even more excited. I started doing a little bit of work on the pony but time and other factors have prevented me from getting to do much with it.
For those who have not done business with David I cannot recommend him highly enough. All of my dealings with him have been very positive and he is a stand up guy. If your on the fence about using his services you can use him without hesitation.
If anyone else is wanting to try their hand at one of these "Pony" knives give David a call. I'm sure he can cut out more easily and I'd get a big kick out of seeing what others end up with as a finished product.
SDS
- Joined
- Oct 22, 2007
- Messages
- 1,389
greatlakeswaterjet
I really hate bladeforums. Which is why I still co
- Joined
- Oct 8, 2007
- Messages
- 1,326
Shawn, it looks like the pony is coming to life! Thats awesome.:thumbup:
- Joined
- May 19, 2006
- Messages
- 3,721
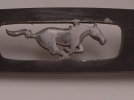
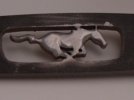
I got to do a little bit of sculpting to the pony this morning. I still have a lot of cleaning up and fine sanding to do to get rid of all of the scratches but I like the way it's shaping up.
SDS
dude, that is AWESOME! I can't wait to see that in person. Looks like it's gonne be a really neat knife.
Have you decided on filling in the handle or not?
take care man,
brett
- Joined
- Dec 3, 1999
- Messages
- 9,437
Just my $0.02, but I think it would look MUCH classier if you used white micarta and just did the red and blue with a couple spacers.
This is coming along VERY nicely. I am most impressed! :thumbup:
This is coming along VERY nicely. I am most impressed! :thumbup:
- Joined
- Oct 22, 2007
- Messages
- 1,389
Nick, your idea may be easier to do than what I was thinking. How wide would you suggest for the spacers? I assume your talking about vertical spacers from the top of the handle (pony's back) to the bottom of the handle (pony's belly)?
I'll try to draw something up to illustrate what I'm thinking. Your right, that may look better than what I had envisioned.
Thanks for all for all of the comments.
SDS
I'll try to draw something up to illustrate what I'm thinking. Your right, that may look better than what I had envisioned.
Thanks for all for all of the comments.
SDS