Ford Mustang knife ideas?

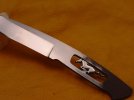
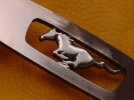
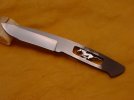
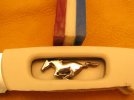
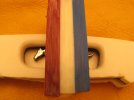
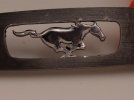
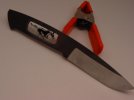
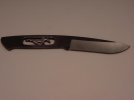
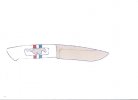
More pics of the blade ground and the pony polished out a bit more. Also added a picture of a possible handle finish. I like the way the thin 1/4" ribbon looks vs. the original way I had thought of.

SDS
 

Attachments

  • DSC00278.jpg
    DSC00278.jpg
    49.8 KB · Views: 165
  • DSC00280.jpg
    DSC00280.jpg
    21.1 KB · Views: 174
  • DSC00282.jpg
    DSC00282.jpg
    14 KB · Views: 125
  • Img0003.jpg
    Img0003.jpg
    12.9 KB · Views: 147
Last edited:
Shawn, thats looking just like I had hoped. The drawing is perfect. This gives me a bunch of new ideas for knife designs.:thumbup:
 
I'll TRY to get some up here before I leave this afternoon. I have the blade ground and heat treated but I'm still gathering materials for the handle. I'm taking the family to Colorado for vacation so all of the knives will be on hold until we get back.

I will try to update before we leave today though.

SDS
 
Here are a few more pictures. It doesn't look much different than it did before heat treat but I have worked on it some. Like I said before, I'm still getting all of the materials together for the handle and then I'll get it all assembled. I also want to do a little more work on the blade.

Thanks for all the help on this one and all of the positive comments.
SDS
 

Attachments

  • DSC00284.jpg
    DSC00284.jpg
    42.6 KB · Views: 72
  • DSC00285.jpg
    DSC00285.jpg
    51.9 KB · Views: 110
  • DSC00286.jpg
    DSC00286.jpg
    45 KB · Views: 124
Just my $0.02, but I think it would look MUCH classier if you used white micarta and just did the red and blue with a couple spacers.

This is coming along VERY nicely. I am most impressed! :thumbup: :cool:

when I first read the original post I thought of using spacers as racing stripes too. Great minds think alike :D
 
Great timing. I just came in from the shop and was working on this one most of the evening. The handle has been giving me some problems, mostly self induced. I've been working on other projects while I was trying to figure out some ways to do a few things. I think I have them about figured out though.

I got one side of the handle "window" done and I have the red, white, and blue stripes glued up and clamped as we speak. Hopefully in the next few days I can finish up the other side of the handle and inlay the stripes.

I don't have any in progress pics right now but as soon as it looks like something I'll try to get some posted up.

On a side note Phyl, I got to visit Honolulu this year. My first trip to Hawaii. Wow. That place is something to behold. Next time I want to try to get to Maui.

Take care,
SDS
 
Okay, here are a few in progress shots. It's not much to look at right now but hopefully it will be soon.

I still have to carve out the "window" on the opposite scale, inlay the "ribbon" and glue everything up. Then I'm going to finish up beveling the windows and finish hand sanding everything.

I have been trying to figure out the best way to inlay the ribbon and I think leaving the white scale one solid piece and milling out a slot for the ribbon to sit it will be the most sound way. It will leave the handle basically one piece and I think there will be less chance of anything coming apart.

If anyone has ideas of another way to do this please chime in.

Thanks,
SDS
 

Attachments

  • IMG_0480.jpg
    IMG_0480.jpg
    45.8 KB · Views: 104
  • IMG_0479.jpg
    IMG_0479.jpg
    41.5 KB · Views: 64
I think you should use very thin red, white and blue liners and behind the running mustang scrimshaw a black grill. Whatcha think?
 
Yes, the horse is polished out on both sides. I could still do the scrimshaw and just leave the handle scale for the other side solid, hiding the opposite side.

I was hoping that the red micarta would be a bit brighter but that is all I could find. Do you think the stripes are too large??

SDS
 
Soooooo, we're still holding our breath......

I guess I'm not sure I understand what you're doing with that killer knife handle. Are you casting a clear acrylic to encase the mustang and "ribbons"? Will the ribbons be just in the cutaway window area? Or, are you cutting the handle through from top edge to bottom edge on both sides, where the mustang is, to inlay the ribbon in there? Or is it something else yet.....?

Sorry to have missed you when you were in Hawaii. Lets get together next time!

All the best, Phil
 
Great project.
I was thinking of doing something Mustang replated for a friend I have that has a herd of of those pony cars. He still has his 67 we used to ride in during college - way back when it was new...
I'll try not to steal your idea and design, but it will be hard to do... :D
 
Phyl, I think on this one I'm just going to mill a slot in the narrow part of the handle above and below the "window" and inlay a small piece of the red/white/blue ribbon in there. It will only be on the top and bottom of the pony. I had considered encasing the opening in resin but for this one I think I'm going to just leave it open. When I finish up this side I plan to do the opposite side just like this one.

I'm still debating on whether to inlay a ribbon on the opposite side. I think it would look better with it but I don't want to risk the two ribbons not lining up.

Howie, this is just an idea. Feel free to do one yourself. I doubt two people could do a project like this and have them both turn out identically. PM inbound.

SDS
 
Cant wait to see this one done. you going to put some big pins in those scales to look like head/fog lights on the old Shelby's ?
 
Rusty, I wish I had thought of that. I don't have the holes in the tang for pins like that right now but I'm already planning on making another one and I may have to start looking for a large mosaic pin that will look like a headlight.

Thanks,
SDS
 
Back
Top