Introduction and a WIP

Status
Not open for further replies.
Now we come to the hardest part: Finishing the blade.
I've read all the info I can find in regards to blade finishing, but I still feel like I'm missing something.
I'm going to try to explain my process and problems in as much detail as I can.

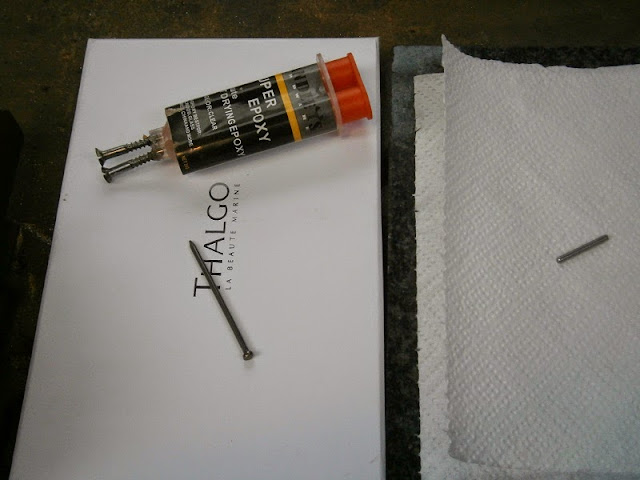
Here are the tools I used. Three hard-rubber lined sanding sticks, strips of 600 grit wet/dry sandpaper (in the envelope), some penetrene to keep the paper from loading, and in the syringe is some 20 micron diamond lapping paste. I've never tried the lapping paste before, so this is a bit of an experiment.
023.JPG


The blade is clamped to its support. Everything was cleaned prior to use.
025.JPG


Now I'll try to explain my sanding technique. This is the only technique with which I've been able to achieve satisfactory(barely) results.

With the sandpaper wrapped tightly around one of my rubber lined sanding blocks, I place the edge of the block in the plunge, then pull to the tip. I do this in as smooth a motion as I can.
If I do the same thing with the flat of the block, I get a noticeable line of short diagonal or hooked scratches where the back edge of the block was, Much like in this picture below(taken from earlier in the thread) but no where near as bad.
074.JPG

I assume that these scratches are caused by the initial jerk as the block starts moving.

However, using the edge of the block also has its problems. If the pull from plunge to tip isn't perfectly smooth, there will be some ripple to the scratch pattern.

Here is my sanding block wrapped in 600 grit paper, that brown goo is the diamond paste.
028.JPG


After a few hundred strokes.
029.JPG


Diamond cleaned off for inspection.
030.JPG


031.JPG


More sanding.
032.JPG


Cool plunge shot.
033.JPG


034.JPG


This is an area that fascinates and frustrates me, so I'd really appreciate it if any of you would like to share some of your knowledge on the subject.
 
Thanks for all the suggestions, guys.

Willie: I like the idea of moistening the wood to get the fibres to fuzz up, I'll be trying that.

Peter: The Cabot's product sounds cool, seems like it dries pretty fast, which I like. Is the other company you're thinking of Organoil perchance? I had planned on buying some Organoil Danish oil at Keith F's recommendation, I think I've seen it at Carbatec.


Have not seen Organoil at Bunnings but Masters has it. It's not the product I mentioned, the bottle was only about 250 ml and lasted me years. If I find it again I 'll let you know.


Edit. Found it "Rustins Danish Oil"
 
Last edited:
Will, try tipping your blade down 10 to 15 degrees. Dragging your paper downhill makes it harder to pause thus avoiding the fish hook scratches. A lot of guys have told me this method has really helped with their finish.
 
Will, try tipping your blade down 10 to 15 degrees. Dragging your paper downhill makes it harder to pause thus avoiding the fish hook scratches. A lot of guys have told me this method has really helped with their finish.

Thanks, Peter. That's the kind of advice I'm looking for:thumbup:.
 
Will, thanks for this WIP. I will be trying a few things you show especially with the guard fit-up. I use a similar process to you, except you have much better attention to detail, and significantly better results than me. I will be paying a lot more attention to these details. I don't have a lot to offer in this forum in terms of blades, but I do have a few tricks up my sleeve with woodworking.
 
There was a slight gap between the handle and fittings, so I got rid of that with some 220 grit sandpaper glued to some flat ground steel.
007.JPG


The guard face was looking a bit scuffed up, so I cleaned that up using the same method, but with 600 grit.
009.JPG


010.JPG


Time to glue some things together.
This is how I set up my bench prior to gluing. I try to have everything I'll need within arms reach. There are no paper towels in this photo, but there should be.
014.JPG


I use syringes to measure the resin and hardener.
015.JPG


Acetone and isopropyl alcohol for cleaning.
018.JPG


Mixing and cleaning sticks.
019.JPG


A fixture for seating the guard on the shoulders while the epoxy sets.
020.JPG


Fittings ready to be cleaned and glued.
022.JPG
 
After cleaning the oxides off the copper spacers, I cleaned everything with Acetone and then Isopropyl alcohol.
025.JPG


028.JPG


Measuring out the resin. I use west systems epoxy, the ratio is five to one.
2.5ml
030.JPG


031.JPG


0.5ml of hardener.
032.JPG


Mixing. My mixing container is just a glass jar with some wax paper over the top. The hardened epoxy just pops right out, so the paper can be reused if needed.
034.JPG


Not much is needed in between each piece.
035.JPG


All assembled.
037.JPG


038.JPG


Guard pressed up against the shoulders.
044.JPG
 
Once the guard epoxy has set (about a day) I Glue the handle on.
First I roughed up the tang a bit. I used 220 grit first, but then I decided to go to 120.
052.JPG


Then I cleaned the tang with acetone and alcohol.
057.JPG


After mixing a suitable amount of epoxy, I scrape it onto the tang to make sure it's really wetting the steel.
060.JPG


Then I inject the handle with the rest of the epoxy.
061.JPG


062.JPG


063.JPG


I want to have some overflow, just to let me know that there's no empty space in there.
064.JPG


I used rubber bands to keep the pressure where I wanted it.
065.JPG


I check on the knife often, to make sure that nothing has shifted.
068.JPG
 
That is a great tip - allowing the overflow to emerge from the pin hole - the clean up around the hand guard always gives me conniptions and this will fix it in 1 easy step. Many thanks!
 
Once the glue was cured I could install a pin. I decided that a peened and domed pin would look best on this knife, and would be most suitable should the handle shrink or expand.
The fist thing I did was clean the dried epoxy from the pin hole, for this I used a 3mm drill bit.
075.JPG


Then I used a tapered diamond file to slightly taper the hole to allow some room for expansion of the pin.
077.JPG


I tried a bunch of crazy stuff to protect the handle as much as I could, but I found that it just got in the way.
078.JPG


This was a first for me, so I practised a fair bit before attempting the real thing.
080.JPG


082.JPG


Here is a little anvil type thing that I whipped up for this task. It has a dimple in the middle to locate one side of the pin as I worked on the other.
090.JPG
 
I use 5 minute epoxy to seal around the pin.
091.JPG


Cleaning the pin with acetone.
092.JPG


I tried to get the pin evenly peened on either side before the epoxy started to set.
094.JPG


Tap tap tap.
096.JPG


Once the pin had expanded substatially, and the shape looked good, I taped the handle up and switched to abrasives.
I found this scotchbrite thing in a gutter:thumbup:
105.JPG


Buffing.
106.JPG


And the result.
107.JPG
 
Will, thanks for this WIP. I will be trying a few things you show especially with the guard fit-up. I use a similar process to you, except you have much better attention to detail, and significantly better results than me. I will be paying a lot more attention to these details. I don't have a lot to offer in this forum in terms of blades, but I do have a few tricks up my sleeve with woodworking.

Cheers, Willie.
I know nothing about wood, so I appreciate your woodworking tips.

That is a great tip - allowing the overflow to emerge from the pin hole - the clean up around the hand guard always gives me conniptions and this will fix it in 1 easy step. Many thanks!

Gavin, there was still some overflow around the base of the fittings, but not much. Maybe it could be completely eliminated if the tang was inserted more slowly.
 
Many thanks for that.
I'll keep this thread in mind when I'll work on my next knife.
 
Superb job and great looking piece Will, and I'm sure your wip will remain a great reference for many makers for a long time.
 
Status
Not open for further replies.
Back
Top