Introduction and a WIP

Status
Not open for further replies.
Now I take the fittings to 600 grit.
Guard face sanded, this time with the scratches orientated spine to edge.
018.JPG


Guard face taped up to protect the finish. This isn't the final finish, but I still don't want it to get all messed up.
020.JPG


This 304 is very easy to finish, it doesn't take long at all to remove the 320 grit scratches.
022.JPG


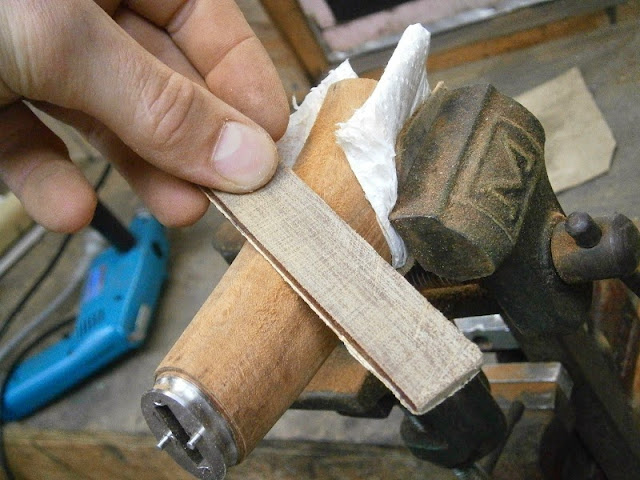
More sanding with the half cork.
023.JPG


This line here was bugging me, it just didn't look right, too harsh or something, so I rounded it over.
028.JPG


I think it looks much nicer with the line softened.
029.JPG


600 grit wrapped around the 4mm pinstock for the groove.
034.JPG


This is as far as I took it before making the handle. There's no point taking it to it's final finish, only to have it get all scuffed up during the rest of the build.
035.JPG
 
Handle time.
The wood is Tasmanian Blackwood.
036.JPG


I was worried that I might cut out a piece that didn't flow very well with the handle curvature, so I cut a little handle shaped window in some paper to make sure.
037.JPG


Marked out.
042.JPG


Cutting.
045.JPG


Void. Luckily It only extended a little way into the piece I was using, and was going to be cut off anyway.
046.JPG


Here I've angled the top face of the block so that the angle of the guard will not clash with the pattern in the wood. The top face is square to the back of the block (the face facing away from the camera).
048.JPG
 
cutting out the window for the handle on the paper pattern so you can orient the grain is brilliant!
 
What amazes me about every new maker I come across on this forum, by new I mean new to me, is the different processes that each have in place to reach the same end result. The detail and time that are put into these tools are what make them such beautiful displays of art and craftsman ship. To do such an amazing job you must be so much more than a machinist or blacksmith or carpenter... You must be equally as skilled an diligent in every task. I thank you sir for taking your time to post and continue this thread. It does not fall on deaf ears! You are a true artist sir!
 
Thanks everyone, I'm glad you're enjoying the thread.

If there are any stages in the build that you would like to see more of, let me know and I'll see if I can find some more photos.
 
With the fittings butted up against the top face of the handle, I trace around the tang.
052.JPG


055.JPG


Using a small square, I continue the lines across the top face of the block.
056.JPG


058.JPG


Hole locations marked. I just used one of my scribes to make indentations for the drill point to sit in.
061.JPG


My drill press vice can't be trusted. So I used this set up to make sure things were fairly square.
062.JPG


I marked out the drill paths with broken lines. Solid lines would have been easier to see.
063.JPG


I line the drill up with a line, tighten the vice, then drill.
065.JPG


067.JPG


I've been thinking that rather than using a terrible (terrible!) vice to hold the block while drilling, a better option would be to clamp the square side to a small angle plate. That, or buy a better vice.
 
Holes Drilled.
070.JPG


I finish the holes to the right depth using a hand held drill and a long series drill bit.
072.JPG


Here are my handle broaching tools. These things are great, I don't know how I ever got by without them.
073.JPG


074.JPG


076.JPG


I use one of the smaller broaches to get into and connect up the holes.
078.JPG


When it all feels like one hole, I do a test fit. This should give me an idea of where material needs to be removed from next.
I shine a torch down into the cavity to see where the tang has burnished the wood, then I try to remove material from those areas.
079.JPG


These broaches make it easy to remove too much material from the wrong places, so I try to only remove a little bit between each test fit of the tang.
082.JPG


Almost there
085.JPG
 
Flattening the top face, and adjusting the angle slightly so that the fittings sit flat.
095.JPG


098.JPG


I used some 5 min epoxy to temporarily stick the spacer to the top face.
101.JPG


Then I drill through the spacer holes into the wood. The spacer is thick enough that it forces the drill bit to the correct angle.
102.JPG


The spacer came off easily.
104.JPG


106.JPG


Now I drill the pin hole. I just marked the block through the hole in the tang.
108.JPG


110.JPG


Centre marked.
111.JPG


Drilled.
112.JPG


The tang hole was drilled oversize to allow for slight misalignment of holes, but even so I had to do some work with the dremel before the pin would slide through.
 
Opening up the hole with a carbide burr in the dremel.
117.JPG


I put some markings on the top face of the block to make it easier to see where not to grind.
121.JPG


122.JPG


Using a coping saw to remove big chunks.
129.JPG


Then I moved over to the grinder. I used a 36 grit belt for fast stock removal. The work rest is set to 90degrees.
140.JPG


Void city. Luckily there was still a lot of material to remove.
142.JPG


Handle profile roughed in.
146.JPG
 
Now I want to grind it very close to the final profile. When I mark out the final handle profile on the block, my main concern is flow. I want the line created by the top of the handle to continue on into the line created by the spine of the blade.
001.JPG


002.JPG


003.JPG


I also thinned the block substantially at this point. Here I am marking where not to grind, again.
006.JPG


007.JPG


Now the handle is very close to its final profile, though maybe a bit long in this picture.
022.JPG
 
To make sure that I shape the handle as symmetrically as possible, I marked a centre line.
The ricasso is held against the surface ground steel bar (covered in masking tape) while the centre line is scribed.
029.JPG


033.JPG


I made a paper template for the butt if the handle. I can easily tell when areas like this (guard faces, spacers etc.) aren't symmetrical, but I find it hard to tell where material needs to be removed from in order to restore symmetry, so reference lines help.
035.JPG


I grind the handle so it bulges slightly in the middle.
037.JPG


039.JPG


Next I take the edges off.
040.JPG


Soon I have an octagonal thing going on.
043.JPG


I take the edges off the new facets, and then grind wherever I think needs to be ground, until I'm left with something like this.
046.JPG
 
Now using 60 grit sandpaper stuck to micarta blocks, I refine the shape of the handle
049.JPG


051.JPG


053.JPG


055.JPG


I use a slightly curved piece to get into the inside curve of the handle.
056.JPG


057.JPG


062.JPG
 
The handle still felt a bit too clumsy for my liking, so I decided to sculpt it a bit.
065.JPG


Scooping out as much as I can with a 36 grit belt on the 10" wheel.
066.JPG


Rounding the butt
068.JPG


069.JPG


071.JPG


075.JPG


077.JPG


080.JPG


089.JPG
 
Will,

I joined this forum so I could thank you for the detailed and clear explanations - you have presented clear and usable solutions for several issues I have had.
Many thanks and as stated by others, great to see yet another talented Aussie maker.

Looking forward to seeing this knife done and dusted (I am wearing out the refresh button on my browser hoping for more!)

Regards

Gavin
Sydney
 
What I am doing with Wills WIP thread is making it a WORD document and then emailing it to my kindle account email. Then I can read it as a book on my Kindle app and it looks great on my Samsung Tablet.

As of now it is about 317 pages :eek:
 
Status
Not open for further replies.
Back
Top