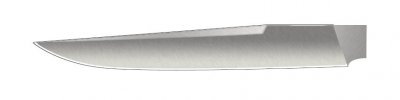
Let's Design Some Knives...

Phil
I've been following along here with out
Photoshop.
I have a new puter On order
(more power then Super Man):D
I'm thinking SP7 is out, can I use it or do I have to use
the PS6 as you say to use?
BTW Thanks for spending all this time on this.
I understand most of what your doing but it's driving me nuts
not being able to do it,
DUDE I'm getting a Dell, Jacked up
and trimmed out.:D ALOL:D
 
Originally posted by Graymaker

I'm thinking SP7 is out, can I use it or do I have to use
the PS6 as you say to use?

SP7 ?

If you mean Photoshop 7 (PS7) then of course you can use it...just don't bust my chops over all the cool features that you have, that I don't have on SP 6.

BTW, your Membership Appplication for DNA is on it's way to you...National Dyslexia Association.

Bwahahahahaha
 
LESSON #9

Open your BOWIE File.

In your LAYERS Palette make sure you have a New Layer activated that’s Not the BACKGROUND LAYER. In fact let’s Name these Layers, if you ALT + DOUBLE CLICK on the Layer a Dialog Box should open where you can Name and Color Code the Layer. How about “BLADE” and RED?

From your PATHS Palette, Click on the BOWIE Shape.

Click on Load Path As Selection Icon, (Third Circle from the Left Icon).

”Hey the Ants are back!”

Gradient Tool...STEEL #1 Selected...Click and DRAG from above the Clip to BELOW the Edge....LIKE THIS!

attachment.php


”Pretty darn Cool! But, what if I drag diagonally across the other way?”

Try IT! In fact try lots of different ways. Why don’t you try clicking and dragging from inside the Blade Shape? You can keep playing as long as the Shape is still SELECTED.

BUT....WHATEVER YOU DO...DO NOT DRAG STRAIGHT UP AND DOWN!

When you’re finished playing, let’s see if we can make this look even more like Steel.

In the LAYERS Palette, you’ll see a Box marked LOCK...Click the Box and make sure there’s a CHECK Mark in it. This will lock your transparent pixels...or in other words keep the next actions inside the lines of the blade shape.

In the FILTERS Menu > NOISE > ADD NOISE...Mine is set to 3.79%...Gaussian...Monochromatic CHECKED.

FILTERS Menu > BLUR > MOTION BLUR...withe the PREVIEW Box Checked...ANGLE -45º...DISTANCE 8 Pixels.

11640180.jpg


Control + D
Control + S
 
Let’s do the Grind and the Swedge, same technique, but with some changes, pay attention.

Open the BOWIE File.

Make sure you have a NEW LAYER selected.

In PATHS Palette, Click on the GRIND Path, Bring on the Ants...LOAD PATH AS SELECTION Icon.

GRADIENT Tool, STEEL #1...Start with your Cursor just above the middle of the Top of the Grind and Drag Straight Down to just below the Bottom of the Grind.

”Hey! Didn’t you say before Never to Drag straight DOWN?”

Hehehehehehe

LAYERS Palette, LOCK TRANSPARENT PIXELS.

FILTER Menu > NOISE > ADD NOISE 7%

FILTER Menu > BLUR > MOTION BLUR...Make sure your PREVIEW Box is Checked.
For the ANGLE you want to match the Angle of your PLUNGE.
Mine happened to be -74º and I used a DISTANCE of 8 Pixels.

11644005.jpg


Control + D
Control + S

SWEDGE

New Layer.
Paths palette, select GRIND, make ANTS.
GRADIENT Tool...STEEL #2...Start just behind the Point of the Blade and end just in front of where the Swedge starts.

Layers palette. Lock Transparent Pixels.

Filter menu > Noise > Add Noise. I used 4

Filter menu > Blur > Motion Blur... I used 13º

”Ohhhh ohhhh ohhhh! I have a Question...How the Heck did you get that DEGREE Symbol?”

It’s a MAC thing...try to stay focused will ya?

CONTROL + D
CONTROL + S

11644014.jpg


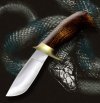
NOTE You can Adjust the BRIGHTNESS & CONTRAST of any of these LAYERS. In your Layers Palette, click on the Layer you want. IMAGE Menu > ADJUST > BRIGHTNESS/CONTRAST.

We’re just missing one thing, an EDGE on the blade.

In your TOOLBOX, select the PAINTBRUSH > 3 PIXELS > Hard Edge Brush...Start at the Point and paint....

”Wait a minute ya Bastid...You said NO PAINTING!!!’

Oh yeah, I forgot...Do this instead...

New Layer.

Paths palette > Grind path > Make ANTS

On Keyboard, Press D and then Press X. This will make your Foreground Color WHITE.

Edit menu > Stroke...Width: 3...Location: INSIDE...Mode: NORMAL...Opacity 100%...OK

Control + D
Contrul + S

From the NAVIGATOR Palette...Zoom in on the EDGE where it meets the CHOIL.
Toolbox > ERASER > Select the Hard Round 13 Pixel brush.
Click to erase the White Edge line where it goes up the grind line.
Move your Zoom Box up until you can see the top of the grind.
While Holding the SHIFT KEY....Click on the Corner.
Release the Shift Key...Move the Zoom Box until you can see the Point of the blade.
SHIFT + CLICK.
If there are any remains of the White along the grind line just erase them.

CONTROL + S

11644026.jpg
 
Phil
That's what I said PS7 :D
Dyslexia.?. My wife said that's the TIHS I have:)
I believe her OOT:( :D
this stuff is looking good Phil:cool:
 
(Ooops, forgot the rest of the post:)


Thanks PhilL for all the ideas! Maybe I can't make a real knife, but now I can play with cyber ones.

Steve
 
Steve, I think you did outstanding, methinks you've dabbled in PS before. It also looks like you took a peak at My Lesson Plan on what's coming up next.

I've been thinking that some of the Knife Makers might not want to post their new designs here, and I fully understand. I do encourage all of you to ask any questions, or post any comments here.
 
Sorry I didn't mean to jump ahead!

I do have to admit something. I don't know how to use PS.

I use Fireworks from Macromedia. Some of the things you mention are easier in Fireworks and some are harder or impossible. Like I didn't understand the 'ants' thing. Also, I tried to do the bolster thing, but couldn't pull it off.

However, I did, obviously, get all the ideas from you. I've never built anything that looked 3-D before. Your texture and highlighting tricks were really cool and easy to get the effect.

Besides I didn't cut myself while making it.

Steve

(BTW, whad ya think of my dream knife? Some day I'm gonna make one. Now if someone on the board would like to build the blade for me....)
 
Originally posted by itrade
Like I didn't understand the 'ants' thing. Also, I tried to do the bolster thing, but couldn't pull it off.
(BTW, whad ya think of my dream knife? Some day I'm gonna make one. Now if someone on the board would like to build the blade for me....)

The ANTS thing is after you've completed making a PATH, the third Circle Icon at the bottom of the Path's palette will turn your Path into a Selection. If you look at the canvas the shape kind of looks like Ants are Marching around it.

"In PATHS Palette, Click on the GRIND Path, Bring on the Ants...LOAD PATH AS SELECTION Icon."

I don't know what you meant by the Bolster thing?

Regarding your Dream Knife it looks very cool Dive Knife. I would drop the butt a little, narrow the handle behind the guard and add a thong hole.
 
RE: Bolster Thing

I was refering to the Brass effect and the shape. You really made it look round; shadows and all. I hope you'll explain that one.


RE: Changes to the knife.

I'll make the mods you mentioned and make a new bit map.

I can see the advantages of making knives in cyber-space first!

Steve
 
Well after looking at Steve's work I feel kinda goofy putting this out here but in the interest of "classmates" I'll share. Unfortunately this is the last time I'll get to join you for a week or so, so have fun!

Dave
 

Attachments

  • lessonsheffieldbowie.jpg
    lessonsheffieldbowie.jpg
    8.8 KB · Views: 231
Originally posted by itrade
RE: Bolster Thing

I was refering to the Brass effect and the shape. You really made it look round; shadows and all. I hope you'll explain that one.

Ya see Steve, that's what happens when you jump ahead.

Sure I'll explain how I did it. I'll give you a hint though, it did require picking up the Eyedropper tool.

I can see the advantages of making knives in cyber-space first!

Hurrrrrray! This was my whole reason for writing these lessons. To save makers time and money while desiging knives. It's faster and costs nothing to make changes in PS. Also, because people will know it's just a Vitrual Knife, I think people might be more open and honest in the critiques.

Dave, I think your blade is excellent. I like the way you did your flat grind and showed that these techniques can be used more subtle.

I hope you're back for my lesson on sizing pics for BFC.

Man, I hate scrolling to look at a pic.
 
once you design a Blade or a Handle, if you Save a copy of it, you can combine it with different elements.
 

Attachments

  • snake.jpg
    snake.jpg
    34.1 KB · Views: 241
Dave,

Don't feel goofy!! Besides I love your picture.

You got the edge on the blade. If you look again on mine you'll see I didn't. I tried, but couldn't get it right.

I have to go over Phil's lesson on that part again.

My first version didn't look so hot. So I added a handle, pins, and a blue background. Then it looked cool. It covered up where I cheated :D.

Steve
 
Folks, it's like anything else, the more you do it, the easier it will get.

Focus on the first couple of lessons, learn how to use the Pen Tools and you'll be able to design anything. The rest of this stuff is just window dressing. ;)
 
Great tutorial PhilL!
Just a couple of thoughts...
you can't do the 'free transform' function with certain tools selected (like the T for type tool), if your having troubles...go to the 'move' tool (top right in the tool bar) & see if that helps.

A shortcut, for when you're working fast & loose, is...
when done drawing with the pen tool (and you are sure you like it) hold down the control key. A submenu will come up under your mouse arrow, (it has to be in the drawn area) & you can choose 'make selection' that will give you the famous running ants, with out saving the paths, etc.
Again, if you want to change the shape, you'd have to redraw it.

I hope this helps a little and not confuses an excellent tutorial :D

I told Shane Taylor that I make knives too, only I make mine on the computer..."
He said:
"How do they cut?"
 
Originally posted by Ebbtide
you can't do the 'free transform' function with certain tools selected (like the T for type tool),

I hope this helps a little and not confuses an excellent tutorial :D

I told Shane Taylor that I make knives too, only I make mine on the computer..."
He said:
"How do they cut?"

Hey Wally, good to see you posting here. Yes, of course it helps. I posted a thread over at PhotoshopCafe, asking for somebody to check out this thread, just to keep me honest. ;)

I have no problem using the Free Transform Tool (Control + T) with the Type tool Selected. :confused:

If you want to show Shane how well these vurtual knives cut, I have a tut on doing "Fake Blood". :D

Next couple of Lessons will be going up tomorrow.
 
Back
Top