- Joined
- Oct 1, 1999
- Messages
- 6,490
I hope youve gone through the Basic Lessons and that youve found them helpful. I must have done a pretty good job because there have been very few questions, or maybe people are just looking and not doing. Im going to assume that some people have come this far and need just a few more techniques to help bring their designs to life.
All through these lessons Ive been giving you shortcuts you can type on your keyboard, they really do save you time when youre working. The two most valuable are:
CONTROL + S...To SAVE your work. I cant stress enough how important this is when youre working in PS.
CONTROL + Z...UN-DO...Undoes your last Action. It brings you back One Step. EDIT Menu > UNDO, does the same thing, but CNTRL + Z is faster.
What if CNTRL + Z doesnt bring you back far enough?
Go to the HISTORY Palette and Click on the change before you made a mistake.
Or, go to the FILE menu > REVERT...(This will bring you back to your Last Saved Copy).
Do you see why CNTRL + S is so important?
You may not know this, but when you learned how to use the Pen Tool, you also learned to use one of the best SELECTION Tools PS has.
CREATE DONT COPY!
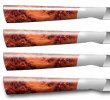
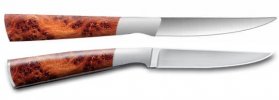
Lets say you have a photograph of a knife, but youd like to change the background.
Open the pic.
With your Pen tool place your Anchor points.
With your Convert tool make your curves match the subject.
Add points if needed with the + Pen.
Use the White Arrow to move any points.
When your Path matches the Subject, in your Paths palette Save it by Double Clicking on it...then make the ANTS march.
CNTRL + C...to COPY it.
CNTRL + D...to DESELECT it.
You know can Paste it...CNTRL + V...into any Background pic you want.
CNTRL + S.
Use CNTRL + T...to Rotate or Resize either the Subject or the Background.
Making either one Smaller to fit together is fine...Bigger will hurt your image.
Phil, how does this apply to the blade I just made?
Patience Grasshopper.
All through these lessons Ive been giving you shortcuts you can type on your keyboard, they really do save you time when youre working. The two most valuable are:
CONTROL + S...To SAVE your work. I cant stress enough how important this is when youre working in PS.
CONTROL + Z...UN-DO...Undoes your last Action. It brings you back One Step. EDIT Menu > UNDO, does the same thing, but CNTRL + Z is faster.
What if CNTRL + Z doesnt bring you back far enough?
Go to the HISTORY Palette and Click on the change before you made a mistake.
Or, go to the FILE menu > REVERT...(This will bring you back to your Last Saved Copy).
Do you see why CNTRL + S is so important?
You may not know this, but when you learned how to use the Pen Tool, you also learned to use one of the best SELECTION Tools PS has.
CREATE DONT COPY!
Lets say you have a photograph of a knife, but youd like to change the background.
Open the pic.
With your Pen tool place your Anchor points.
With your Convert tool make your curves match the subject.
Add points if needed with the + Pen.
Use the White Arrow to move any points.
When your Path matches the Subject, in your Paths palette Save it by Double Clicking on it...then make the ANTS march.
CNTRL + C...to COPY it.
CNTRL + D...to DESELECT it.
You know can Paste it...CNTRL + V...into any Background pic you want.
CNTRL + S.
Use CNTRL + T...to Rotate or Resize either the Subject or the Background.
Making either one Smaller to fit together is fine...Bigger will hurt your image.
Phil, how does this apply to the blade I just made?
Patience Grasshopper.


")

 I like it