"Living With a Little Giant" The rebuild and continued maintenance of my 50lb hammer.

Joined
Oct 20, 2008
Messages
5,547
IMG_6401.JPG

Here are the boys, wasting 6 hrs. of their Saturday helping me move this thing.
We figured it would take an engine hoist, 4 men and a boy, so from the left:
Zack's son Gabriel, Zack, Laif, and Barley.

It took a lot of effort to get the hammer out of the old smithy and onto the trailer. But we prevailed in the end.

Down at my shop, we picked the hammer upright again and set it on rollers.

IMG_6411.JPG


We pried, grunted and strained it along the trailer and onto some thick planks over to the door.

IMG_6412.JPG


The run to the door.
IMG_6413.JPG


The machine in position. Although it needs babbitt poured, of course I had to lift the shaft and crankplate up and set it on for fun.
IMG_6415.JPG


A little closer up.
IMG_6416.JPG


I mocked up most of the rest of the parts and got the cheesy pic with me all dirty and tired throwing a shaka.
IMG_6417.JPG


I found the serial number today, it's No. 950, a pretty early hammer. By the book, this would have been made in 1906. It originally would have had the K6 clutch spider (fibrous belting), but was retrofitted with the K06 spider with wood clutch blocks. It has the old-style ram with T-toggle links.

I need to order a spring, and rent the babbitting mandrel and collars. Guess I'll call up Little Giant tomorrow.

More pics to come. I'll try to document what I do with this hammer. Thanks for looking.
 
Last edited:
Yeah, I've got to jump in on this. I don't think your current spring with work good. But you could try willow it's springy. :)

Congratulations and good luck with your new hammer.

Dave from Diller
 
I just bought a piece of 2" round cold rolled for the mandrel. It was cheaper than renting after adding in the shipping. Worked out better since I had to pour the Babbitt twice to get it right.
Make sure you have at least 2 propane torches to keep up the temp as you pour. Not too difficult to get them poured. Be sure and build a shield and also a brake. The brake comes on when you let up on the clutch. Let's you make single hits.
I love my 50!
Chip Kunkle
 
I'll be following closely, My 25# has been waiting for a rebuild for about 20 yrs. I think it's time.
 
Congrats on the LG can not wait to see her all new again. Do you have to pour new clutch babbitt?
 
Good friends! That's what it's all about. :D
Oh yeah, heavy hitting hammer thingy also helps. ;)

Thanks for sharing Salem.
 
Here's a good one for those on face book. Go to Little Giants page and you'll find pics. of Sid pouring a babbit bearing.

Keep us posted of your progress.

Dave from Diller
 
I’ve been working on the hammer a bit more. I ordered some Babbittrite from Little Giant, got some more scrap babbitt, and Monday I’ll be going to buy some 2” cold rolled to build a dummy shaft for the pour.

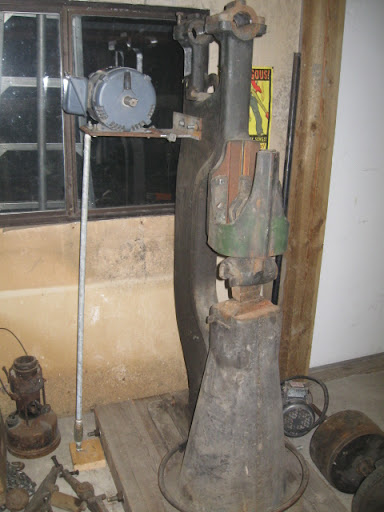
In the meantime, I’ve been dealing with the base and motor/mount. When I got this hammer, there was no motor and mount with it.

I got some 4x7 timbers and big bolts from an apple shed that I helped demolish. I cut four pieces, bored them, and bolted them together. Later, the hammer will be bolted down to it. Question: do you think ½”x4” lag bolts with lock washers would hold it down tight? This hammer is a pain to pick and remove the pad.

IMG_6570.JPG


I had on hand two electric motors, a 5hp 1725 rpm single phase Baldor, and a 2hp. 3450 rpm single phase Baldor.

The 5hp motor was the right speed, but way oversized for the job. It pulls 26 amps and weighs almost as much as the hammer does! :eek: Plus, it’s for the press build. I turned to the other motor. Just right, except too fast. I did all the math and looked around, I’d have to build a jackshaft to reduce the speed, and although I have a shaft and pillow blocks on hand, the three pulleys would set me back around $100. I think that’s a bit much to pay for a slightly clumsy solution.

I went to the junkyard today, looking for motors. I found a good one in new condition for $65! It’s a 3hp, 3phase 1750 rpm TEFC Magnetek. It draws only 9.6 amps at 220V, so I can run 14 gauge wire to it from the VFD. I found a pulley for $32 at Grainger with a 2.4” pitch diameter, (with 4L belts) which will yield +/- 348 rpm at the hammer shaft when driving the 12” flat pulley. Just right.:thumbup:

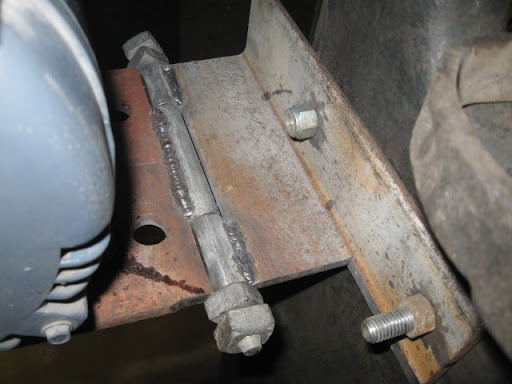
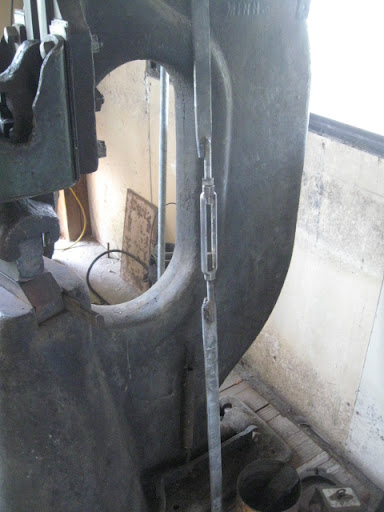
I scrounged around, and came up with some flat plate, some angle iron, some ¾” plumbing pipe, and some 5/8” all thread and nuts.

I welded the plates together to make the motor mount base. I filed the seam out of the pipe so the all thread fit through, and sectioned the pipe to make hinge knuckles.

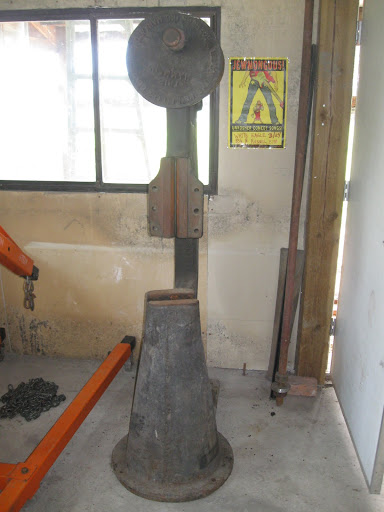
I measured the angle so the motor would sit with the pulleys centered, then cut it and drilled it to match the two holes in the side of the hammer frame.

I welded the middle hinge knuckle to the base plate, then the outer ones to the angle. I mounted the angle on the hammer frame, held up the base plate, and slid the all thread home. Then I propped it up and bolted the motor on. The weight of the motor will hold tension on the belts.

IMG_6572.JPG


IMG_6573.JPG


IMG_6574.JPG


IMG_6571.JPG


Of course, the shop is totally wrecked all over again. :eek:

IMG_6575.JPG


So far, so good. Hopefully I’ll pour the babbitt next week. A smith nearby has a spare spring and top die he’ll let me use for a while. Also, soon I have to bore out the toggle arm and link pin holes and turn new pins to fit. And, I’ll build a safety cage around the front of the moving parts.

More progress updates as I go. Thanks for looking.
 
Last edited:
A friend and top-shelf artist blacksmith, Gary Eagle, dropped by my shop with a mild drawing die to replace the top die on my hammer, which had been a plow-sharpening type. He also brought me a spring, the correct length for the old-style toggle linkage. He just happened to have this stuff lying around...

After initial frustration trying to remove the old top die, I turned to my fellow forumites here for expert advice. I got some good tips, Dave from Diller told me the trick that finally got it out.

I went at it with a big 'ol hammer and mild steel punch, had to dress the punch three times, changed my approach. I welded some 1/2' all thread to the end of the key, got a piece of 1-1/2 sq. tube scrap, slid it over the allthread, put washers and a nut on top. I proceeded with the whole draw it out/hammer the back end thing. That even took a LOT, but after a while I started having to tighten the nut every time and then it started to really slide out. I'm going to have to reshape the key a little bit, to fit the new die in- it's close, though.

Here's some pics of the process.

IMG_6740.JPG


IMG_6741.JPG


IMG_6742.JPG


I measured the dies, to see if they are still tall enough. The top is 3-1/8", the bottom is 2-1/2". 75% of the original die height is the maximum wear recommended for use by LG. The original height being 3-1/2" each, the bottom die is pretty marginal since 75% would be 2.625". The top should be fine for a good while yet. I'm just going to run it this way, and see how it performs.

I also picked up a 1/2" threaded turnbuckle, and dug some 1-1/4" x 1/4" flat bar out of the scrap pile. I welded it up into an adjustable clutch/treadle linkage rod. I'll cut the ends to length and drill them for bolts after I get the babbitt poured and the crankshaft back up.

IMG_6743.JPG


More soon.
 
Salem,

Looking good!!

I'd like to point out a couple of things from your photos. The first is your ram guide has been cut on the sides. A couple of causes for this is to weak of a spring and too short of a lower die. You'll find this on a lot of hammers most old time blacksmiths would do this when the toggle links started striking the ram guide. You will also find one or both toggle links rewelded when this happened. Since you've already obtained a new spring we can eliminate that.

The thing that really concerns me is your lower die. Like you said it is still usable, but I'd like to see at least a pocket knife blade tip width between your die and sow block. If the edge of your die sits on your sow block you could possibly blow out your sow block. Not good. A cheat I've found is to put a thin shim under your lower die to raise it up. In your case I'd use a sixteenth or eighth inch steel plate the full length of the sow block. This might cause problems with your die key though so I'd test to see which works better. You'd not believe the difference this makes in how hard a hammer hits. If you think about it the ram doesn't have to travel as far to hit the lower die.

Please take my advice light heartedly I'm a LG fanatic if you couldn't tell. Excellent thread by the way.

Dave from Dillerhammerschool2011 014.JPGhammerschool2011 006.JPG
 
Salem,

Please take my advice light heartedly I'm a LG fanatic if you couldn't tell. Excellent thread by the way.

Dave from DillerView attachment 219741View attachment 219742

Actually, I intend to take that advice seriously and follow it. Blowing out the dovetail is the LAST thing I want to do. A harder hitting hammer is also something to shoot for, so I'll be shimming that up.

You are right about the ram guide being cut, there are a couple other signs that the ram was traveling too far as well.

I may go buy the cold- rolled for the dummy shaft today. We'll see.
 
Salem, I don't know how I messed this. Like Dave, I'm also a LG fanatic. :)

I can't add anything to what Dave has already mentioned, just be sure to
do everything he says to do. He really knows what he's talking about.

Congrats, man! You will love the hammer when you get it up and running.
 
I love it already. I drove 60 miles round trip today for the dummy shaft, to find the supply had closed just before I got there. I'm going back tomorrow, and then- look out babbitt, your a$$ is getting melted!

I just got over 8 feet of CruForgeV in, it's 1-1/4" round stock. Between that and the big W2 rounds I have, the 1" W1 rounds, the pails of roller bearings I have and the tacked up billets sitting around, that hammer is going to get a WORKOUT right off the bat.
 
Back
Top