March of Dimes fundraiser 2011 WIP

WOW - this is going to be very fun to watch!

Nice blade Dave - great welding/forging job!

Bill Flynn
 
I'll start off by thanking John for asking me to participate in the project. It's a real honor, John! I'm happy to be working with all the guys involved in this project. I've used Dave's damascus several times, and I love it. I've had Paul make sheaths for my knives - just a great guy and fine craftsman. Although I haven't worked with Joe I've admired his engraving for a long time. Mark contributed a piece of killer ivory for this project. And John is a great organizer and craftsman too, and I love his stands.

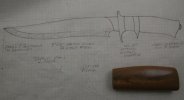
I've attached a picture of my original sketch with the ivory from Mark sitting on it. Knowing that a lot of guys here on BF like both ABS styles and contemporary sub hilts I went for a blending of both. Lots of curves including at the joints of the fittings and ivory. I think this will give Joe something a bit different to work with than the usual fittings. It will be made so that it can be taken down mostly for ease of construction and engraving, especially on the finial, but will be permanently assembled upon completion. I'll make a stud for the sheath so Joe can engrave it to match.

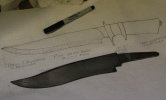
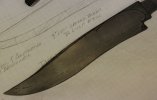
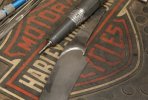
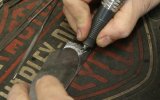
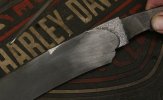
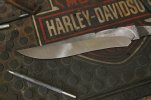
After seeing Dave's WIP shots I believe I need to do more on the blade than a simple flat grind. I'll have to think about what exactly to do while I'm waiting on the billet, and I'll probably get my fine point Sharpie out and doodle on the steel. I don't want to go overboard with carving and risk competing with Joe's engraving. There's got to be a balance here. We'll see.

I enjoy making WIP threads, and I like reading them as much as the rest of you do. I also like being able to participate in a charitable event like this when I can. I hope you folks enjoy all of it as well. This is going to be a blast!

David
 

Attachments

  • MarchOfDimes2010SHF1.jpg
    MarchOfDimes2010SHF1.jpg
    39.5 KB · Views: 174
I would like to say that John should be commended for this effort. Having had the honor of being one of the participants in one of the early "teams" I can see that he is learning something about putting together a team :):) Well done John. Thanks for having what it takes to drag these guys in for a good cause!!!
 
Dave's billet of damascus arrived today. Lisch, you did good! I had a couple of other things I should have been doing, but I couldn't resist. I smoothed it up and wiped it down with ferric chloride so I could see the edge, then drew the blade on it. I changed it from the original design by adding some carving. I hope all you guys don't mind!

David
 

Attachments

  • MarchOfDimes2010SHF2.jpg
    MarchOfDimes2010SHF2.jpg
    46 KB · Views: 187
  • MarchOfDimes2010SHF3.jpg
    MarchOfDimes2010SHF3.jpg
    46.1 KB · Views: 190
Very Cool David I thought you would do that. I had left it a little big of the pattern you sent me.
 
Very Cool David I thought you would do that. I had left it a little big of the pattern you sent me.

You're making extra work for me. If you'd just made an ordinary slab of steel it would have been easy, but nooooooo!
 
Folks, it's time to get this knife going. Here are some WIP pictures I've taken.

1. Making sparks! Dave L. forged the billet to shape and got it so close to my original paper pattern that I have very little to remove. That's convenient!

2. I'm finishing the spine of the blade with a fine belt. Slack belt grinding blends and smoothes it nicely.

3. Shaping the choil. I'm using files of various shapes. Here I've filed part of it.

4. Here I'm finishing the shape with a triangular file. Between it and a round file I'm defining the "S" shape.

5. Sandpaper and those files and other holders clean and smooth the choil.

More in the next post.

You guys and gals feel free to comment and ask questions.

David
 

Attachments

  • MarchOfDimes2010SHF5.jpg
    MarchOfDimes2010SHF5.jpg
    43 KB · Views: 169
  • MarchOfDimes2010SHF6.jpg
    MarchOfDimes2010SHF6.jpg
    54.3 KB · Views: 169
  • MarchOfDimes2010SHF7.jpg
    MarchOfDimes2010SHF7.jpg
    55.7 KB · Views: 203
  • MarchOfDimes2010SHF8.jpg
    MarchOfDimes2010SHF8.jpg
    51 KB · Views: 193
  • MarchOfDimes2010SHF9.jpg
    MarchOfDimes2010SHF9.jpg
    48.3 KB · Views: 203
More pictures:

1. The choil is clean and at its final shape.

2. I'm "carving" that element on the spine with a flat file. I cut the sweep that comes from the rear, then the small radius up and toward the front.

3. Here I am using a triangular file and my thumb as a guide to define part of the cut.

4. The upper element is shaped and I've laid out the lines for that sweeping cut that will define my ricasso/bevel transition.

5. Using my smaller rotary tool and an abrasive cut off wheel I'm roughing in the sweeping transition.

David
 

Attachments

  • MarchOfDimes2010SHF10.jpg
    MarchOfDimes2010SHF10.jpg
    24.5 KB · Views: 166
  • MarchOfDimes2010SHF11.jpg
    MarchOfDimes2010SHF11.jpg
    54.9 KB · Views: 166
  • MarchOfDimes2010SHF13.jpg
    MarchOfDimes2010SHF13.jpg
    21.1 KB · Views: 163
  • MarchOfDimes2010SHF14.jpg
    MarchOfDimes2010SHF14.jpg
    65.8 KB · Views: 197
  • MarchOfDimes2010SHF16.jpg
    MarchOfDimes2010SHF16.jpg
    55 KB · Views: 186
1. I'm using a diamond burr in my rotary tool to define the transition line. It's shallow up on the spine and gets deeper toward the choil.

2. Cut to shape and ready to texture.

3. I'm using a small carbide burr to cut the texture. It's on the harsh side for most of the ricasso area, but I've faded it toward the guard where it's shallow and softer. I don't want a bunch of gaps in the guard/blade joint!

4. All of the texturing on both sides is done.
 

Attachments

  • MarchOfDimes2010SHF17.jpg
    MarchOfDimes2010SHF17.jpg
    42.7 KB · Views: 180
  • MarchOfDimes2010SHF18.jpg
    MarchOfDimes2010SHF18.jpg
    40.8 KB · Views: 184
  • MarchOfDimes2010SHF19.jpg
    MarchOfDimes2010SHF19.jpg
    33.8 KB · Views: 183
  • MarchOfDimes2010SHF20.jpg
    MarchOfDimes2010SHF20.jpg
    35.6 KB · Views: 207
1. I'm roughing in the bevels prior to heat treating the blade. I'm using a pair of grinding jigs that were made by Harold and Carolyn Broadwell for me sometime in the late summer of 1953. They were finished and delivered in 1954. They still work well.

2. The blade is ready for heat treat.

I'm heading back out in a few minutes to get this blade in the oven. I'll have a few more pics later this evening.

David
 

Attachments

  • MarchOfDimes2010SHF21.jpg
    MarchOfDimes2010SHF21.jpg
    53.3 KB · Views: 172
  • MarchOfDimes2010SHF22.jpg
    MarchOfDimes2010SHF22.jpg
    71.3 KB · Views: 240
The guys who do this type of thing (and there are many) are what keeps me coming back.

Thanks to all who have participated in the past, to those working on this project and ones in the future. All of you just add to my enjoyment of our community.

You can already see David in that blade. ;).

Gus
 
Thanks, Men. I appreciate your words. I do believe this is a good cause. Some of us are old enough to remember the March of Dimes fundraiser and those cards our folks filled with dimes. There's been a little inflation since the 1960s so we need more than dimes! I'm hoping that this project will get a lot of you to buy the tickets and support the cause, that the winner really appreciates what has been done, and that all you guys who lost place your orders for similar knives! :D

Here are the last pictures for today:

1. Sorry, no shots of me plunging the red hot blade into the secret Broadwell blend of quenching oil. It would reveal my secret recipe of eleven herbs and spices, and it would require an assistant which I don't have. In this shot I've quenched the blade and am sighting along it to make sure it's straight. Lisch must have done a good job of normalizing this billet as it's very straight. (Never have had one of Dave's billets warp on me. Darn good iron!)

2. The oven is coming up to the proper temperature for tempering. I'll run this cycle and pull the blade, then go out later this evening and run it a second time. Maybe tomorrow I can get the blade ground.

Later,

David
 

Attachments

  • MarchOfDimes2010SHF23.jpg
    MarchOfDimes2010SHF23.jpg
    47.8 KB · Views: 100
  • MarchOfDimes2010SHF24.jpg
    MarchOfDimes2010SHF24.jpg
    52.2 KB · Views: 93
Oh!!! Man, David that is looking cool I'll be right here when you get some more pics
 
Back
Top