March of Dimes fundraiser 2011 WIP

Here are a few more pictures.

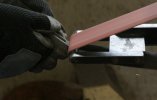
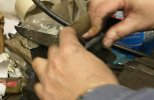
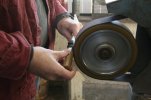
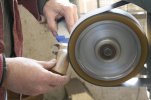
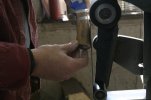
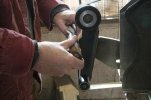
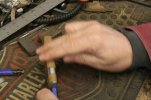
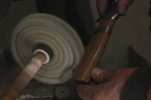
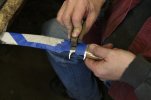
1 & 2. Roughing in the finger placements on the fittings with my small wheel attachment.

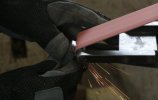
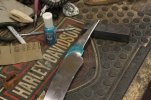
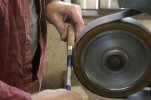
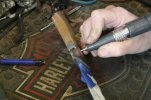
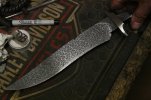
3. All the handle parts are roughed in, so it's time to finish the blade. I'm sanding with my final grit of sandpaper.

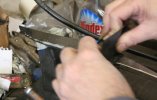
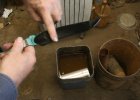
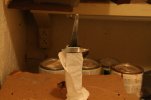
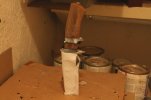
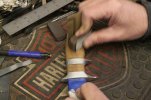
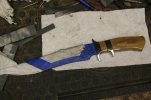
4. Masking off the textures with fingernail polish. It's a good thing I still have a daughter at home to buy my nail polish for me so I don't have to ask for it at Walgreens. The bad thing is she goes off to college next year.

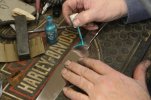
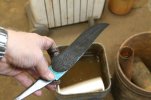
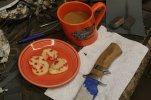
5. All the masking is done. It's break time while it dries. And speaking of fingernails, mine are pretty nasty looking!

Back out to etch the blade in a little while.

David
 

Attachments

  • MarchOfDimes2010SHF75.jpg
    MarchOfDimes2010SHF75.jpg
    18 KB · Views: 135
  • MarchOfDimes2010SHF76.jpg
    MarchOfDimes2010SHF76.jpg
    18.4 KB · Views: 131
  • MarchOfDimes2010SHF77.jpg
    MarchOfDimes2010SHF77.jpg
    36.3 KB · Views: 135
  • MarchOfDimes2010SHF78.jpg
    MarchOfDimes2010SHF78.jpg
    67.4 KB · Views: 146
  • MarchOfDimes2010SHF79.jpg
    MarchOfDimes2010SHF79.jpg
    77 KB · Views: 161
Can't wait to see that pattern!

Roger

Pattern? What pattern? The blade is made from 440c and it's a nice soft gray.


NOT!


I just finished the etching and finishing of the blade and am about to glue things up. I'll tell you that the pattern is awesome! It has an organic quality to it, and I love how it goes with my carving and the curves of the blade. But you'll have to be patient. I'll get some pictures posted later.

David
 
And speaking of fingernails, mine are pretty nasty looking!

not if you apply a nice helping of that beautiful seafoam blue fingernail polish to them.
 
You think that will help, Lorien?

1. Etching the blade. I've pulled the blade from the ferric chloride and rinsed it, and am wiping the sludge off with my finger. (That's not helping how my hands and nails are looking!)

2. Another rinse and I look over the blade to see how it's etching. I like an etch that's deep enough that you can feel the difference in layers. I repeat the etching, wiping and rinsing several times until I have what I want. (Here's your first look at the pattern, Roger.)

3. After getting the depth I want I clamp the blade back in my vise with the support block and polish the top layers with my leather faced block and worn out sandpaper. I then strip off the nail polish. All this is a simplified description. The process is really more complicated as any maker knows who's worked with damascus. I'm not going to go into more detail because I need to keep some things secret!

4. It's time to start the permanent assembly process. The first step that I use is to fit the guard in place and make sure it's properly seated on the shoulders. I put 5 minute epoxy in the back of the guard to seal it off. The quick stuff isn't particularly good at holding things together, but it sets quickly and doesn't ooze out the front of the guard. The purpose is to seal it off so that the longer setting epoxy doesn't flow out the front by capillary action before it gels. That is not easy to clean up!

5. Today I assembled the rest of the knife with System 3 marine epoxy. It's going to set up overnight. I'm going to watch a movie with my daughter. Y'all enjoy your Saturday evening.

David
 

Attachments

  • MarchOfDimes2010SHF80.jpg
    MarchOfDimes2010SHF80.jpg
    31.7 KB · Views: 149
  • MarchOfDimes2010SHF81.jpg
    MarchOfDimes2010SHF81.jpg
    52.9 KB · Views: 174
  • MarchOfDimes2010SHF82.jpg
    MarchOfDimes2010SHF82.jpg
    31.2 KB · Views: 153
  • MarchOfDimes2010SHF84.jpg
    MarchOfDimes2010SHF84.jpg
    45.9 KB · Views: 157
  • MarchOfDimes2010SHF85.jpg
    MarchOfDimes2010SHF85.jpg
    48.3 KB · Views: 170
You think that will help, Lorien?

uh, actually probably not. But it would make for an entertaining thread!:D
(not that this thread isn't entertaining enough as is, that is)
 
Here are the shots from this morning.

1 & 2. Grinding the sides of the handle and blending the ivory and the steel on the Square Wheel's 8" contact wheel.

3. Using my smaller rotary tool and a drum sander to true up and blend the area between the guard and sub hilt.

4. Grinding top of the handle.
 

Attachments

  • MarchOfDimes2010SHF86.jpg
    MarchOfDimes2010SHF86.jpg
    49.7 KB · Views: 116
  • MarchOfDimes2010SHF87.jpg
    MarchOfDimes2010SHF87.jpg
    46.2 KB · Views: 114
  • MarchOfDimes2010SHF88.jpg
    MarchOfDimes2010SHF88.jpg
    68.7 KB · Views: 138
  • MarchOfDimes2010SHF89.jpg
    MarchOfDimes2010SHF89.jpg
    48.6 KB · Views: 124
1. Slack belt grinding the back of the handle.

2. Slack belt grinding with a narrowed belt between the guard and the sub hilt.

3. A bit of a sneak peek at the blade. It's all finished with the guard in place. Taken before assembly. Pretty cool, huh?

Had some of those cracks I've mentioned to fill, so I got out the super glue and did it just before lunch. I'm about to head back out to finish the knife.

David
 

Attachments

  • MarchOfDimes2010SHF90.jpg
    MarchOfDimes2010SHF90.jpg
    49.3 KB · Views: 130
  • MarchOfDimes2010SHF91.jpg
    MarchOfDimes2010SHF91.jpg
    48.9 KB · Views: 126
  • MarchOfDimes2010SHF83.jpg
    MarchOfDimes2010SHF83.jpg
    68.3 KB · Views: 221
Here are the last pics for today. I may have one last little thing to do in the morning, or I may not. Won't know until later.

1 & 2. Hand sanding the ivory.

3. Buffing the ivory.

4. A very important step in the process of finishing this knife - taking a break! My daughter was home from school and making some cherry icebox cookies for friends. I get three that aren't pretty enough for them. That's okay. A couple of minutes after I took this picture they were gone. Taste is more important than looks! Had a mug of Starbucks to go with them.
 

Attachments

  • MarchOfDimes2010SHF94.jpg
    MarchOfDimes2010SHF94.jpg
    58.1 KB · Views: 128
  • MarchOfDimes2010SHF95.jpg
    MarchOfDimes2010SHF95.jpg
    66.7 KB · Views: 140
  • MarchOfDimes2010SHF96.jpg
    MarchOfDimes2010SHF96.jpg
    48 KB · Views: 131
  • MarchOfDimes2010SHF97.jpg
    MarchOfDimes2010SHF97.jpg
    65.2 KB · Views: 163
1. Now that I'm refreshed I can proceed with laying down a finish on the fittings. I mask off the buffed ivory with blue masking tape, then brush the fittings with SC sandpaper and a rubber eraser as a backing. I'm laying down a satin finish that should be a good base for the engraving.

2. The handle is finished. I will finish the faces of the finial and the sheath stud. The finial is left loose so that Joe can engrave it more easily. I'll permanently attach it and sharpen the blade after everything else has been completed. I'll see if I can't take a nice portrait of the knife in the morning, then get it in the mail to Joe Mason for some of his outstanding engraving.

David
 

Attachments

  • MarchOfDimes2010SHF99.jpg
    MarchOfDimes2010SHF99.jpg
    43.7 KB · Views: 128
  • MarchOfDimes2010SHF100.jpg
    MarchOfDimes2010SHF100.jpg
    61.8 KB · Views: 206
Handle looks great. Blade looks terrific. Now we need a pic showing both at the same time. :thumbup:

Roger
 
John, the cookies were excellent. Just what I needed to put down my best finish!

Roger, you may have to use your imagination for now. I believe someone is scheduled to take official portraits and I may need to hold off for now. We'll see.

I will say that the knife is really nice and I'm very pleased with how it turned out. Lisch's steel has an organic quality to it and I like the way it seems to coordinate with my carving. I'd be proud to put the knife on my table especially after it's engraved and sheathed.

David
 
David, Its breathtaking even in these pictures. You sure did a nice job on it and for such a good cause too.
 
O Man Nice job David I love the way it came together thanks for all your hard work and pics.
 
Hey guys, I really appreciate the comments. Just wait until everything else is done. I think it's going to be an awesome collaboration by all of us.

Thanks,

David
 
Back
Top