March of Dimes fundraiser 2011 WIP

Had a very busy weekend and didn't get a chance to adjust and post the pictures from Friday afternoon. Here they are.

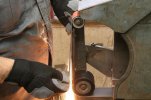
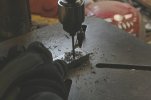
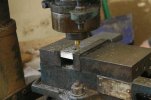
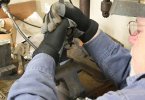
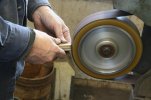
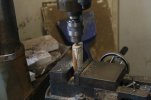
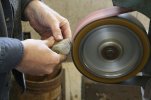
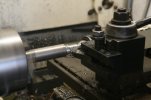
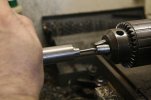
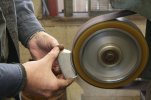
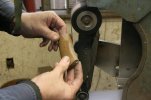
1. Flat grinding the blade after heat treatment. I'm working with a 50 grit belt in this shot.

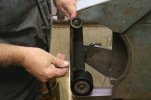
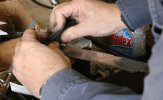
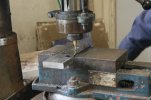
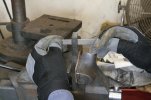
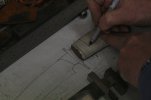
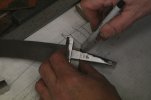
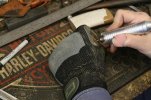
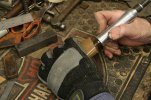
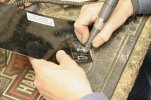
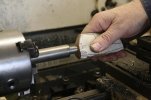
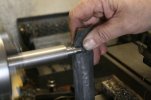
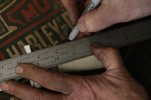
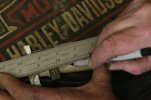
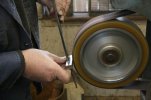
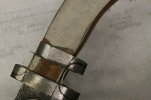
2. Finer grits here so the gloves are off. Let's me feel the heat so I don't overdo it.

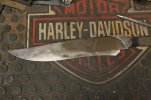
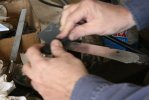
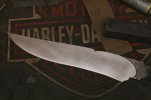
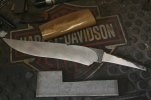
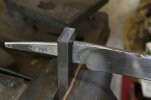
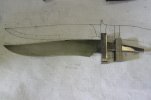
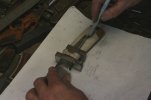
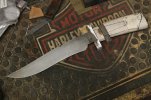
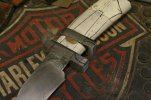
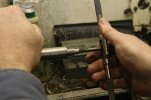
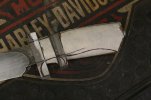
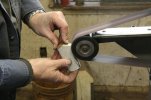
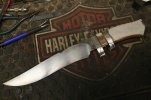
3. Pretty much ground to size and shape here. I'll fine tune it with a 400 grit belt, then it'll be ready for hand sanding.

I'll see if I can't get some more done this afternoon, maybe even start fitting the guard.

Thanks,

David
 

Attachments

  • MarchOfDimes2010SHF25.jpg
    MarchOfDimes2010SHF25.jpg
    53.1 KB · Views: 172
  • MarchOfDimes2010SHF26.jpg
    MarchOfDimes2010SHF26.jpg
    55.9 KB · Views: 170
  • MarchOfDimes2010SHF27.jpg
    MarchOfDimes2010SHF27.jpg
    61.6 KB · Views: 236
that pic with the sparks splashing off your shirt is very cool.
Looking great man:thumbup:
 
that pic with the sparks splashing off your shirt is very cool.
Looking great man:thumbup:

Yeah, until something ignites! A couple of weeks ago it was warm and I was working in a T-shirt and cut off jeans. I smelled something burning and looked on the floor to see if there was a piece of paper that caught the sparks. It was the fringe on my shorts.

Thanks,

David
 
don't grind in short shorts:D
 
Here's the latest update. Sorry to have taken so long to get on this knife. Filling orders (to pay bills) and dealing with my daughter's senior year and upcoming college stuff I'm overloaded!

1. I left off with the blade ground to size. Here I'm using a block of Micarta that has been machined flat. With this block, some 320 silicon carbide sandpaper, and Windex as a lube I'm "hard sanding" the bevels. The hard block helps insure there are no dimples or ripples in the bevels.

2. I'm using a wood block with leather epoxied to it as a block for finer grits of paper.

3. The blade has been sanded to a mid level. There's still some more to do later, but this shows me there are no flaws in the steel (it's Lisch's steel and I knew there wouldn't be, but I still go through the motions!) and I can begin the next process. I did wipe on a little etchant to see the pattern. It's outstanding! My edge profile follows Dave's piece on the blade, and the way the main mosaic body flows up and out the point is great! Too bad you guys can't see it. :eek:

4. Time to make a handle. That's a block of 416 stainless, and I'll be cutting a guard and sub hilt from it. I have the ivory here for a reference.

5. I'm using the blade to mark the ends of the slot I'll be cutting.
 

Attachments

  • MarchOfDimes2010SHF28.jpg
    MarchOfDimes2010SHF28.jpg
    30.9 KB · Views: 159
  • MarchOfDimes2010SHF29.jpg
    MarchOfDimes2010SHF29.jpg
    35 KB · Views: 146
  • MarchOfDimes2010SHF30.jpg
    MarchOfDimes2010SHF30.jpg
    44.4 KB · Views: 174
  • MarchOfDimes2010SHF31.jpg
    MarchOfDimes2010SHF31.jpg
    57.6 KB · Views: 176
  • MarchOfDimes2010SHF32.jpg
    MarchOfDimes2010SHF32.jpg
    47.9 KB · Views: 178
Here's your next set of pictures.

1. I've marked the 416 with a centerline for the guard and the ends of the slot, then center punched 5 holes. Here I'm drilling out those holes.

2. In my mill I'm using a 1/4" end mill to open up the back side of the guard.

3. With a 1/8" end mill I'm opening the front of the guard. I get it close to size.

4. With the block of 416 in my bench vise I'm filing the slot to fit the blade. I start by squaring the radius at the corners. Then I ink the inside of the slot with a large marker and push the blade in. Where it rubs the ink off is where I file.

5. I've done some filing and am pushing the blade into the slot. This is why I'm wearing the gloves. The blade has not been sharpened, but the edge is thin enough to cut my fingers.
 

Attachments

  • MarchOfDimes2010SHF33.jpg
    MarchOfDimes2010SHF33.jpg
    55 KB · Views: 145
  • MarchOfDimes2010SHF34.jpg
    MarchOfDimes2010SHF34.jpg
    56.3 KB · Views: 144
  • MarchOfDimes2010SHF35.jpg
    MarchOfDimes2010SHF35.jpg
    55.6 KB · Views: 154
  • MarchOfDimes2010SHF36.jpg
    MarchOfDimes2010SHF36.jpg
    59.2 KB · Views: 151
  • MarchOfDimes2010SHF37.jpg
    MarchOfDimes2010SHF37.jpg
    59.9 KB · Views: 166
1. Almost there. The tang is tapered on the sides. At this point there isn't much left to remove to get the guard to shoulder up. I'll tap the blade out and hit the high spots again.

2. As I get to the last little bit I put the blade in the slot, then remove everything from the vise. I've closed the jaws down close to the tang, but not gripping it. I'm pushing the blade down into the slot. I've found that if it's too tight, as in a press fit, the edge of the slot can easily be deformed. I don't want that, so I go for more of a metal to metal fit.

3. The guard is up against the shoulders. I've slotted another piece of 416 for the sub hilt in much the same manner, although it doesn't need as precise a fit. I'm using the original drawing as a spacing reference.

Tomorrow I'll be cutting into that nice piece of ivory Mark donated for the knife.

David
 

Attachments

  • MarchOfDimes2010SHF38.jpg
    MarchOfDimes2010SHF38.jpg
    55.4 KB · Views: 141
  • MarchOfDimes2010SHF39.jpg
    MarchOfDimes2010SHF39.jpg
    49 KB · Views: 138
  • MarchOfDimes2010SHF40.jpg
    MarchOfDimes2010SHF40.jpg
    54.2 KB · Views: 193
It's really starting to shape up David! Your time and effort in this project is very much appreciated, as well as the other participants, both past and present!!
 
Thanks, John. It's a privilege and a pleasure to build this knife.

Got some more work done today. Things are moving along pretty smoothly.

1. Marking the ivory for cutting. I've laid down a piece of masking tape. It's easier to write on it than the slick ivory. The front end is at an angle so I've drawn a line where I need to trim it and another line for the cut for the sub hilt. Then it's off to get the ends trimmed and squared in the mill.

2. I'm marking the profile of the tang. . .

3. . . . and transferring the lines to the front.

4. After drilling holes I cut out the excess ivory with a Foredom-like rotary tool until the piece slips on the tang up against the guard.

5. Squaring up the end of the larger block of ivory on the Square Wheel. I check it with a straight edge and my eyes.
 

Attachments

  • MarchOfDimes2010SHF41.jpg
    MarchOfDimes2010SHF41.jpg
    45.8 KB · Views: 120
  • MarchOfDimes2010SHF42.jpg
    MarchOfDimes2010SHF42.jpg
    50 KB · Views: 125
  • MarchOfDimes2010SHF43.jpg
    MarchOfDimes2010SHF43.jpg
    44.2 KB · Views: 126
  • MarchOfDimes2010SHF44.jpg
    MarchOfDimes2010SHF44.jpg
    82.8 KB · Views: 137
  • MarchOfDimes2010SHF45.jpg
    MarchOfDimes2010SHF45.jpg
    51.1 KB · Views: 128
1. Got the guard, first piece of ivory, and the sub hilt in place. I'm holding the big piece of ivory up against the sub hilt and drawing the outline of the tang on the tape.

2. I've sketched in the shape of the handle, then projected the tang extension out the butt end. There are some notes for the next operation.

3. Drilling and counterboring the butt of the handle.

4. Drilling out the front of the handle for the tang.

5. Using the rotary tool and a long burr to reach into the handle and remove material to fit it onto the tang.
 

Attachments

  • MarchOfDimes2010SHF46.jpg
    MarchOfDimes2010SHF46.jpg
    45.1 KB · Views: 119
  • MarchOfDimes2010SHF47.jpg
    MarchOfDimes2010SHF47.jpg
    47.5 KB · Views: 124
  • MarchOfDimes2010SHF48.jpg
    MarchOfDimes2010SHF48.jpg
    49.7 KB · Views: 118
  • MarchOfDimes2010SHF50.jpg
    MarchOfDimes2010SHF50.jpg
    52.7 KB · Views: 123
  • MarchOfDimes2010SHF51.jpg
    MarchOfDimes2010SHF51.jpg
    81 KB · Views: 136
1. All of the ivory and steel parts in the handle stacked in place. The ivory that Mark sent had a nice curve across it's back and I've pretty much incorporated it into the handle shape of the knife. It's a nice piece of mammoth, caramel all the way through with nicely contrasting cross hatched grain and some cracks (filled of course) for character.

2. I'm putting black G-10 liners between the ivory and the fittings. I'm using my smaller rotary tool and a small carbide burr to cut out the slots.

3. With all the liners in place the other parts butt up cleanly and have little movement.

4. Time to make the tang extension. I'm turning it from HR mild steel.

5. I've slotted the large end and drilled it to form a clevis. It's sitting in place with a removable pin. I've also glued the G-10 liner to the end of the handle. You'll see why later when I start shaping things.

More tomorrow.

Thanks,

David
 

Attachments

  • MarchOfDimes2010SHF52.jpg
    MarchOfDimes2010SHF52.jpg
    88.7 KB · Views: 142
  • MarchOfDimes2010SHF53.jpg
    MarchOfDimes2010SHF53.jpg
    79.7 KB · Views: 118
  • MarchOfDimes2010SHF54.jpg
    MarchOfDimes2010SHF54.jpg
    68.4 KB · Views: 139
  • MarchOfDimes2010SHF55.jpg
    MarchOfDimes2010SHF55.jpg
    43.7 KB · Views: 119
  • MarchOfDimes2010SHF56.jpg
    MarchOfDimes2010SHF56.jpg
    67.2 KB · Views: 131
Man, you're really moving along. That's a nice rich caramel colour on that ivory.

Roger
 
Roger, I wanted to have this done last month. Just now finding the time to finish it up.

1. Profiling the butt. I'll have it to its final shape before assembling the knife.

2. Time to make the knife's finial and the sheath's stud. I have a stick of 416 in my lathe and am turning it down to about 1/2". I don't have any smaller round stock so I'm starting with 7/8" rod.

3. There is a 3/8" counterbore in the handle. I think I'll skim about 1/32" off the end of the finial so the flange sits closer to the handle.

4. Running a bottoming tap into the finial.

5. Sanding with SC sandpaper and a piece of leather for backing.
 

Attachments

  • MarchOfDimes2010SHF57.jpg
    MarchOfDimes2010SHF57.jpg
    48.8 KB · Views: 96
  • MarchOfDimes2010SHF58.jpg
    MarchOfDimes2010SHF58.jpg
    50.7 KB · Views: 101
  • MarchOfDimes2010SHF59.jpg
    MarchOfDimes2010SHF59.jpg
    47.6 KB · Views: 105
  • MarchOfDimes2010SHF60.jpg
    MarchOfDimes2010SHF60.jpg
    56.2 KB · Views: 103
  • MarchOfDimes2010SHF61.jpg
    MarchOfDimes2010SHF61.jpg
    53.3 KB · Views: 115
1. Running a tap into the stud. Paul uses 8-32 screws on the sheaths. I've parted off both parts and just faced the ends for now.

2. Time for the final layout of the handle. It's a little hard to see, but I'm laying my machinist's rule along the top edge of the blade and transferring a line to the handle.

3. Now I'm lining up the rule with the choil and transferring that line onto the handle. That's how you get "flow" on a knife.

4. The finished layout on the handle.

5. This will give you a sense of proportion and size.
 

Attachments

  • MarchOfDimes2010SHF62.jpg
    MarchOfDimes2010SHF62.jpg
    51.3 KB · Views: 98
  • MarchOfDimes2010SHF64.jpg
    MarchOfDimes2010SHF64.jpg
    51.3 KB · Views: 100
  • MarchOfDimes2010SHF65.jpg
    MarchOfDimes2010SHF65.jpg
    55.3 KB · Views: 104
  • MarchOfDimes2010SHF66.jpg
    MarchOfDimes2010SHF66.jpg
    57.5 KB · Views: 108
  • MarchOfDimes2010SHF67.jpg
    MarchOfDimes2010SHF67.jpg
    50.5 KB · Views: 153
Very sweet looking. And like stated earlier.... thank you for a look into how such nice steel is make and worked with. Rock on!!!!
 
I just saw on my header that I'm a service provider. Makes me sound like the electric company!

1. Removing the excess material and shaping the underside of the handle.

2. Grinding the sides of the guard to even it up (remember that it was sawn from a wide piece of steel). I'll rough it in close to its finished size so I don't have to do that and generate a lot of heat with the ivory attached. I'll do the same with the sub hilt.

3. Eyeballing the fittings to get them even.

4. Back to the ivory on the 3" wheel. I form the shape, then round it. It's slipped on and off the tang several time until I get it even. If this were a block of wood that was squared up it would be pretty easy, but the ivory is not even to begin with.

5. Slack belt grinding with a fine belt. This smoothes and evens the underside of the handle. A little hand sanding and buffing of the area behind the sub hilt and it's finished.
 

Attachments

  • MarchOfDimes2010SHF68.jpg
    MarchOfDimes2010SHF68.jpg
    52.4 KB · Views: 87
  • MarchOfDimes2010SHF69.jpg
    MarchOfDimes2010SHF69.jpg
    48.7 KB · Views: 88
  • MarchOfDimes2010SHF70.jpg
    MarchOfDimes2010SHF70.jpg
    49.8 KB · Views: 87
  • MarchOfDimes2010SHF71.jpg
    MarchOfDimes2010SHF71.jpg
    47.5 KB · Views: 93
  • MarchOfDimes2010SHF72.jpg
    MarchOfDimes2010SHF72.jpg
    46.6 KB · Views: 92
Thanks guys. Cohea said he wanted WIP pictures. It's fun and doesn't add too much time to an already complex project. Besides, I'll post some on my Facebook page and hopefully educate and attract non knife people to what I do.

1. I've put the handle together. You can see why I have to finish the handle just behind the sub hilt. There's no radius there. The ivory butts up against the sub hilt fitting.

2. Here's the whole knife at this point. I'm pleased with the way it's going. Hope you all are too.

I'm heading out the shop now. I'll rough in the finger placements in the fittings, the finish sanding the blade. I should be etching it this afternoon, and if that goes well (and there's no reason to believe it won't) I'll glue everything up by the end of the day.
 

Attachments

  • MarchOfDimes2010SHF73.jpg
    MarchOfDimes2010SHF73.jpg
    53.9 KB · Views: 93
  • MarchOfDimes2010SHF74.jpg
    MarchOfDimes2010SHF74.jpg
    65.9 KB · Views: 153
Back
Top