Mod'ing The CS Trail Hawk

Lets see if I can crash some 56K


I wrote this a while back for the forum, thought it might help if it was in this thread since it was stickied. Hope no one minds. If so, ill remove it.

With all the interest in modding the lower end of the Tomahawk world, I decided to put together a quick rundown of how I mod, and assemble these Hawks.
First off, I realize that MANY members on this board build FAR superior Hawks than myself,and I by no means, mean to offend their work. This is just a step by step process of how I put them together and I thought some members could pick up some tips I have learned, as well as suggesting some to me that I may not have thought of.
Lastly, all of this work was done in my fathers and my shop. He is a retired Machine Shop Owner, and an old-school Machinist of the finest order. I realize that not everyone will have access to some of the tools and processes that I use, but nearly all of this can be accomplished with lesser tools, while still achieving the same end results.
I had to break this down into 2 different threads, as the forum will only allow 10 pictues per post.


Here we go.
I am doing this Hawk for a co-worker. He is full blooded Native American, and has agreed to trade me an authentic War Hammer in exchange for this Hawk. He wanted something simple, effective, and not very modern looking.
This is no stranger to you all, The CS Trail Hawk, in all its $19.95 Glory.
This was one of the better handles I have gotten as of late. Straight grain, and a ton of meat above the head.

tomahawk1.jpg


First we will address the head. Inside the "eye" there is usually 1/8in of rollover material. If not removed, this will cause the head to grab the handle premature, and not allow for a good seat.
tomahawk2.jpg


My weapon of choice to remove this is an air grinder with an abrasive stick.
tomahawk3.jpg


A few rounds inside the eye, and we are looking good and smooth.
tomahawk4.jpg


Next I hit the head with a small belt sander. I remove all the rough slag, and take off as much of the finish as I can. As well as remove that pesky "Taiwan" stamp. You know you hate it. The finish that CS uses is TOUGH.
tomahawk5.jpg


Back to the handle for a bit. You can see where the rough inside of the head has gouged the handle from the factory, this is what we want to prevent. A few quick hits on the belt sander, and we will be good.
tomahawk6.jpg


Ahh, a snug fit all the way around. This may take a few times of sanding, and eyeballing. You want there to be no gap between where the handle meets the eye.
tomahawk7.jpg


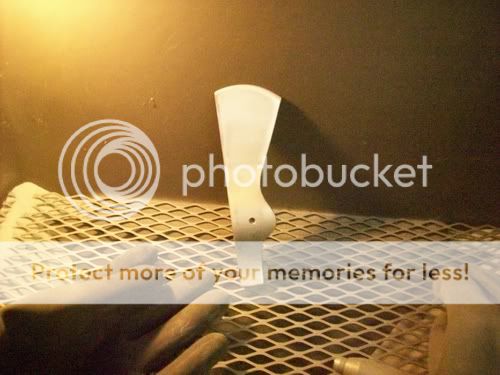
Once we have a good fit, its back to head prep. A sandblaster is by far the easiest way to do this. It also provides a great surface for paint to adhere to.
tomahawk8.jpg


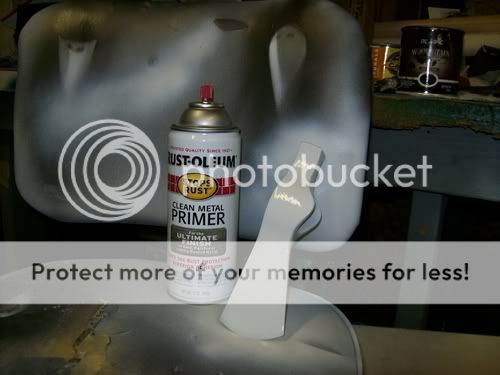
After the blasting, I give the head a good bath in water and soap. Then, hit it with a coat of primer.
tomahawk9.jpg


While that is drying, I decided to hit the handle with the ol Fire Wrench (torch) to add some character, and give it an aged look.
tomahawk10.jpg


Continued in pt2.
 
Continued from Part 1

After the torch, I hand sand with 150grit, then work my way down to 400. Your hands are the best judge of when she is smooth. Also, run a soft cotton rag up and down, feel for the snags. If the cloth hangs, sand a tad more till the cloth will glide over without snagging.
Now for the stain. My friend wanted a darker Hawk. This particular color is Black Cherry. I did 2 coats, and lightly sanded with 400grit after it dried.
tomahawk11.jpg


Head Paint. Some use powdercoat, some like parkerized, other like a natural look. Consider that nearly no coating will stand up forever. Once you use the hawk, its going to get worn. I went with Rustoleums Hammered in a dark bronze. 2 coats.
tomahawk12.jpg


Back to the handle. I am using Minwax rub on poly. This stuff is pretty tough.2 coats, sanded with 400grt at the end.
tomahawk13.jpg


Now that we are all dried, and prepped, its time to install the head. This is the best method I have found, and if done correctly, makes for a HELL of a strong fit. I have yet to have one loosen up on me. First, we heat the head in an oven at 200deg for 20min. This will cause the eye of the head to expand, and allow it to go further up on the handle. We are using a 2lb deadblow.
Liberal disclaimer-Things tend to get hot when you put them in the oven, consider gloves for removal.
tomahawk14.jpg


After the head has heated, we remove it from the oven, slide it down the head, take the handle if your weak hand with a modest grip. With several STRONG, and accurate blows, give the top of the handle a good rapping. This is my father going through the process so I can make the picture.
tomahawk15.jpg


tomahawk16.jpg


There are a TON of threads on how to haft-wrap, so ill spare you. Citizen Q did and EXCELLENT pictorial walk through.

And here we are, all modded, wrapped up and ready for delivery and hard use. I originally did a small bit of wrapping below the head just because I thought it looked cool, but after using my hawks, it really does a good job of catching some missed strikes, and will save that nice handle from a premature death.

tomahawk17.jpg


tomahawk18.jpg


Well, that's it folks. If I missed anything, you have some suggestions or questions, feel free to contribute.
 
I just sand blasted the head than used a cold blue process and the head looks nice the best thing about cold blue is that once you get back from camping a dry to the touch finish/repair juob only takes five minutes....
 
I just sand blasted the head than used a cold blue process and the head looks nice the best thing about cold blue is that once you get back from camping a dry to the touch finish/repair juob only takes five minutes....

And you have no pictures for us???!!!
massueassome.gif
 
I just sand blasted the head than used a cold blue process and the head looks nice the best thing about cold blue is that once you get back from camping a dry to the touch finish/repair juob only takes five minutes....

amen.

that's why i love just good ol' paint, as well.

sound wisdom.


i am trying to get started Duracoating some heads for Special Orders - some folks say to Parkerize the heads first.

any opinions out there on that practice...?

vec
 
amen.

that's why i love just good ol' paint, as well.

sound wisdom.


i am trying to get started Duracoating some heads for Special Orders - some folks say to Parkerize the heads first.

any opinions out there on that practice...?

vec

the cold blue I was using is a three step process...degrease, use cold blue with a rag..rinse in cold water after 60sec....done

duracoat rocks as a firearms finish but yes you want to parkarise fist.......we are about to learn/discuss a new topic on refinishing monday Our profeesr is going this weekend to get certified in the coating....

it is a ceraminc paint that is hard like ceramic but will not flake.....as they paint a metal surface with it then tell you to strike it with a hammer...no scuff, marks or scratches...and I cant remeber what it is called...but I will take notes monday


as for no pics I dont have a cam....

thanks for the good info, brother burningcort.

sounds like you are talking about Cerikote, which makes me all tingly inside.

someday....


you taking an armorer's course or something...?

thanks for the elaboration.

vec
 
thanks for the good info, brother burningcort.

sounds like you are talking about Cerikote, which makes me all tingly inside.

someday....


you taking an armorer's course or something...?

thanks for the elaboration.

vec

Associates Applied SCience Gun Smithing from Murray State College...one of the four colleges in the U.S. to offer it......

but it was no Cerikote because in the long run Cerikote chip...this stuff is supposed to be 98-99% chip resistant......

Finished my Trail hawk today

Sand Blasted then Cold Blued the head.....

Sanded the handle then Tru-oil and a coat of black shoe Polish.....then after I let the shoe polish dry for 6 hrs...I steel wooled all of it off to give the wood a burned/old dark oil color....

Gripped from bottom 85% of the Handle with Green 550 cord....

I am going to see if I can borrow a Cam from a buddy....
 
Burningcort: that is undoubtedly a UFO...not a trailhawk! Worst trailhawk picture ever! ;)

gatmog: That is one SWEET 10/22. Tell us what you did to it. What optics did you use? :thumbup:
 
CitizenQ, The 10/22 is outfitted with a tapco t6 stock modified to fit a GM heavy tapered barrel. The opic is a Mueller APV--best entry level scope I've seen! 4.5-14 magnification with enough clarity to use for spotting little .22cal holes at 50yds =-]

I'd say the rifle is minute of eyeball at 50yds! I've also stoned the hammer/sear contact down to about 4lbs--just enough to be drop safe when in the woods. I also installed an extended magazine release and modified my bolt release to release upon pulling the bolt back from the locked position. Can't say I'm the greatest shot, but the rifle surely will outshoot me..

Man oh man, if you guys thought trail hawks were addictive!!! Lots of 10/22 users at rimfirecentral.com, but be warned, they're addictive!
 
My First Modded Trail Hawk-

3-9-08018.jpg


I say first because this was a lot of fun, and assuming it passes my tests once it hits the woods, I'll be getting a couple more of these to dress up!

3-9-08021.jpg


There isn't too much about mine that's revolutionary, but the package fits me well and is very simplistic. On the head, I just slowly hand sanded until only specs of black were left in the cracks from the forging. I had originally intended to fully strip it, but it looks so cool and 'fresh from the forge' this way. I think it will still do a good job protecting from rust, since it's deep in the cracks, but of course it will still require a lot of care overall compared to any paint type finish.

3-9-08023.jpg


I wasn't happy with the edge when I got the hawk, so one of the first things I did was sit down with a bastard mil file and a rigged-up jig to thin it out a lot. Looks like a scandi hawk now! But it will slice like none other and easily shaves me. It's got a slight convex edge to it (fine grit sandpaper on a mouse pad, plus cardboard strop). I don't believe that I've weakened the edge such that a throw or chop will damage it, and even if that happens I'll just take the edge back as far as any dings/dents and have a steeper angle for next time.

3-9-08019.jpg


3-9-08024.jpg


The haft was sanded heavily by hand, then three coats of walnut stain were applied. I put three coats of polyurethane on top of that, sanded between each application.

I did a simple paracord wrap at the top and bottom. I wanted a top one to protect from bad strikes and the bottom is pretty much for 'looks' and aesthetic balance. I applied some hairspray on the haft before and after the wrap to help keep them in place a little more securely. I tried doing a 'full' wrap at first, at both the top and across the bulk of the handle, but I didn't like how much fatter the grip was after that (odd, because usually my first complaint about a knife is an overly tiny handle!).

3-9-08020.jpg


Overall, I like how it has turned out and how it handles right now. I've done some very light chopping around the apartment and a lot of choking up + slicing, and it's performed quite well. The main competition for this is my Fiskars, which makes for big shoes to fill! When I get a chance to take this out (hopefully this week) I will report back on how well I feel it fares in the woods.

Thanks for looking! :thumbup:
 
Back
Top