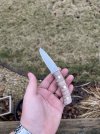
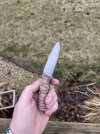
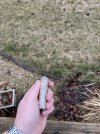
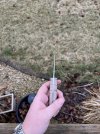
My first attempt

You are learning why a jig isn't always a good idea.

Clamp or screw the blade to a 2X4 and either screw the board to a workbench or clamp it in a vise. If you need, wedge a business card or two as shim to keep the tip and middle supported. Fancier sanding/filing boards have the ability to adjust for the blade taper with support screws from below.

Don't drive yourself crazy over the edge thickness variation. I'll give it a few seconds on the disc grinder if needed before or after HT.
So clamp to a 2x4 and support and try one filing without the jig?
 
Yes.
Many of us drill the tang holes and screw the blade to the board (pan head screws), with the knife edge just at the board edge and end. Others use clamps.
Some cut the board on a bandsaw to match the exact blade curve. This keeps the tip and edge from sticking out and avoids stabbing/cutting yourself over and over. Save the board for future filing and sanding of a similar size knife. Cut the other end to fit a different size knife next time. Some folks have a dry-wall bucket of sanding boards for all sorts of knife sizes.
 
There is a saying..............There are no mistakes, just smaller knives.

This makes me feel better. I'm currently working on my first and have learned quit a bit from this post. Thanks to all!!!
 
Blade going home tomorrow morning. Box of goodies going with it keeping it company.

View attachment 2098439
Thank you, Stacy! So ready to get to work on it! I received your email with the (very detailed) instructions. I’ll print that out and keep it next to me as I work through getting the blade finished. Will send pictures as I make progress. Wish me luck!
 
First and foremost, your fingernails are FAR too clean! Besides that, really nice knife! 'specially for a first!

Personally, i'd make the handle thinner and with a bit of "coke bottle" curve to it, and made the profile with just a little less of a curve on the spine.
 
Last edited:
First off, congrats, glad you followed through and have a knife!
Thoughts for next time. You can curve the handle scales a little at the front where they sit on the ricasso. I also agree that you could make the handle thinner, more oval than broom handle.
One more: get a granite plate and do figure eights with the handle slabs on some 120 grit paper until they are dead flat. Lightly clamped in place for glue-up, you should avoid the tiny gaps.
 
First and foremost, your fingernails are FAR too clean! Besides that, really nice knife! 'specially for a first!

Personally, i'd make the handle thinner and with a bit of "coke bottle" curve to it, and made the profile with just a little less of a curve on the spine.
Thanks!

Finger nails are clean from all the acetone I had to use to clean up the disaster I made in the garage 😂

What’s the best at to get that coke bottle shape with hand tools? Just file it?
 
First off, congrats, glad you followed through and have a knife!
Thoughts for next time. You can curve the handle scales a little at the front where they sit on the ricasso. I also agree that you could make the handle thinner, more oval than broom handle.
One more: get a granite plate and do figure eights with the handle slabs on some 120 grit paper until they are dead flat. Lightly clamped in place for glue-up, you should avoid the tiny gaps.
Thank you! Do you use clamps when you are using corby bolts? I just used the bolts themselves to hold it together when I applied epoxy and I’m assuming that was a mistake.

Granite slab is next on the list!
 
Last edited:
With snug Corby bolts, you may not need clamping. I'm guessing it was the flatness issue. BTW you can pay for a very precise surface plate, but I paid $15 at a kitchen outlet store and it's plenty flat for what I do. (you might need more precision for folders)
 
What’s the best at to get that coke bottle shape with hand tools? Just file it?

Yeah, a rasp or file. Preferably half round.
My personal favorite two tools for this kind of thing are the "Shinto" rasp and the 4 sided combo rasp/file.

Shinto rasps just demolish hard woods, and leave a relatively smooth finish, considering how aggressive they are, and the combo half-round rasp/file let's you get nearly any shape you can think of.
 
Thanks!

Finger nails are clean from all the acetone I had to use to clean up the disaster I made in the garage 😂

What’s the best at to get that coke bottle shape with hand tools? Just file it?
Congratulations on your first knife! I agree with the above comments about handle shape.

A shinto rasp is great for aggressive stock removal. I like to use spray adhesive (3M 45) to attach sandpaper to various backers. With 60 grit paper, you can remove a lot of stock quickly and then refine the shape from there. The 3M 45 adhesive is strong enough to hold the sandpaper in place, but weak enough to let you pull it off easily and attach a new piece.
Thanks! And great tip on the sanding!
 
Looks good. Excellent job!
Some suggestions:
1) Use some sandpaper or a diamond file and round off that sharp tip at the ricasso just a tad to make it less sharp.
2) I thought I lapped the scales flat on the disc sander, but they may have warped a bit afterwards due to internal stress. Doing figue-8 sanding with 120 grit paper on a flat surface like Richard suggested is good if the scales are not flat. Another cause may have been not completely snugging the Corby bolts down. I use a pair of small fat handle screwdrivers to snug then down tight. Tighten in this order - front, rear, middle, repeat until snug. If the front or back has a little gap, loosen the middle bolt and tighten the gap end bolt more.
Another cause can be getting epoxy in the hole of the female bolt. It will refuse to tighten down tight.
A trick to make gaps and glue lines less a visual issue is to dye the epoxy to match the wood color. I prefer the colored powder type epoxy dyes. A kit with brown, tan, black, red, and white can be blended to create a close match for most woods. Another thing people do is use a vulcanized liner material to create a contrast line between the tang and scales. This takes care of gaps quite well. Red and black are the most common liner colors and the epoxy can be dyed to mar0th the liner for a perfect transition.
3) Your handle is what is called a "Broom Stick" style. Not a terrible thing, just lacking "flow".
Shaping the handle adds a lot to the look and feel. I make the front a little narrower than the butt and put a tiny waist to the handle. I don't like a full Coke-bottle handle except on big fighter style knives. Look in the gallery and online at a bunch of knife handles and see what they usually look like. You can still modify the handle now or wait until later when you have a belt sander. Tape the blade up heavily when doing that to avoid scratching the blade or cutting yourself. I would slightly round over the transition from the front to the sides, so it is not such a sudden drop. Then I would taper the bottom side so the cross-section is slightly egg shaped
4) Looks like the plunge lines are not quite even. Again, this isn't ruinous, just not as ascetically pleasing. A file guide is a great tool for getting them perfect. Most all knife suppliers sell one.
 
Last edited:
Back
Top