My first knife design. Critiques and Comments welcome

Finished up sanding at 400 grit, and got the handle a bit slimmer on the grinder and cleaned them up a bit with the files. I also felt the spot that dipped down at the but was a bit pointy so I rounded it slightly too to make it a bit smoother. Nothing crazy as far as change goes just made it a little less abrupt. So the handle work seems to be done., I've got to go and get a chainsaw file to work on the choil, although the more I look at it I'm debating whether or not to put it in.

I'm going to poll you guys for what you guys think would look better. Here it is with no tape on it.

PC090645.jpg


If I cut it in I was thinking something around this look. (Forgive my paint skills)

KnifeChoil.jpg
 
I think the choil will improve the look. You have to do something with that projection, anyway.
Stacy
 
I agree the choil would help, but that flat spot on the end of the guard is the only flat area on the knife and it looks a little lost. How about rounding the front of the guard a bit to make a smooth curve throughout the guard area?

I think it would improve ergonomics a bit.

newchoil.jpg


Curt W.
 
Last edited:
Just finished cutting the choil in and rounded off the guard Sill may make some changes to it but not 100% sure just wanted to get rid of that squared off look. Coming into the home stretch I believe as far as pre-HT is concerned. Going to go and work on cleaning up the ricasso area and I have to smooth out the file marks I made when I modified the handle.

Knife-3.jpg
 
Just a quick update so you guys know I'm still a sanding fool :D. I got started working on the ricasso a few days ago. On one side I had 2 low spots one where the guard curves into the handle which likely was a result of my narrowing the handle. And one almost smack in the middle of the ricasso which I have no idea how it even got there. I got them out along with the rather deep file marks I put in near the plunge line, which I finished up tonight. Also got to work for a bit on the other side which doesn't seem like it should be as bad.

I've also noticed one thing that is irking me. My plunge lines aren't equal in terms of length on both sides of the blade. When I cut them in it looked like they were fairly close in terms of how far they went up the bevel. But one side seems like it's about 1/8-1/4" shorter/longer than the other. At least that's the way it appears with the tape all over the blade. I'll be able to get a better view once I finish up the ricasso area and get all the tape off the blade.

I'm sure I can easily say "well it's my first knife I can't expect perfection" but I'm really trying to avoid that mentality. I mean I know it's not going to be "perfection" but I'd like it to get as close to it as I can. I can tend to be a bit critical/perfectionist with things like this.

I should have some pics up hopefully soon once I get the ricasso cleaned up to 400 grit.
 
Matt,
Don't stress about the plunge lines. You will adjust that in the final sanding after HT.
I would suggest curving the finger guard back from the front a bit more , as was drawn by Curt (clw3). Look at your current shape and the one he drew. Which has a "flow" to it?
Stacy
 
Okay I think I got all the ugky scratches out of the ricasso now I just have to clean it up. I also re-shaped the guard as per Curt's suggestion. After I originally rounded it I wasn't sure what I wanted to do and rather than rushing in I kept looking at it and thinking. After I finally finished it tonight I looked at it and said "Damn that is nice looking". So to Curt I would like to say thank you sir for the suggestion.

Here is a pic of it sanded to 120, I just have to take it up to 400 give everything a good once over to see if there is anything that needs a little more attention. Then should everything look clear it's off to Stacy for the HT.... One thing I did notice when sanding, which I didn't see until some grit and file dust got into the plunge line was another small scratch running parallel to the plunge line.

It took a bit of sanding to get my ugly scratches out so Stacy just want to let you know that the handle area that you roughed up got a bit smoother in quite a few spots :D.

Here is an updated pic.

Knife009.jpg
 
Looks good, Matt.
The plunge lines can be a tad off as far as height ( as long as they are more or less the same), since you will be re-sanding those areas after HT. You want them to be parallel, and the same depth, but the closeness to the spine will move with only a small amount of sanding, so avoid over-sanding them in the pre-HT sanding steps.......Remember, this isn't the finished knife - it is the Pre-HT knife.

The rounded finger guard looks much better.

I would not take the tang to 400, 120 is plenty. It helps with the glue sealing better.

At this point, I would take the tape off and, using 400 grit, carefully go over the junction that is currently taped. All you want to do is even anything out that is high or low. Then it looks like it is ready to HT.

After HT you will re-sand the knife at 220 and then go up the grits to the final finish. Sanding will be slower, but deep scratches will not form as easily as they did in the soft steel. The post-HT time spent getting the surface cleaned up at 220, and then dead smooth at 400 is the best spent time on the knife. You will not need to tape up the blade to work it then, so you can look at the progress as it goes. Once past 400, the sanding goes faster........as long as you did all the work to 400 completely.

It sure looks like you are paying full attention to the details, so I am confident that this will be a first class hunting knife when finished.

I further want to compliment you on your resistance to saying, "Heck, it's my first knife. This will be good enough." The time put in now equals the quality that comes out later ( but avoid getting too obsessive over the minute things at the early steps). Sure, there will be things that aren't perfect, and trade-offs as to what you want and what you can do, but your ability to plan, and follow through, will take you far in this hobby.
I also want to commend you on doing a bit, taking a look, thinking about things like the guard, and making changes slowly. I see too many brand new makers who proudly post, " I spent four hours in the garage last night, and ground out my first three knives ,....and sanded them, too. I will do the HT tomorrow.... How do you HT a lawn mower blade?"
Some day, with experience and a good bit of equipment, that speed might be possible , but for the beginning maker, weeks is more likely than hours.
Also to your credit is the planning and discussion in a public forum. This is an excellent way to garner the experience of many who have been there and know the pitfalls. My sage Grandfather said that learning by experience also includes the experience of others.

Stacy
 
Also to your credit is the planning and discussion in a public forum. This is an excellent way to garner the experience of many who have been there and know the pitfalls. My sage Grandfather said that learning by experience also includes the experience of others.

I've found the best way to get better at anything, is to find people who are better than you and either compete against them (if it's something like a sport) or pick their brains and learn what you can from them through questions and watching how they do things.
 
Okay I just about finished up my sanding at 120 on the tang. I took all the tape off, looked it over, went back and did some more sanding on the tang and again on the blade and think I have all that aspect done. I can't see any real blaring scratches I missed on the blade at 400. Or the tang at 120 (with the exception of parts that will obviously be covered by the scales).

Also since I'm obsessive compulsive about the plunge line heights I took a pics and marked where they basically stop. In case it's recommended for me to try and deal with them now should they be too far off.... You guys tell me.

This pic looks like the line extends past the tip of the toothpick a bit but it's more slightly raised than it is actually a line. The scratches towards the top of the ricasso I just noticed when I looked at these pics and checked them on the blade.
Knife11.jpg

Knife12.jpg


As much as it looks it in this ^^^ pic those are not horrible scratches in the guard and ricasso area. Believe me I went back and double checked it after seeing the blown up on my PC. It's a bit of residue from the painters tape that makes it look so ugly.
 
Well took out the scratches that were in that pic tonight. Also figured it has to be done at some point so I went around the knife and sanded out all the marks from the bandsaw and took that up to 280 grit. I'm not sure what the next step is at this point..... I'm guessing I'm just about to the point where it's ready for HT?
 
Well the knife got shipped off the end of last week to Stacy for the HT. So no future updates from me till it's back in my hot little hands. :D
 
Did you notice that there's a toothpick stuck on the sides of your knife? :p

Looks great for a 10th knife! :thumbup:
 
Blade is in the HT oven for its last temper cycle. I'll clean it up, drill the Corby bolt holes in some Micarta for the handle, and get it off in the mail later this week.

Stacy
 
Thank you sir! Can't wait to get back to work on that one.

I just cut out another blank not too long ago to keep myself busy in the meantime. Won't be long before I have a handful of knives all ready for HT. :D
 
I rough fitted the scales and drilled them for the Corby bolts and thong tube. The box will ship Monday.
Stacy
 

Attachments

  • Matt's knife 001.jpg
    Matt's knife 001.jpg
    49.6 KB · Views: 72
  • Matt's knife 007-1.jpg
    Matt's knife 007-1.jpg
    55.8 KB · Views: 73
Some notes on mounting scales with Corby bolts and with thong tubing:

Finish the blade completely except the final sharpening. It should be completely sanded and polished to its final finish. Check it over carefully in a bright light for scratches you missed. Get it right now, because you will have a lot harder time once the handle is mounted.

Fill the thong tube with wadded toilet paper. That way the epoxy won't get inside the tube. When you have filed/sanded the tube down to the scales surface, the paper will push out easily.

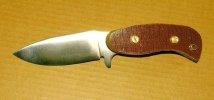
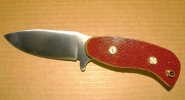
Your scales should be a little larger than the tang, but a reasonable outline of the desired shape. About 1/8" excess is good. The front area at the ricasso needs to be the exact shape you want, as this can't be shaped after handle assembly.
Make sure you have sanded and buffed the front surface of the scales to 400 grit or higher before assemble, or you will never get that area smooth without scratching the heck out of the ricasso on your blade.

Dry fit everything a couple of times to get the procedure down, making any last adjustments needed. If things don't line up ( especially the thong tube) back off the bolts about a turn,and move the scales until all the holes line up. That is one of the big reasons you drill the tang holes 50% larger than the rivet/bolt shaft size.

When you are ready to assemble the handle with epoxy, mix up your preferred brand of slow set epoxy. It needs to be at least a one hour type, and 24 hour is better. I like System Three T-88. Dye it to match the scales if you wish.

Put on a pair of nitrile gloves for the assembly work ( place a spare pair nearby). Lay out a stack of paper towels, have your acetone can handy, cover the work area with newspaper. Get two old screwdrivers that you don't mind getting epoxy on the handles ( you probably will only use one). Check that all parts and things you need are there and ready to use.

Put a small amount of epoxy in the bolt holes on one scale, and slip in the female bolts with a turning motion. I usually put a little epoxy on the outside of the bolts to assure a completely wet joint.Do the same thing for the other scale with the male bolts. Use a toothpick to remove any epoxy that got in the female holes, but don't worry about the male threads. Turn the scales over, and apply a thin layer of epoxy to the inside of the scales. Place the female scale on the tang. Align the male bolts scale to the shafts of the female bolts, and using a screwdriver, give each bolt a starter turn. Don't turn more than one turn until you know that both bolts are started and not cross threaded. Tighten the bolts down ,alternating from one to the other, until the scales are just about snug to the tang, but will easily move a little. Put epoxy on the toilet paper stuffed thong tube, and in the handle thong hole if needed, and insert the thong tube with a twisting motion. If it hits the tang, move the scales a tad to allow passage through to the other scale. Once all is in place, tighten the bolts just to snug. You don't want to crank down on them and squeeze out all the epoxy. Wipe the excess epoxy off the handle sides, and take care to get all the run out off the ricasso area. Check that the handle is sitting where you want it and that the tang isn't projecting out beyond the scales anywhere. Loosen the bolts and adjust if needed. When all is well, take a paper towel with some acetone and wipe off the blade and ricasso area to remove all epoxy.You can give the handle scales a quick wipe down, but don't worry about excess epoxy here since you will be grinding/sanding it all away. Set it down until the epoxy is just barely set up ( check the epoxy cup you mixed in to see when it is no longer sticky or movable) . This is about 20-30 minutes if using a one hour epoxy, and usually a couple hours for the twenty-four hour variety. Being gentle to not apply any strong pressure to the still not cured epoxy joint, wipe the blade and ricasso down again, as there is often a little additional squeeze out that seeped while the epoxy was still liquid. Pay attention to the front area of the scales that you pre-sanded, and remove any epoxy on that area ,too. It is a lot easier to get it off the ricasso and front of the scales now than later when fully cured.

If you are happy with everything, set it down and let it cure for a day. After it is cured, clean the blade and tape it up to the ricasso with masking tape ( blue painters tape is best). Put on several layers to protect the blade from damage or scratches.

To shape the handle, first cut off the excess bolt shaft and thong tube sticking out. If you have a grinder, the temptation is to just grind them down with a 100 grit belt.....DON'T do it. The heat will conduct down the bolt and not only break down the epoxy, but discolor the scale around the bolt. Always cut off the excess with a band saw or hack saw, and file down to the surface before any grinding is done. When shaping the handle, grind with care as to not heat up the bolts. Stainless bolts are the worst for heating up, brass and nickel somewhat less, but still require care.

Once the bolts and thong tube are cut down, start shaping the handle. Using either rasps and files, or a belt sander ( preferably one running on a lower speed), start by knocking off the edges, making the handle somewhat octagonal, then rounding the surfaces into graceful curves. Try and avoid the blocky "square looking" handle that many first knives have. Decide where the handle needs to be thiner and reduce the thickness in those places. Do a little at a time, as it is easy to take a little more off, but impossible to add any back on. Work the handle all over, not in just one place, shaping as you go.
Slowly bring the handle into the shape and feel you wish, stopping when it is still a little larger than desired. At this point the scales should be nearly flush with the tang all around, and the knife should be looking like what you want. If using a file ,switch to 100 grit sandpaper now, and refine the shape more. Pay attention when sanding the tang/scale joints not to undercut the scale material and leave the tang proud. Using a backing block in this area is a good idea.
When the shape is just about there, switch to 220 grit and go up the grits to at least 400 grit. Make sure you get all the scratches out of the tang . Higher grits and buffing may be needed on some materials, but 400 works fine for many materials. If the material requires a finish, apply it and work it down to the required/desired gloss.

Remove the tape, clean the blade off ( avoid getting acetone on the handle as it may affect the finish), and sharpen your knife.

Stacy
 
Back
Top