-
The BladeForums.com 2024 Traditional Knife is available! Price is $250 ea (shipped within CONUS).
Order here: https://www.bladeforums.com/help/2024-traditional/
You are using an out of date browser. It may not display this or other websites correctly.
You should upgrade or use an alternative browser.
You should upgrade or use an alternative browser.
Newbie collaboration knife?
- Thread starter scottickes
- Start date
- Joined
- Nov 25, 2006
- Messages
- 99
Joe when things scare me I usually hit them with a hammer! A caveman response I know but it works for me.
yeah, but this is a $200 piece of damascus...lol
Nah....the piece you have can't be more than about $12 in steel...

Get to it Joe!!!!
-d
- Joined
- Oct 27, 2005
- Messages
- 2,527
yeah, but this is a $200 piece of damascus...lol
Joe,
I was looking at my piece for the hunter. The twist could be forged to go either up towards the tip, as it moves towards the tip.......or down as it moves toward the tip. Which way are you going to forge it?
My suggestion is that we forge it so that with the tang to our right, the twist should move left and down. What do you think?
Ickie
KnifeHead
Knifemaker / Craftsman / Service Provider
- Joined
- Apr 5, 2006
- Messages
- 5,581
staring at the billet in abject terror
That's some funny stuff now, but a wise man once told me "If it was easy a bunch of girls would be doin it". Look at it this way, if you mess it up the only one that is going to hate you is deker.
Does that help")
Joe,
I was looking at my piece for the hunter. The twist could be forged to go either up towards the tip, as it moves towards the tip.......or down as it moves toward the tip. Which way are you going to forge it?
My suggestion is that we forge it so that with the tang to our right, the twist should move left and down. What do you think?
Scott,
I say that the first guy to forge a piece gets to decide! Forge it and show us pictures so that the other guy has to match!
-d
- Joined
- Oct 27, 2005
- Messages
- 2,527
Scott,
I say that the first guy to forge a piece gets to decide! Forge it and show us pictures so that the other guy has to match!
-d
And........if we both pick the same day to forge on? Disaster!!!
Ickie
And........if we both pick the same day to forge on? Disaster!!!
You guys worry too much...so, in order to avoid any further confusion, I will make a decree...
HEAR YE! HEAR YE! SO IT SHALL BE WRITTEN THAT ALL FORGING ON THE NEWBIE KNIFE BLADES SHALL BE DONE SO THAT THE TWIST PATTERN FLOWS DOWN TO THE BLADE EDGE!
There ya go...Feel better now?
-d
- Joined
- Nov 25, 2006
- Messages
- 99
towards the tip or the guard
towards the tip or the guard
Tang end is already marked, it can only go towards the tip
")
-d
- Joined
- Oct 27, 2005
- Messages
- 2,527
I'm forging it like this
Spine of blade.
Tip / / / / /
End / / / / / Handle
Cutting edge
Now you have a really good reason to laugh. Is that a crude drawing or what?
Ickie
Spine of blade.
Tip / / / / /
End / / / / / Handle
Cutting edge
Now you have a really good reason to laugh. Is that a crude drawing or what?
Ickie
- Joined
- Oct 27, 2005
- Messages
- 2,527
I've been busy today. I got my christmas knife through heat treat today. (Pictures are in that thread)
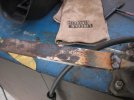
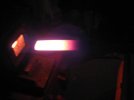
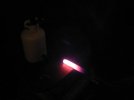
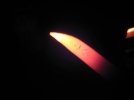
Here's a series of photos of the forging of the Newbie Hunter. These first ones are of Dekers damascus welded onto a hunk of 1/2" rebar so that I have a handle. The second picture is of the initial heat and the third picture is of the starting of the preform of the tip.
Here's a series of photos of the forging of the Newbie Hunter. These first ones are of Dekers damascus welded onto a hunk of 1/2" rebar so that I have a handle. The second picture is of the initial heat and the third picture is of the starting of the preform of the tip.
Attachments
- Joined
- Oct 27, 2005
- Messages
- 2,527
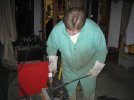
I was surprised how well this steel moved under the hammer. I had a brass template that I cut out to work with. It was laying in front of my anvil the entire time.
Attachments

- Joined
- Oct 27, 2005
- Messages
- 2,527

- Joined
- Oct 27, 2005
- Messages
- 2,527
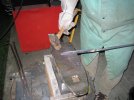
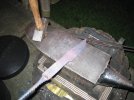
The bar was narrower than the design. I liked this, because it allowed me to move metal and let it get wider from spine to cutting edge, without having to worry too much about it. Here I refined the shape, worked on the edge and then located the choil.
The way I forge choils, I always end up with a little dip on the spine that I have to work hard to get it back out. I should learn a little eventually and begin to forge a little hump back there first, so that it moves back to straight when I locate the choil. But alas, I learn slowly!
You can see my brass template laying in front of the anvil. I was checking the shape constantly!!!
Attachments


- Joined
- Aug 6, 2007
- Messages
- 5,060
COOL SHOTS SCOTT shaping up really nice! hey Deker any chance of getting some steel this way?
- Joined
- Oct 27, 2005
- Messages
- 2,527
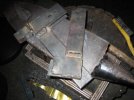
I spent a lot of time refining the shape. I forged it thick and slightly oversized, so that Mr. Fleming has some stock to work with. I spent a lot of effort trying to get most of the hammer marks out now, while the bar was still strong. Once I start on the tang, it will get flimsy, and I didn't want it bending the blade out of shape too much as I forged the tang.
Here are pictures of the tang being drawn out with my guillotine fuller. Towards the end of the work, I broke the bolt in my top fuller hinge. I was close enough that I didn't have to stop to fix it.
Here are pictures of the tang being drawn out with my guillotine fuller. Towards the end of the work, I broke the bolt in my top fuller hinge. I was close enough that I didn't have to stop to fix it.
Attachments
-
 4 Starting to draw out the tang with my guillotine fuller.JPG13.1 KB · Views: 18
 -
 4 The fuller does a nice job.JPG16.3 KB · Views: 29
 -
 4 Close up of the job the fuller does.JPG15.1 KB · Views: 21
 -
 4 It's going to be a long tang.JPG17.7 KB · Views: 40
 -
 4 Broke my fuller - a casualty.JPG60.3 KB · Views: 48