- Joined
- Oct 27, 2005
- Messages
- 2,527
Through email, a few drawing designs have been being passed around. All of them great looking. It seems though that since the original set of drawings a lot of people have been suggesting a hawk, a large knife like a bowie, and a smaller knife.
I have to disagree with this though, because I don't see any need for a large bowie type knife if we are making a hawk. I just think that the hawk and bowie would be competing against each other for use as a chopper. If we are making a set I don't know why we don't make each blade specialized for different tasks.
I would think that if we are making a hawk, then we don't have need for a knife with longer than a 6" blade. I would suggest a hawk for chopping and camping chores, a 5" or 6" hunting knife, and a 2 1/2" or 3" fishing/caping/ or skinning knife.
This of course is just my opinion and I know that there will be many differing oppinions, but I just don't see the use for a large chopping knife AND a Hawk.
Of course I could just be miss-understanding the desire for a large knife completely and maybe there are more versitile uses for a large knife that I don't know about and that the hawk wouldn't work well for.
I would normally agree with you, but now that we have the wonderful donation of curly maple from Bill Morans shop it behooves us to use it in the spirit of the man. I also tend to disagree somewhat that the two are interchangeable. Splitting small logs with a camp or bowie knife is one thing, but splitting large logs with that kind of knife is something it is capable of doing, but not best at. That is why the hawk is essential to the set.
Which leads to eliminating the camp/bowie knife as you have suggested. I think a camp/bowie still has its place along side a hawk though. Even though a hawk can do the chores of splitting smaller logs and knocking smaller branches off of trees, etc., it isn't as ideal as a camp knife would be. A well designed camp knife is a joy to use with smaller logs and the like. In addition it can be used very well as a butcher type knife.
I tend to lean towards smaller hunting knives anyhow, so making a drop point hunter in about a 4" blade design (this is in the middle of the two knives you proposed for cutting length) allows it to be used for more tasks than a longer 6" version or a shorter 2.5" to 3" version.
A 4" ranger drop point will compliment the hawk and camp knife very well.
This is, of course, just my opinion.
Ickie


")
 just a guess
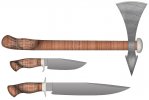

")