Sheath WIP

Use a larger needle (same size as your drill bit). Just a suggestion. If you are happy with your system, keep at it.... the work speaks for itself, bro!
 
Hey, I am always open to trying new thing. It can only get better, right?


Please say "right"
 
Ha! Of course you're right, Matt..... Even when we do stuff that flops, it makes us better makers in the end.......... or so I'm told.
 
Matt, what size needle/drill bit do you use? I use a 1/16th bit but still have to use pliers to pull the thread through. Not sure what size needles I'm using, but they're some of the smaller ones the Tandy store had and they come in a 10 pk.

Next time I'm in there, I think I'll pick up some larger needles and give Rick's technique a try. You're right, having to pull the needles through on every stitch is a b....bear. ;)
 
It holds up well. The leather remains fairly stiff, but I have not had any problems with it cracking.

Here it is getting ready to slick the edge. It is a plastic slicker and a piece of brass rod. It works well, I make sure I round the edges as much as I can.
IMG_0591.jpg

IMG_0592.jpg


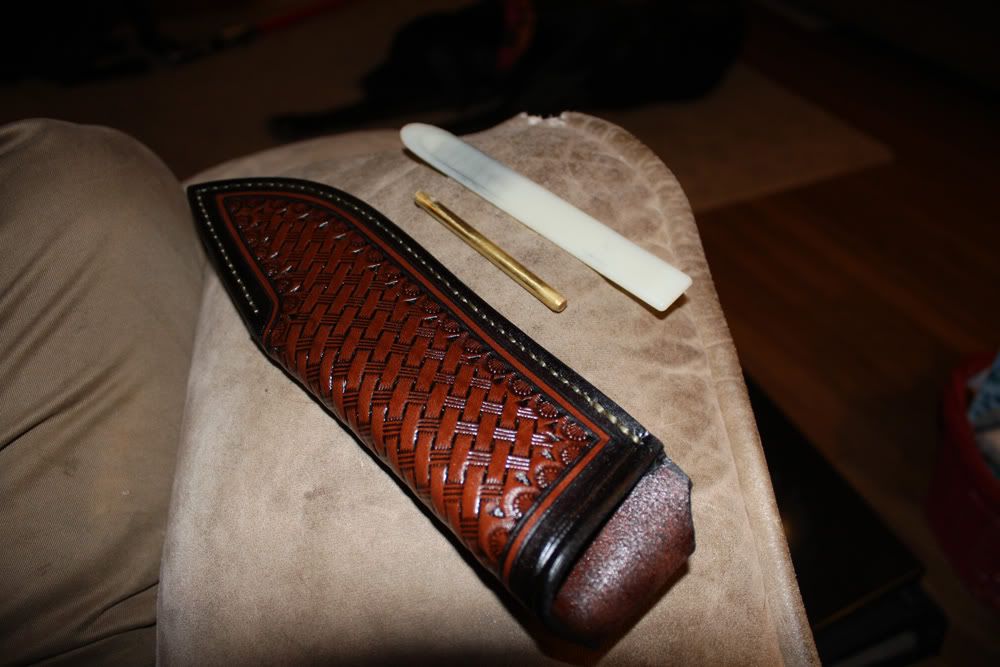
Now I am done... Here it is.

IMG_0593.jpg

IMG_0596.jpg


What do you think?

Hope it was helpful.

Matt

Your stitch spacing is a bit off. Your work is so excellent otherwise, I think it might pay to take more care with the stitch, and look into using a sharp awl. I use a drill myself, but I don't work at your level of beautification. Other than the stitching being noticably mis-spaced. Very, very nice work. Check Chuck Burrows tutes on the stitching.
 
Matt, what size needle/drill bit do you use? I use a 1/16th bit but still have to use pliers to pull the thread through. Not sure what size needles I'm using, but they're some of the smaller ones the Tandy store had and they come in a 10 pk.

Next time I'm in there, I think I'll pick up some larger needles and give Rick's technique a try. You're right, having to pull the needles through on every stitch is a b....bear. ;)

If you insist on drilling the holes as I do, go to a 5/64" bit. Much easier, and the leather closes in very well.
 
Yeah, that one stitch right in the middle a bit off. It does not look so prominent in real life. I jerked a bit and just drilled right through it, missing the layout mark by nearly half a space. I will have to try the needle in the drill chuck. I think I use a 5/64ths bit. I have been using the same one for a while, but I think that is the one.
LRB, I went on your website...I love those period knives.
 
Matt, excellent and very informative tutorial:thumbup:

If you get that third and newest DVD, it goes into a little more detail on several of the stamps and basket weave in particular. You and I use different layout methods, but the results are the same.

Using drill press for punching the stitch holes, I suggest trying an ice pick like polished metal "awl" or a needle a little larger than you sew with, chucked up in the drill press. I always preferred to punch the holes with power off and no rotation, but be sure to lube the awl with common paraffin wax or bee's wax every few insertions. It will make it so much easier. Actually the way I did it mimicked the action of a heavy duty stitcher without thread. As you noted be sure to run a stitch wheel in the groove to space the holes prior to punching.

Artificial sinew can be tricky as it relates to perceived odd spacing of the holes. The tension on each stitch is really important, because if it varies much at all the stitch will give the appearance of being placed in unevenly spaced holes.

Another little time saver for you. I NEVER EVER put any tooling on the back side of a sheath. !. It will hardly ever be seen. 2.In the case of the basket weave you are setting yourself up for misaligned stamping on the two legs of the butterfly style sheath because of the center gap. ( in other words if you can avoid a problem before it has a chance to happen, that's the very best time:D) 3. It is the mark of a professional to know when to stop and based on what I see you are fast on the track of "professional".

A little dye on the inside of the welt edge BEFORE you glue it in saves a lot of time and frustration compared to dying it after it's inside the sheath.:cool:

Excellent effort and results. Be sure to post some of your leather work down in the "Sheath and Such" forum!

Paul
 
GREAT thread, Matt, thank you!!

I always wondered about the ordering of steps when tooling was involved.
It freaks me out a bit to see the power tools applied to the mostly-finished sheath.

When doing holsters, dye & sheen was always last (inside and out). I punched holes with the ol' 4-prong diamond punch. It keeps spacing relatively even and the holes close up nicely, but you don't wanna be whacking on something pre-finished.

That sheen product is great. It really stiffens and seals without making the leather dry. Drawing a pistol from a sheened holster is almost like kydex.

-Daizee
 
Meh... the sheath is okay.... now that dog and cat leather work... THAT was art! ;)

Looks good bro - and the suggestions are money. I used to use a drill bit too - and now I use a larger needle for all of my holes except the first and last hole in my stitch sequence.

Also - why not stitch the back for the belt loop - instead of rivet it. It is easier of the knife - and matches the stitching on the sheath. Also - why not dye the inside of the sheath rather than leave it neutral.

All of this is just preference though - if what you have works for you - I think the sheath looks great!

TF
 
I think the tooling on the front and back is classy and sets your sheaths apart from the common one sided pieces. I see the sheath as a complete package and whether it is off the belt or not, I want every aspect of it to be finished. For that same reason, I opted not to get the Tippmann. I don't like the look of the unfinished holes it puts on the backside. I used to just drive the needle through in the drill press, too but found that I got better results with it spinning at high rpm's.

I also have to mention that I think rivets are the way to go with the belt loop. I have seen too many stitch-only connections ripped apart to convince me otherwise. The same goes with a couple strategically place rivets on the welt. Again, this is purely from my own experience and testing but that is all I can truly trust, right?

Rick
 
I agree with Rick on the tooling part, I can understand on a 2 piece sheath but for a pocket or folded sheath I think the tooling looks good all the way round. However, I am nowhere near this level on sheathmaking. I do use a drill bit as well but I just bought a 1/2/3 diamond punch as my holes are usually erratic.. Yes, more practice would help and so would taking my time... I know. :-) Great sheath Matthew.
 
Rick, please be sure to show some of your work.

Paul

Ah these guys have seen enough of my junk... lol. One can only look at that chewed up, copper riveted stuff so long before it becomes boring. I'm sensing a disturbance in the force... If I expressed something that offended you, that was not my intent. I'm a big fan of your work, Paul.:thumbup: I do the things I do based on my own experience using blades and sheaths. You won't see me much in the sheath forum because my stuff doesn't compare, aesthetically to the great makers in that area... and those guys hate rivets:grumpy:.
 
No Rick, it's all good. I'm always ready and looking for new ideas and methods of doing things. That how I managed to grow a little since 1951 when I started this leather thing. I must admit I'm not a fan of rivets or anything else that puts metal inside the sheath. That's why I fully line every sheath I make, but back to the point.....Nearly everything I know I learned from someone before me in line and I'm always ready to learn some more.

Paul
 
Whew... I thought for sure I managed to tick off one of the good guys for a minute there, Paul. I totally understand your reasoning behind not liking the rivets. I couldn't get away from it performance wise, though. But being mindful of the blade finish is one of the reasons why I switched to copper. Like Matt, I have never had an issue with a recessed rivet.... but we are comparing my 5-6yrs to your 60yrs experience.
 
Whew... I thought for sure I managed to tick off one of the good guys for a minute there, Paul. I totally understand your reasoning behind not liking the rivets. I couldn't get away from it performance wise, though. But being mindful of the blade finish is one of the reasons why I switched to copper. Like Matt, I have never had an issue with a recessed rivet.... but we are comparing my 5-6yrs to your 60yrs experience.

Careful or you will upset one of the Good guys! :D

Great thread Matt. I have learned a bunch already. I own Paul's DVD's and they have been a great resource for me. After receiving your knife and sheath in the mail I had to find out how you got the shine and stiffness in your sheath.
 
First off, I want to say thank you all for your input.
Rick, I like your sheaths a lot. I like how they match the rugged beauty that your knives possess. I can spot a Marchand knife from a mile away. Your style is all your own, and your constant testing is impressive. I really appreciate all the information. I am going to try to get a nice polished awl to chuck up in the drill. It seems like it may be the way to go.

Paul, well as mentioned earlier in this thread, I am a bit of a Paul Long admirer. I watched at a craft show a while ago as an older gentleman used a woodburning kit to burn individual feathers onto hand carved wooden birds. It was amazing and I realized that you dont achieve that skill through any amount of studying. You only get that good when you have tried woodburning ten thousand feathers. I get the same understanding when I watch you make a sheath. You do a great job teaching on your videos, but the only way to make sheaths like you do is to do it for several decades.

I really appreciate all the advice I have received on this thread. I am going to try a few of them over the next few sheaths to see which works well with my methods.

I am going to have to pick up that "tips and tricks" dvd, and after Christmas my Paul Long trilogy will be complete.
 
I agree Rick. I make sheaths too - and I post them in the Sheaths Forum - but mostly because I have guys like Sandy, Paul, and Chuck to comment on my work. I read their posts and pick up just LITTLE things now and then that I had not read before - but every one of those nuggets make me better.

For instance - I now have a chunk of beeswax next to my drill press to wax my needle as I make my holes for my stitches - it has saved me a ton of time and makes a better end product - it was just something Paul mentioned off hand in a recent post.

I always feel a little self conscious - and when I make a 'how to' - I always point them back to the masters. Al Stohlman books, and Chuck's video's were invaluable for me.

TF
 
Thanks so much for sharing, probably took longer to post all this than to make the sheath.
 
Back
Top