-
The BladeForums.com 2024 Traditional Knife is available! Price is $250 ea (shipped within CONUS).
Order here: https://www.bladeforums.com/help/2024-traditional/
You are using an out of date browser. It may not display this or other websites correctly.
You should upgrade or use an alternative browser.
You should upgrade or use an alternative browser.
The first sharpening
- Thread starter Jason B.
- Start date
Jason B.
Knifemaker / Craftsman / Service Provider
- Joined
- Jun 13, 2007
- Messages
- 11,223
That's an absolutely amazing edge, I applaud your skills. I'm blown away by the time you spent on it though, 8-12 hours on a pocket knife is just incredible. Do you spend that much time on all of your knives?
Usually, depends a lot on the steel though. That's also the first sharpening too, touch-up only take a few minutes after that.
In my last post I mentioned pressure points, with the use of small amounts of pressure in specific areas you can follow the angle and curve of the blade easily. Picking your angle will mainly come down to how you like your knife to cut and the abilities of the steel to manage such angle. Almost all steels will be able to handle much lower angles than most think, given proper HT its not out of line to say that 10 degrees per side 20 inclusive would be fine for most folders/pocket knives. Some steels will see more deformations and small compression points (those things most call chips) but because the angle is already low it means you don't need to remove as much steel to fix and resharpening takes less time.
Jason B.
Knifemaker / Craftsman / Service Provider
- Joined
- Jun 13, 2007
- Messages
- 11,223
Following the curve of a blade is probably one of the harder points of sharpening because their seems to be more of a fixation on angle. Its fine to know what angle your sharpening at but if you can't properly follow the curve you end up with tips that are not sharp, belly's that are not sharp when the tips are, and uneven bevels along each side. Did you ever wonder why when using a jig sharpener you'll see the tip get wider on some knives? Its because the jig is following a single angle on a single axis basically creating a cone shaped circle. Think of it like a X and Y axis, the X being the angle per side and the Y being the shape of the blade ie. re-curve, tanto, large and small belly blades. If you have a scandi ground knife its easy to learn the proper way to follow the curve of the blade because it lets you know on a large scale where you missed. Another good example of how the angle changes throughout the curve is if you take a dinner/salad bowl, flip it upside down, then lift it at a angle so just one point of the rim is touching the counter. Now roll the bowl around its rim but keep at your tilted angle. That feel in angle change in a 90 degree section of the bowl is the same as in a belly of a knife.
2 movements and 2 to 3 pressure points are all that's needed to sharpen a knife. The first movement that we all understand is moving the blade down the sharpening surface, the second and very important one is lifting the handle vertically from the stone. Lifting the handle is one of the key points to keeping your angle and curve correct. The first pressure point and the one I find to be most important is down pressure in the choil area, along with the lifting of the handle this is basically all you need to know to get your bevels correct. I know, sounds way to easy.

2 movements and 2 to 3 pressure points are all that's needed to sharpen a knife. The first movement that we all understand is moving the blade down the sharpening surface, the second and very important one is lifting the handle vertically from the stone. Lifting the handle is one of the key points to keeping your angle and curve correct. The first pressure point and the one I find to be most important is down pressure in the choil area, along with the lifting of the handle this is basically all you need to know to get your bevels correct. I know, sounds way to easy.
Jason B.
Knifemaker / Craftsman / Service Provider
- Joined
- Jun 13, 2007
- Messages
- 11,223
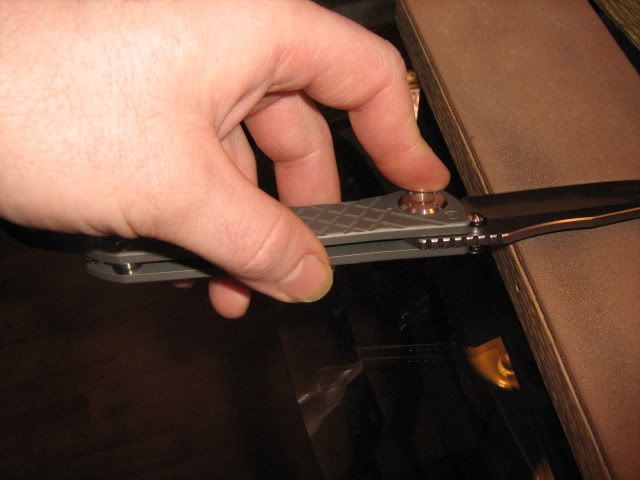
The next pressure point or 3 is your thumb and remaining fingers, your thumb will support the back of the blade from dropping and steady your angle so the pressure from your index finger is the only real pressure you are applying. Your thumb and index finger almost create a twisting motion of pressure forcing the edge to stay in position on the sharpening surface.
Jason B.
Knifemaker / Craftsman / Service Provider
- Joined
- Jun 13, 2007
- Messages
- 11,223
The last and optional one and the one I don't have a pic for is placing your freehand on the blade. You can use a single point of contact like placing your index or middle finger in the belly and applying pressure when the handle starts to lift.... Or spreading you fingers across the blade to control bevel pressure where you want it. I use this method when using benchstones but its not really a option when you are holding both stone and blade.
A LOT of freehand sharpening is about feel, its the feel of what you are doing that is more of a guide than anything.
I hope I have done a decent job of explaining this as its not easy to put into words, please ask questions if not understood.
(guess I just had to break it up)
A LOT of freehand sharpening is about feel, its the feel of what you are doing that is more of a guide than anything.
I hope I have done a decent job of explaining this as its not easy to put into words, please ask questions if not understood.
(guess I just had to break it up)
- Joined
- Feb 28, 2010
- Messages
- 239
knifenut sharpened a Griptillian for me. It was so sharp that it was months before I could bear to cut something with it and mar that edge. But boy was it worth it when I finally did.
He has my Ritter Grip right now. I can't wait to see how it turns out.
")
- Joined
- Dec 18, 2009
- Messages
- 248
Realistically how much would you charge if someone wanted that sharpening job? Off say a completely dull knife that requires XXC reprofiling?
I <3 the DMT stone especially the XXC, reprofiling without powertools ftw.
I <3 the DMT stone especially the XXC, reprofiling without powertools ftw.
I would love the D8xx, except for the rounded edges. I'm looking for a replacement for it.
Same here. I've been thinking about getting the rounded corners ground straight. Then it would be the perfect profiling and edge-repair stone.
- Joined
- Jun 4, 2008
- Messages
- 1,945
Sorry to bring up an old thread, but i always go back to this one to read. My question: when doing it this way, do you do one side of the blade and then the other on each grit? or do you do the whole side, and then flip? Also, at what points do you strop, and with what micron strop? thanks.
Dave
Dave
Jason B.
Knifemaker / Craftsman / Service Provider
- Joined
- Jun 13, 2007
- Messages
- 11,223
As the sharpener you are the artists, you continually shape and refine your work until its just how you envisioned it. I like to keep my grinding in the center line of the blade, if you were to draw a line down the center of the spine then cross section the blade in half the apex of your edge should be at the other end of the center line.
I don't count my strokes or do one side then the other, I work on each side a little bit at a time. I feel this method of not over working one side too much prevents mismatched angles and leades to a more uniform bevel formation.
Once the main grinding is complete all the following steps are simply for refinement of the set bevel. How far you refine the edge depends of how you like your edge to cut.
For stropping/polishing and like all other steps I follow a close grit reduction without skipping abrasives. As shown in the thread, after the EF 9 micron hone I use the 6 micron paste then the EEF 3 micron hone followed by the 3 micron paste. To continue the progression 1, 0.5, and 0.25 would be the path to the dark side")
Before you strop you need to know the difference in abrasive size from your stone/hone to your polishing strop. Example: two knives, same steel, same edge angle, one finished to 600 grit and the other to 10k grit. You now polish each blade with 0.5 micron 50k grit compound, which one is sharper, more polished and more effected by the polish?
I don't count my strokes or do one side then the other, I work on each side a little bit at a time. I feel this method of not over working one side too much prevents mismatched angles and leades to a more uniform bevel formation.
Once the main grinding is complete all the following steps are simply for refinement of the set bevel. How far you refine the edge depends of how you like your edge to cut.
For stropping/polishing and like all other steps I follow a close grit reduction without skipping abrasives. As shown in the thread, after the EF 9 micron hone I use the 6 micron paste then the EEF 3 micron hone followed by the 3 micron paste. To continue the progression 1, 0.5, and 0.25 would be the path to the dark side
Before you strop you need to know the difference in abrasive size from your stone/hone to your polishing strop. Example: two knives, same steel, same edge angle, one finished to 600 grit and the other to 10k grit. You now polish each blade with 0.5 micron 50k grit compound, which one is sharper, more polished and more effected by the polish?
- Joined
- Sep 14, 2007
- Messages
- 504
When using DMT's what hand motion do you use? Do you sharpen like they were japanese water-stones or do you use a slow push only motion with the blade perpendicular to the stone?
Jason B.
Knifemaker / Craftsman / Service Provider
- Joined
- Jun 13, 2007
- Messages
- 11,223
Like a waterstone, I start choil to tip and back without removing the blade from the stone. I find by doing this you keep a more consistent angle and the finish from the stone on the bevel becomes more visually pleasing.
I thought I was the only one using that motion. Heel to tip and back, repeat a few times (10 to 20) then swap sides. Do you hold the stones in your other hand or rest them on the table/bench? I find this works pretty well for matching existing angles. For rebeveling, I use the table or my angled rests.
Jason B.
Knifemaker / Craftsman / Service Provider
- Joined
- Jun 13, 2007
- Messages
- 11,223
I for a long time held the stone in one hand but 8x3 diamond plates are kinda heavy and therefore sit on the bench. I've used them a few by holding them but only with the EEF, I can get a softer touch that way and sometimes helps with burr removal.
I thought I was the only one using that motion. Heel to tip and back, repeat a few times (10 to 20) then swap sides.
I do this. I think it saves time, and to my surprise, it helps me to keep a steadier angle. I have no idea how.
- Joined
- Jun 4, 2008
- Messages
- 1,945
So, then you do go both ways on the stone? up until now, i only have been using push strokes going foward, from choil to tip. And, one more question...i think i understand that you don't need to do anything other than use the stone to remove the burr? Like i said before, i have been trying to remove the burr on a piece of wood, but i think you said i should not do that. but, what is the right way? i mean, do you just use lighter pressure to refine the burr? and it should get smaller through grit reduction, right? there are so many different ways people use to sharpen and remove the burr, that it just gets confusing. Do i remove the burr, or don't I? Man, i really wish Knifenut would do a video...i mean, there are many that are good at sharpening, but i would really like to see how someone with such skill does it in motion? its hard for a guy to try to breakdown all the different opinions and ways that are out there, and what works the best, ya know?
Jason B.
Knifemaker / Craftsman / Service Provider
- Joined
- Jun 13, 2007
- Messages
- 11,223
Look up my thread "the burr" it will help.
Pressure is key with any stone and especially with diamonds, the more pressure you use the greater the amount of plastic deformation occurs. Even with something as coarse as a XXC 120 micron hone you can have a burr free edge you just need the right touch.
The method of running the edge over wood is best left for when your using a belt sander. Big floppy burrs usually created by a belt sander, ones you can easily see and move with your finger are the ones best delt with by this method. When hand sharpening your burr should never get that big, also the type of burr usually created in hand sharpening is more ridged and will not be affected by the wood. The reason it would not be good to use on a finer edge is that you would cause/dulling of that edge.
Believe me I know what you mean. I feel I do a decent job of explaining things and try to capture as much as I can in photos but there are some parts that simply cannot be explained that way. There are things I see and can feel that I have yet to figure out how to put into words that make sence.
Yes, I stay on the stone. There are several difference ways to use this method too. Tip to heel being most common is great for keeping things even over the length of the blade but most blades are not even to start. To correct problem areas or high spots I use a method of "walking the edge". For example: the plunge grind on most spyderco knives causes a problem area that always seems to require more grinding. If you use the heel to tip method a small section of bevel at the start of the plunge grind will go almost untouched. Walking the bevel refers to making small 1/2in strokes while using your fingers to create direct pressure points on the area of bevel needing special attention. The direction of stroke also changes from up and down the bevel to side to side or a stabbing motion to the stone.
Note: if you walk the bevel always finish with a few heel to tip strokes.