- Joined
- Apr 14, 2006
- Messages
- 7,021
My wife often says, "Many of the best things in life are the simple things." Well, I don't know if she's talking about me or not, but that's the same thought I had, the first time I saw the nail trap trigger in one of Ron and Karen Hood's videos, called Traps and Trapping (highly recommended).
I dont know what it is about trap triggers but they hold a great fascination for me. From the simple L-7
to the more complex large animal deadfalls.
Perhaps its the deadly efficiency of something that can be made from a few sticks and bits of cordage. The fact that the concept works is demonstrated by the fact were here today. Its, in a large part, how our ancestors fed themselves.
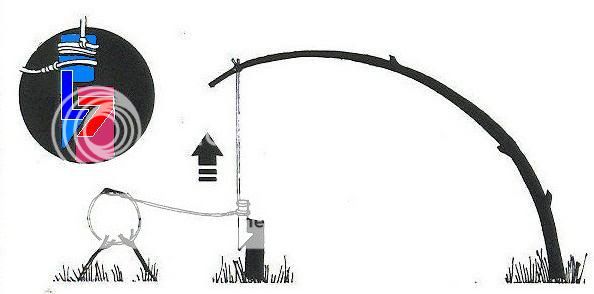
So anyway, when I saw the nail trap trigger, I was hooked. I started experimenting with it, and the more I played with it, the better I liked it. The nail trap trigger consists of an anchor cord (tied off to a root, rock, etc.) with two loops, one higher than the other, and a spring pole cord with a loop that is attached to the snare.
The spring pole cord is attached to the 2 anchor loops by way of a stick (nail) running through the two anchor loops at an angle (this is important) and the spring pole loop. (Diagram 1)

The snare is attached to the cord going to the spring pole and (in the original), a trip wire/cord was attached to the lower trigger loop, so that when something tripped the wire, it pulled the lower loop off of the nail, releasing the spring pole (and the snare).
In the original, the trip cord was strung between a rock, which it was tied to, and the lower anchor loop. However I wanted to use it as a neck snare which directly released the trigger. To this end, the trip wire became the end of the snare and was attached to the spring pole cord.
Working on this, I encountered two problems. The first problem was the snare loop dropping down around the anchor loop, negating the mechanical advantage of the trigger to the point where the trigger may not release, or at least, not release properly. (Diagram 1B).
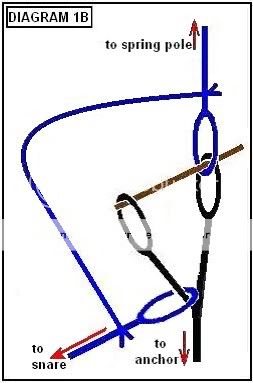
In Hood's application, the tension of the trip wire kept the snare loop cord in the proper position. With the neck snare application, this tension is not present.
With a bit of experimenting, I came up with a better set up. (Diagram 2).
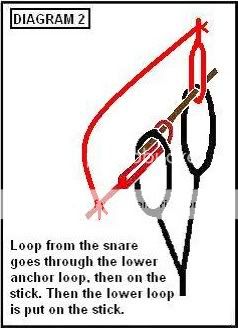
I, originally, had some concern that the snare loop would pull under the anchor loop without pulling it off. This has not been the case., and even if it was, it could be rectified by making the cord coming from the snare a larger diameter than the anchor loop. By modifying it in this way, the positioning of the trigger, relative to the snare becomes a lot less important.
This trigger is excellent because of its versatility, which you will see more of, shortly, and also because of its (adjustable) sensitivity. Now stop reading (and fondling your knives) and go and set it up. You can do it in your house, if need be, - using a counterbalance weight instead of a spring pole, or elastic bands, or..... I want you to see, first hand, how excellent this trigger is. And that's only the beginning. Also, understanding this part helps to understand what's to come.
--------------------------
I'm going to stop at this point and give you a chance to play with it. I want to hear your observations, questions, and any problems you may have with it. I also want to see pictures.
However, if there's no interest, I'll stop now, and save myself a lot of work.
If this continues, I will link the subsequent posts at the beginning of this post, and here, so they will be easy to find.
----------------------------------
Doc
I dont know what it is about trap triggers but they hold a great fascination for me. From the simple L-7
to the more complex large animal deadfalls.
Perhaps its the deadly efficiency of something that can be made from a few sticks and bits of cordage. The fact that the concept works is demonstrated by the fact were here today. Its, in a large part, how our ancestors fed themselves.
So anyway, when I saw the nail trap trigger, I was hooked. I started experimenting with it, and the more I played with it, the better I liked it. The nail trap trigger consists of an anchor cord (tied off to a root, rock, etc.) with two loops, one higher than the other, and a spring pole cord with a loop that is attached to the snare.
The spring pole cord is attached to the 2 anchor loops by way of a stick (nail) running through the two anchor loops at an angle (this is important) and the spring pole loop. (Diagram 1)
The snare is attached to the cord going to the spring pole and (in the original), a trip wire/cord was attached to the lower trigger loop, so that when something tripped the wire, it pulled the lower loop off of the nail, releasing the spring pole (and the snare).
In the original, the trip cord was strung between a rock, which it was tied to, and the lower anchor loop. However I wanted to use it as a neck snare which directly released the trigger. To this end, the trip wire became the end of the snare and was attached to the spring pole cord.
Working on this, I encountered two problems. The first problem was the snare loop dropping down around the anchor loop, negating the mechanical advantage of the trigger to the point where the trigger may not release, or at least, not release properly. (Diagram 1B).
In Hood's application, the tension of the trip wire kept the snare loop cord in the proper position. With the neck snare application, this tension is not present.
With a bit of experimenting, I came up with a better set up. (Diagram 2).
I, originally, had some concern that the snare loop would pull under the anchor loop without pulling it off. This has not been the case., and even if it was, it could be rectified by making the cord coming from the snare a larger diameter than the anchor loop. By modifying it in this way, the positioning of the trigger, relative to the snare becomes a lot less important.
This trigger is excellent because of its versatility, which you will see more of, shortly, and also because of its (adjustable) sensitivity. Now stop reading (and fondling your knives) and go and set it up. You can do it in your house, if need be, - using a counterbalance weight instead of a spring pole, or elastic bands, or..... I want you to see, first hand, how excellent this trigger is. And that's only the beginning.
Also, understanding this part helps to understand what's to come.--------------------------
I'm going to stop at this point and give you a chance to play with it. I want to hear your observations, questions, and any problems you may have with it. I also want to see pictures.
However, if there's no interest, I'll stop now, and save myself a lot of work.
If this continues, I will link the subsequent posts at the beginning of this post, and here, so they will be easy to find.
----------------------------------
Doc

 :thumbup:

")

