Watch out! This might be a trap!

I will *make* time tomorrow to try again and get some good pictures to post. This connection has limited upload/download bandwidth, so I have to be careful about posting pictures, unfortunately.

Excellent, rocketbomb, I'm looking forward to it.

I'm going to try this out. I have zero trap making experience, but a few things come to mind reading this thread:

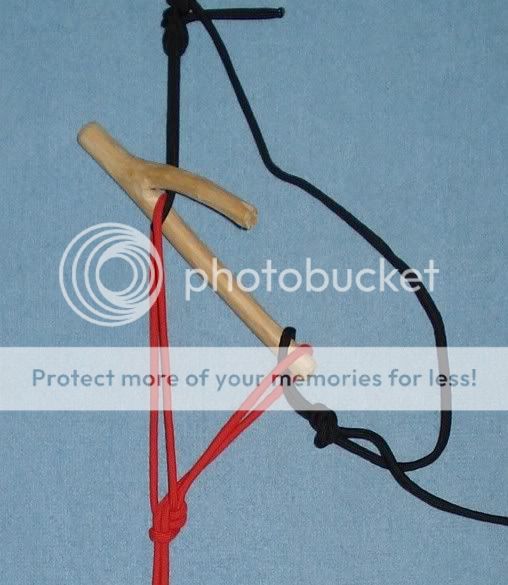
1. It seems you could also adjust the equilibrium point (and I assume the sensitivity) by how you space the loops on the anchor line. In other words, you could get a longer stick or make the standing end of one loop longer or shorter to adjust. I know a longer stick is a better mechanical advantage, but the idea of moving the loop instead of changing the stick leads me to my next thought... Your thinking is good, but the longer stick really represents, greater distance between the loops (which requires a longer stick), which is what provides the mechanical advantage - moving the loop does exactly that. :thumbup:

2. It seems like you could make an infinitely adjustable anchor by using a big loop instead of 2 smaller ones. In other words, take a piece of cord & tie the ends to make a loop. Then put the loop under an anchor like an exposed root. Now pull the respective ends of the loop up on both sides of the anchor and put them on the respective ends of the stick. That way you could pivot the stick under tension by pulling one end or the other of the loop. When you get it about where you want it, you could take the loop off and put it around the anchor again to secure where the turn in the bight is. I'll try and post a pic to show what I mean (and to see if it actually works).

Once again, your thinking is excellent. I know exactly what you mean, but a drawing or picture would be good, for me and others.

This is taken care of with a special knot which has yet to be posted, but I did something similar at one time, due to the aggravation of trying to get the loops in the correct position, relative to one another. I tied a loop in each end of a piece of cord, positioned the loops and then secured the position with an overhand knot . This was then secured to a root, etc. with a toggled bend.(this is discussed in my next installment, that is if you don't continually read my mind and scoop me :D).


3. It also seems that you need to have the line to the snare be at least the same or larger in diameter as the line to the anchor. It seems like a small snare line (e.g. copper wire) could possibly slide underneath the anchor line with a quick pull without releasing the trigger. A larger diameter snare line would force the anchor loop off.

This was a worry I also had, but in practice, it never happened. I also considered using an overhand knot, to increase the bulk to facilitate release. Once again, never proved to be necessary. (I think it was edgyone that also addressed this consideration.


Pics to follow, but it might take a bit. Definitely looking forward to it.

I must say my faith is being restored :) . I was beginning to think this thread was going to die because of lack of participation. This thread requires the trigger information (from me), BUT, it also requires participation and feedback from the participants (you) in order to make it work.

If people don't participate in a skills thread, why should the skills author (for want of a better word) go to the trouble?

(leaving my soap box...........)

Doc
 
Thanks Doc, I always learn something new from your posts and I love that. I get that this could be applied different ways but I always have some large nails and screws in my truck. I need to put a few of them in my pack.
 
Thanks Doc, I always learn something new from your posts and I love that. I get that this could be applied different ways but I always have some large nails and screws in my truck. I need to put a few of them in my pack.

Thanks mistwalker, I try to make them helpful.

By the end of this thread, you may throw away those nails and screws. :D

Doc
 
drawing or picture would be good, for me and others.

I did something similar at one time, due to the aggravation of trying to get the loops in the correct position, relative to one another. I tied a loop in each end of a piece of cord, positioned the loops and then secured the position with an overhand knot .

Doc

Ok. Here are a few observations. I hadn't read your response, and the first thing I tried was an anchor line with two loops on the end. Of course, when you do this the loops just slide around the anchor and the trigger won't hold. I ended up doing a double overhand knot to hold the position just like you mentioned... and I got it to hold.

In all the pic's that follow the anchor line is the white cord (the standing end is extra cord b/c I didn't want to cut the length I had). The snare line is the green 550 cord.

securing the two-loop anchor line with a double overhand knot


trigger set with a two-loop anchor


The next thing I tried was a single loop anchor line. One large loop hooked under an anchor and put over respective ends of the stick. The problem here was the same as the two-loop... the loops would slide and the trigger would spill to the tension side & therefore not set properly (had to hold it for the pic).


So, I tried a couple of ways to fix the loop in place. The first few I tried were putting an overhand knot in the loop, then putting the loop over the anchor like this...


I tried a double overhand version as well, but neither of these worked to keep the trigger from spilling.
 
Finally, I decided that I would secure the loop just by using the tails of the sheetbend that I used to make the loop in the first place:

idea of the knot


how it looks on the anchor


I basically wrapped the tails around and tied it like you would tie your shoes, except I pulled the loops through... a round turn with a double overhand, I guess.

Not as elegant or easily removable as a toggle, but effective. Here's how it looked when set.


I haven't had a chance to test the smaller diameter snare wire / larger diameter anchor line, but I do subscribe to the old adage "believe one who has tried it," so I imagine it's not a common problem. I'll get around to trying it myself eventually.

The other thing I'm not sure about is how these different anchor configurations affect the sensitivity of the trigger. They seemed fairly equivalent to me, but I didn't do any rigorous testing to be sure.


Thanks, Doc, for the jumping off point for this thread! Skills threads like this are probably a pain to put together to begin with, but they are definitely worth it from my perspective! This kind of stuff makes WSS a special place to keep coming back to. For those with the knowledge, please keep on sharing it!! :thumbup::thumbup:


Speaking of which... what's this fancy toggle knot I've heard so much about??
 
Speaking of which... what's this fancy toggle knot I've heard so much about?? Which one, there are several? :D

chopchop, to say I'm impressed would be an understatement! Way to get your hands dirty. :thumbup:

A generalization, perhaps, but you and rocketbomb and edgyone are going to benefit more from this thread than most others. By playing with it, feeling some of the frustrations, seeing some of the solutions, and overall becoming familiar with this trigger and its variations, will help you realize what a fantastic trigger this is. For the most part, 'copy and paste' won't cut it.

Also, I may benefit from some of the discoveries you make, by not being influenced by solutions, I came up with.

That's, hopefully, the last I'm going to say on this :rolleyes:

rocketbomb (and maybe a few others :thumbup: ) was off to do some more experiments, so I'll wait for those results, before I post the next part.

Doc
 
OK, captain slow is back with some more thoughts and, for the first time ever, pictures of his experiments with this trap.

So this was my first experiment with this trap. I spent a very, very, very long time trying to get the loops adjusted so that this trap would work properly but was never able to get it right.
DSC_4350.jpg


Today I was able to get out (albeit a bit late) and try the trap again. I had a thought (yes, I am aware of the danger inherent in this) and decided to try it. Used a prussik loop for one of the loops on the anchor so that it can be adjusted however necessary to line it up with the trigger stick. Within about five minutes I had the entire trap set up, and it functioned flawlessly.
DSC_4361.jpg


Close up of the prussik used for the trigger:
DSC_4360.jpg


Interested to hear your thoughts, Doc, on what issues this may present for the trap. I couldn't see it doing any harm myself.

It was pretty late when I was out tonight fiddling with this, so I wasn't really able to do anything more. Well, could have, but it was getting cold and dark and the dogs were bored to the point of pestering the daylights out of me.
 
OK, captain slow is back with some more thoughts and, for the first time ever, pictures of his experiments with this trap.

So this was my first experiment with this trap. I spent a very, very, very long time trying to get the loops adjusted so that this trap would work properly but was never able to get it right.
DSC_4350.jpg


Today I was able to get out (albeit a bit late) and try the trap again. I had a thought (yes, I am aware of the danger inherent in this) and decided to try it. Used a prussik loop for one of the loops on the anchor so that it can be adjusted however necessary to line it up with the trigger stick. Within about five minutes I had the entire trap set up, and it functioned flawlessly.

Interested to hear your thoughts, Doc, on what issues this may present for the trap. I couldn't see it doing any harm myself. You have obviously figured out what the problem was with the first picture. I'm also glad to hear that even with the Prusik, your set-up time was pretty quick.

It was pretty late when I was out tonight fiddling with this, so I wasn't really able to do anything more. Well, could have, but it was getting cold and dark and the dogs were bored to the point of pestering the daylights out of me.

--------------------------------------------------------------------------

Hey rocketbomb, very innovative of you to use that Prusik. Like you, I found positioning of the loops to be a pain in the ass. I have another method, that you might like, and should be a lot faster to set up. So here it is:
---------------------------------------------------------------------

(In this part, I'm going to introduce a solution to the relative sizing of the anchor loops, one to the other.)

One thing to keep in mind is that in a survival situation, almost all of the prep work of loops etc., can be done in camp, at night, around the campfire, so many sets can be prepared. Once in the field, a few knots, etc. and you're set.)


The next problem I had with the trigger was to get the loops in the right place. I found that sometimes I had to retie the loops 3 or 4 times to get them in just the right position, and I found this to be irksome.

The first solution that I came up with was to tie a loop in each end of a piece of cord and then tie the two ends together with an overhand knot, keeping in mind the desired location of the two loops relative to each other.

firstsolution.jpg


The anchor cord could then be tied to a root, rock, etc. This seemed to work pretty well as it was easier to locate the relative positioning of the 2 anchor loops.

This is important as it determines how sensitive the trigger is. The greater the angle of the stick, from horizontal, the more sensitive the trigger, assuming, of course, that the stick length between the loops is constant or greater (affected by the length of each of the separate anchor loops and attachment cord). The stick, after all, is just a lever. The longer the lever, the greater the mechanical advantage, thus, the greater the sensitivity.


As I was working with this new method, other possibilities became apparent. To make the anchor loops more readily adjustable, a different knot is used. It is known as a BOWLINE IN A BIGHT

You will note that one side of the Bowline in a Bight is continuous to the other side,

DSC08745-3-R.jpg


so with a bit of pulling, the loops are adjustable.

DSC08752-R.jpg


DSC08760-R.jpg


(Note: you want to tie this in a loop of cord, not just a straight piece of cord. Under certain conditions, the knot can 'spill' as discovered by my buddy, Phil. In other words, use a tied loop for the anchor loops. This also helps in securing it)

Using a loop of cordage, the anchor loops can be made in less than a minute.

Let me know how you like it.

The next part will deal with anchoring.

Doc

ETA: The following is a pretty basic drawing for tying the Bowline In A Bight - thought it may help.

uploadthisone.jpg
 
Last edited:
Good grief, I never even thought of the bowline on a bight. Need more practice tying that one anyway.

Personally, I find that as long as I have a short piece of cordage available tying a prussik does not take very long. Then again, I tend to find the prussik the solution to about a quarter of all my cordage-related woes.

And you may continue to prefer the Prussik, but do give the BIAB a try. I hope you noticed that you should use a loop rather than a straight piece of cordage. No big deal for me, as I carry a couple of loops of 550 with me all the time.

Actually, a Prusik is going to be used in another part of this, very shortly.
 
Wow, looks like the mods are coming along quite well. Weekend's here, I should have some pics up Sunday night of my attempt. I'll keep an eye out for further tips in the meantime :thumbup:

Thanks for sticking with it Doc!
 
Thanks RocketBomb and DocCanada! I had a case of beginners luck so didn't appreciate the importance of the position of the loops until I tried to retie it. After a bit of fiddling it was set again and today it has held up well despite moderate winds and rain - and still triggers under appropriate tension on the snare. I'm loving the improvements :thumbup:
 
Alright, I got to try this out for a few minutes today while on a hike with the GF. I could not get it to work :(

As with rocketbomb, positioning the loops seemed to be my major problem. I used a small log as a counter-balance weight; the direction of the pull may have had some effect as well, not sure.

Anyway, primarily, I could not get the snare-side trigger loop to pull the snare-side anchor loop off. I could not position the loops correctly, or my stick wasn't long enough, or the angle between the stick and the snare-side anchor loop was too obtuse...won't know until I try again. I used the bowline in a bight in this attempt, but I want to try using separate loops or tying the BIAB with the knot closer to the anchor itself next time. Maybe having the knot so high up didn't allow for enough tension on each of the anchor loops.

I'm sure I could figure out exactly what I was doing wrong if I had more time. As it was, it was getting late. I'm planning to try it again tomorrow night here at home. The loops should be positioned pretty close to the ends of the stick, right?

Pics below aren't stellar, sorry. Who knew taking in-focus pics of black paracord against a bright background could be so annoying:rolleyes::o.

bf39a56c.jpg


7fe4096c.jpg
 
Last edited:
Alright, I got to try this out for a few minutes today while on a hike with the GF. I could not get it to work :(

As with rocketbomb, positioning the loops seemed to be my major problem.

Anyway, primarily, I could not get the snare-side trigger loop to pull the snare-side anchor loop off.

The loops should be positioned pretty close to the ends of the stick, right?

HikingMano - please take this one with a grain of salt - I'm only just learning myself but at first glance I think that either the two loops are too close together/short for the the chosen stick or the stick is hanging out the bottom loop too far for the snare-side trigger loop to pull it out - depends on how you look at it. As the snare-side trigger loop pulls the lower anchor loop a long way down the stick (relative to the side of the triangle formed), the angle between the two anchoring loops increases, the distance between the middle of the stick and the anchor point decreases etc - if I'm right with that line of logic it means it is more likely the loop will slip without triggering.

On second thoughts, let's wait for DocCanada to explain it properly :o :D

I left in my comment just to show that if you are willing to post up a trigger that didn't work out, I'm willing to show I'm still sorting it out in my head! :thumbup:
 
Hey Russell,

Good on you for getting out and trying it. I can tell from your picture that the trigger wouldn't work.

First of all, the angle between the 'nail' and the lower anchor loop should be approx. 90 degrees or greater. You don't have to obsess about this, though. Once you see how the trigger works, you will set it correctly, just by the feel.

I, also, think your problem is in part, because the anchor loops are too close to being equal in length. If you had shortened the smaller (lower) loop which would also have lengthened the upper loop (when using the Bowline in a Bight) and repositioned the 'nail so that it barely extended past the lower anchor loop, you would have been in business.

Maybe this will help:

Russellstrigger-3-corrected.jpg

Compare the angle and the length of 'nail' extending past the lower anchor loop of my picture here:

dontlosethenail.jpg


with your first picture. I think you'll see the difference.

Looking forward to your attempt tomorrow.

Doc
 
Last edited:
Yeah, the picture was one of the earliest attempts, it was the best picture I had though. The rest were too blurry. I did try to adjust the lower anchor and trigger loops to be closer to the end of the stick. I had actually shaved the snare end of the stick down to a mild point for better sensitivity, but decided to cut it off just to be safe (didn't want to get stuck in the eye while messing with the trap)...I figured i could work on sensitivity once I actually got the thing working :D :o.


I did miss the 90 degree angle thing though, will have to work on that in the next attempt :thumbup:

Thanks Edgyone and Doc :thumbup:
 
Yeah, the picture was one of the earlier attempts, it was the best picture I had though. The rest were too blurry. I did adjust the lower anchor and trigger loops to be closer to the end of the stick. I had actually shaved the snare end of the stick down to a mild point for better sensitivity, but decided to cut it off just to be safe (didn't want to get stuck in the eye while messing with the trap)...I figured i could work on sensitivity once I actually got the thing working :D :o.


I did miss the 90 degree angle thing though, will have to work on that in the next attempt :thumbup:

Thanks Edgyone and Doc :thumbup:

Just a quick note: if anything, cutting the snare end of the 'nail' to a point could be counterproductive because you're introducing yet another angle to the release path and may make it more difficult to set up. When set properly, the sensitivity is amazing.

Doc
 
:o :o Just realized I hadn't posted the picture of the forked stick already.

-------------------------------------------

OK, anchor attachment. These attachments are assuming that you're using a loop of cordage and a Bowline In A Bight for the anchor loops.

Obviously, you can just tie this loop to a root, rock, etc. but because it's a loop, it can also be attached with a cow hitch (see diagram) and this works fine.

simplecowhitch.jpg


However, you may have need for an expedient attachment - that's where a toggled hitch comes in - pull the toggle and the anchor comes free. A toggled hitch may also reduce wear on the anchor cord, especially if you're using something like Spruce root as an anchor attachment (no really sharp bends like with a conventional knot, for more brittle cordage.) It's also very fast to attach.

detailsoftoggledhitchanchor.jpg


An overview:

overview-revised.jpg


In this picture, you will note that the bottom section of the anchor loops cord is quite long. This is to allow it to be tied to different diameter anchors. The height of the actual trigger loops is not too important.

Now here's where some of the versatility is evident - maybe you don't have a rock, root, etc, as a tie down. If your main loop is long enough, it can be used as a Prusik knot on a nearby sapling, etc.

prusikloopattachment.jpg


Another nice feature of the nail trap trigger is that it is auto aligning, that is, the trigger will align itself in the direction of the pull and it’s not too important how close, higher, or lower, whether it is right side up, upside down or horizontal, the trigger is to the snare.

My buddy Phil, was pretty bugged when playing with the trigger, because every time the trigger was tripped, the 'nail' took off for places unknown and he would have to make another 'nail'.

He solved this by tying the nail to where the upper anchor loop would be and retaining the lower loop as is. It worked well, but, it prevented the use of the adjustable Bowline In A Bight anchor loops.

This, of course, could be circumvented by using my original method for setting up the loop positions - a loop on one end of the cord and the 'nail' on the other, setting the relative position, then tying an overhand knot to secure the positioning.

I, however, wanted to retain the adjustability of the Bowline In A Bight, so came up with an alternate solution.

dontlosethenail.jpg


The use of a forked 'nail'. When the trigger releases, the 'nail' doesn't fly very far. One caution, don't have the smaller fork side down and against the upper anchor - I have had it bind on a couple of occasions. This is only used for playing anyway. Set up for real critters, the loss of a stick is no big deal.

OK, so these are a couple of ideas for anchoring the lower part of the trigger. You may come up with some better ways. If so, we need to see them.

Next up - different applications.

Doc
 
Thanks DocC and HM. I love the new anchor attachment options.

To anyone that has been thinking about trying it but has been to busy - make some time, it is a fun trigger to play with!
 
Back
Top