-
The BladeForums.com 2024 Traditional Knife is available! Price is $250 ea (shipped within CONUS).
Order here: https://www.bladeforums.com/help/2024-traditional/
You are using an out of date browser. It may not display this or other websites correctly.
You should upgrade or use an alternative browser.
You should upgrade or use an alternative browser.
Whacha Been Up To......
- Thread starter Horsewright
- Start date

 .......Very pretty!!!
Horsewright
Knifemaker / Craftsman / Service Provider
- Joined
- Oct 4, 2011
- Messages
- 14,110
That is looking really good. Definite step up from the first. What would you do different next time?This is my third one of these, definitely turned out better than the others.

Thank you!That is looking really good. Definite step up from the first. What would you do different next time?
duramax Very nice my friend, very nice!
Definitely make sure the molded part is more square with the edges and stitchline (you can’t see it in the picture but its a little angled), also I think I would dye my next one.What would you do different next time?
Any other improvements I should consider for next time?
Horsewright
Knifemaker / Craftsman / Service Provider
- Joined
- Oct 4, 2011
- Messages
- 14,110
Yes sir, I’ve got a couple ideas. I’ll probably type em in the morning. Most of my typing is early am, coffee time.Thank you!
Definitely make sure the molded part is more square with the edges and stitchline (you can’t see it in the picture but its a little angled), also I think I would dye my next one.
Any other improvements I should consider for next time?
Something like this is what I’m wanting. Again, this is for a knife made by Flat Rock Forge. Need to know if you can work from measurements or do I need to send the knife to you. Thank you very much!
Horsewright
Knifemaker / Craftsman / Service Provider
- Joined
- Oct 4, 2011
- Messages
- 14,110
Sorry didn’t have time this morning. We’ll catch you tomorrow . I won’t forget.Thank you!
Definitely make sure the molded part is more square with the edges and stitchline (you can’t see it in the picture but its a little angled), also I think I would dye my next one.
Any other improvements I should consider for next time?
No worries; I appreciate it!Sorry didn’t have time this morning. We’ll catch you tomorrow . I won’t forget.
Horsewright
Knifemaker / Craftsman / Service Provider
- Joined
- Oct 4, 2011
- Messages
- 14,110
Okie dokie. Here's some ideas for you.
Are you leaving the bottom piece oversized and are you trimming flush to the top after sewing? If not that would certainly help with the alignment. You only have to match up the top edge to the premolded front. Thats a lot easier than matching up four sides. If you are, than are you using an adjustable stitching groover with a fence to keep your groove consistent to an edge?
Now I don't do a lot of molded stuff like this but I would have one design concern. Seems like there is quite a distance between the bottom of the multi tool and the bottom stitch line. Will, in some years time that bottom molding get soft from use abuse and the weight of the tool? Seems like it might. Is your design unnecessarily deep? If the bottom molded part was closer to that stitched edge I think that would be stronger.
Yesterday would of been a good day for you to hang out in the shop because I was doing a lot of what I would suggest to help ya with this project. I work in batches and make several things all at once. I almost always leave the bottom piece of a project oversized so that I am only prefinishing and having to align up the tops. In this pic I have 6 Leatherman sheaths to make up, a holster and have already sewn three slip sheaths for kitchen knives. The slip sheaths have a simple welt on the bottom side other wise the construction of all these guys is very similar. I have 12 other sheaths to do too but I tend to divide batches up into groups of what is constructed similarly and these are pretty much all the same.

I'd already sewn up the three slip sheaths with red. I sewed them separately cause the red thread was already in my machine from my wife using it on a purse so I did them before changing back to white for the others. After sewing I trim off the excess of the oversized bottom pieces.

No matter how sharp your knife is and how careful you are there is gonna be some unevenness. Your sheath is showing that a little.

So whats a guy to do? Sand the edges. Now I was pretty experienced and had hung out in several saddle shops quite a bit before I ever heard of sanding an edge. Its a handy deal. You can use foam sanding blocks or just sandpaper. Lil more later.
Are you leaving the bottom piece oversized and are you trimming flush to the top after sewing? If not that would certainly help with the alignment. You only have to match up the top edge to the premolded front. Thats a lot easier than matching up four sides. If you are, than are you using an adjustable stitching groover with a fence to keep your groove consistent to an edge?
Now I don't do a lot of molded stuff like this but I would have one design concern. Seems like there is quite a distance between the bottom of the multi tool and the bottom stitch line. Will, in some years time that bottom molding get soft from use abuse and the weight of the tool? Seems like it might. Is your design unnecessarily deep? If the bottom molded part was closer to that stitched edge I think that would be stronger.
Yesterday would of been a good day for you to hang out in the shop because I was doing a lot of what I would suggest to help ya with this project. I work in batches and make several things all at once. I almost always leave the bottom piece of a project oversized so that I am only prefinishing and having to align up the tops. In this pic I have 6 Leatherman sheaths to make up, a holster and have already sewn three slip sheaths for kitchen knives. The slip sheaths have a simple welt on the bottom side other wise the construction of all these guys is very similar. I have 12 other sheaths to do too but I tend to divide batches up into groups of what is constructed similarly and these are pretty much all the same.
I'd already sewn up the three slip sheaths with red. I sewed them separately cause the red thread was already in my machine from my wife using it on a purse so I did them before changing back to white for the others. After sewing I trim off the excess of the oversized bottom pieces.
No matter how sharp your knife is and how careful you are there is gonna be some unevenness. Your sheath is showing that a little.
So whats a guy to do? Sand the edges. Now I was pretty experienced and had hung out in several saddle shops quite a bit before I ever heard of sanding an edge. Its a handy deal. You can use foam sanding blocks or just sandpaper. Lil more later.
Wow, thank you. It haven’t even ocurred to me to leave the bottom panel oversized until after stitching, but that does seem wise!Okie dokie. Here's some ideas for you.
Are you leaving the bottom piece oversized and are you trimming flush to the top after sewing? If not that would certainly help with the alignment. You only have to match up the top edge to the premolded front. Thats a lot easier than matching up four sides. If you are, than are you using an adjustable stitching groover with a fence to keep your groove consistent to an edge?
Now I don't do a lot of molded stuff like this but I would have one design concern. Seems like there is quite a distance between the bottom of the multi tool and the bottom stitch line. Will, in some years time that bottom molding get soft from use abuse and the weight of the tool? Seems like it might. Is your design unnecessarily deep? If the bottom molded part was closer to that stitched edge I think that would be stronger.
Yesterday would of been a good day for you to hang out in the shop because I was doing a lot of what I would suggest to help ya with this project. I work in batches and make several things all at once. I almost always leave the bottom piece of a project oversized so that I am only prefinishing and having to align up the tops. In this pic I have 6 Leatherman sheaths to make up, a holster and have already sewn three slip sheaths for kitchen knives. The slip sheaths have a simple welt on the bottom side other wise the construction of all these guys is very similar. I have 12 other sheaths to do too but I tend to divide batches up into groups of what is constructed similarly and these are pretty much all the same.
I'd already sewn up the three slip sheaths with red. I sewed them separately cause the red thread was already in my machine from my wife using it on a purse so I did them before changing back to white for the others. After sewing I trim off the excess of the oversized bottom pieces.
No matter how sharp your knife is and how careful you are there is gonna be some unevenness. Your sheath is showing that a little.
So whats a guy to do? Sand the edges. Now I was pretty experienced and had hung out in several saddle shops quite a bit before I ever heard of sanding an edge. Its a handy deal. You can use foam sanding blocks or just sandpaper. Lil more later.
I do use an adjustable stitch groover, but the molded part of the leather gets in the way of the adjustable arm, so I used a scratch awl to mark my lines and then went back over them with the stitch groover with the arm removed.
I do agree that there is too much space between the bottom of the multitool and the stitchline. I will definitely change that on my next one.
Sandpaper is a good idea! I have a 2x42 belt grinder; would you recommend using that to even up my edges? It does move pretty fast so I would have to be careful not to burn the leather.
Thank you for taking the time to help a noob out! I really appreciate it.
P.S. Your work is amazing; I am currently working on a pancake sheath similar to the ones you make and referred to pictures of yours while designing it.
Wow, thank you. It haven’t even ocurred to me to leave the bottom panel oversized until after stitching, but that does seem wise!
I do use an adjustable stitch groover, but the molded part of the leather gets in the way of the adjustable arm, so I used a scratch awl to mark my lines and then went back over them with the stitch groover with the arm removed.
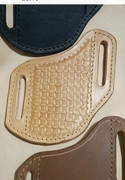
I'm assuming the groover you have is the same as the one in the top of this picture. The one on the bottom will solve the arm getting in the way problem. I also find it works better on projects where you don't have to worry about the arm getting in the way. It's just easier to follow the edge.

O.B.
Yep, you are correct. I have seen ones like the one on the bottom; I may have to look into getting one of those eventually.I'm assuming the groover you have is the same as the one in the top of this picture. The one on the bottom will solve the arm getting in the way problem. I also find it works better on projects where you don't have to worry about the arm getting in the way. It's just easier to follow the edge.
O.B.
Horsewright
Knifemaker / Craftsman / Service Provider
- Joined
- Oct 4, 2011
- Messages
- 14,110
We've got several (4 or 5) of the bottom ones. Thats what we use. I've never used the top one. Looks like an idea looking for a problem. The bottom ones are $15 from Tandy. Probably worth it if you are gonna shorten your pattern too. We have several very expensive groovers from top tool makers. I use the $15 Tandy one.
Yes you can certainly use your 2x42 sander to sand the edges. I prefer to sand edges damp. That holds down the dust and helps in preventing burning. Get a dedicated belt used only on leather. 120 grit is about right and I like ceramic belts for that as they last and last and last. For many years I used a 6x48" sander. with a dedicated belt. I've sanded miles and miles of leather on that thing. Recently, we bought a Cobra finisher. I was thinking about this the other day but for those that are upping their game a little and thinking about getting a sewing machine, I was wondering if getting the finisher first might be right. I use this thing A LOT! So does my wife. Besides my 6x48 I had a full size lathe with a rubbing stick mounted up. Does great edges but this lil guy does the job of the sander and the lathe with a much smaller footprint and cost. It also has variable speed which also helps with not burning a project. Heres the Cobra Finisher:

The dial to the right is the speed control. Most of the time I keep it on warp drive but do occasionally slow er down. Sanding drum on the left and a rosewood rubbing stick on the right.


I keep a glass of water and a foam brush right there by it and if the edge is not wet I will wet it with the foam brush. This keeps the water where you want it. These slip sheaths are not wet molded so they don't ever go swimming like the rest of my sheaths do.

Sanded even:

Then I edge them. I use a #4 for almost all sheath work and most other stuff too. The tops that I finished individually before the parts are sewn together I use a #2 on.

After edging I will dampen the edges again, rub a little paraffin on them and rub one more time. The heat of the burnishing drives the paraffin down into the leather. Then I oil them.

The oil is warmed in a dedicated $10 crockpot from Wallyworld and I apply the oil with a piece of sheepskin. I'm able to apply the warm oil very uniformly with the sheepskin and I use the brush for the edges. LESS is more with oil very light coat of 100% pure neatsfoot oil. Then the sheaths are set aside and allowed to "set" for a day or so.
Thanks for the kind words. More later. Football coming on.
Yes you can certainly use your 2x42 sander to sand the edges. I prefer to sand edges damp. That holds down the dust and helps in preventing burning. Get a dedicated belt used only on leather. 120 grit is about right and I like ceramic belts for that as they last and last and last. For many years I used a 6x48" sander. with a dedicated belt. I've sanded miles and miles of leather on that thing. Recently, we bought a Cobra finisher. I was thinking about this the other day but for those that are upping their game a little and thinking about getting a sewing machine, I was wondering if getting the finisher first might be right. I use this thing A LOT! So does my wife. Besides my 6x48 I had a full size lathe with a rubbing stick mounted up. Does great edges but this lil guy does the job of the sander and the lathe with a much smaller footprint and cost. It also has variable speed which also helps with not burning a project. Heres the Cobra Finisher:
The dial to the right is the speed control. Most of the time I keep it on warp drive but do occasionally slow er down. Sanding drum on the left and a rosewood rubbing stick on the right.
I keep a glass of water and a foam brush right there by it and if the edge is not wet I will wet it with the foam brush. This keeps the water where you want it. These slip sheaths are not wet molded so they don't ever go swimming like the rest of my sheaths do.
Sanded even:
Then I edge them. I use a #4 for almost all sheath work and most other stuff too. The tops that I finished individually before the parts are sewn together I use a #2 on.
After edging I will dampen the edges again, rub a little paraffin on them and rub one more time. The heat of the burnishing drives the paraffin down into the leather. Then I oil them.
The oil is warmed in a dedicated $10 crockpot from Wallyworld and I apply the oil with a piece of sheepskin. I'm able to apply the warm oil very uniformly with the sheepskin and I use the brush for the edges. LESS is more with oil very light coat of 100% pure neatsfoot oil. Then the sheaths are set aside and allowed to "set" for a day or so.
Thanks for the kind words. More later. Football coming on.


Gary W. Graley
“Imagination is more important than knowledge"
Knifemaker / Craftsman / Service Provider
- Joined
- Mar 2, 1999
- Messages
- 28,153
Needed a nice slip sheath for my new Swiss Army Cadet folder, the red cross is always tricky as leather does like to bleed and the first go at it I had to scrap, no saving it, but this second one came out better.
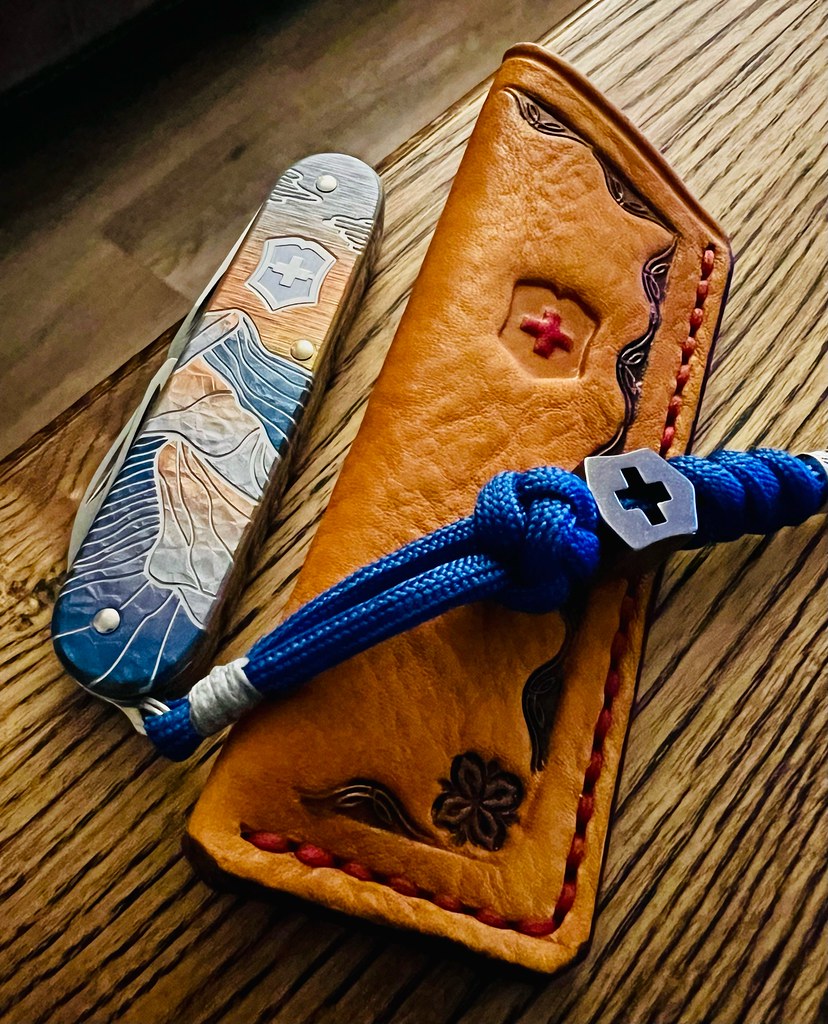
 Untitled by GaryWGraley, on Flickr
The knife is a 2023 limited edition from VIctorinox which sold out pretty quickly and it is an amazing bit of work.

G2
Untitled by GaryWGraley, on FlickrThe knife is a 2023 limited edition from VIctorinox which sold out pretty quickly and it is an amazing bit of work.
G2
Last edited:
Horsewright
Knifemaker / Craftsman / Service Provider
- Joined
- Oct 4, 2011
- Messages
- 14,110
My friend looks like your stitching is doing great to me. Very nice work. Bag making is a whole different deal isn't it?I bought recently another machine adler 69, but this is sewn on my singer 45k, I try to learn precise sewing, a lot to learn but shears not bad

Gorgeous my firend, knife, sheath and pics! Are you able to do the red cross first before ya have more time into the sheath if it doesn't work?Needed a nice slip sheath for my new Swiss Army Cadet folder, the red cross is always tricky as leather does like to bleed and the first go at it I had to scrap, no saving it, but this second one came out better.
The knife is a 2023 limited edition from VIctorinox which sold out pretty quickly and it is an amazing bit of work.
G2
That looks great! Some great work being shown here today.Sent this one down the road recently.

Gary W. Graley
“Imagination is more important than knowledge"
Knifemaker / Craftsman / Service Provider
- Joined
- Mar 2, 1999
- Messages
- 28,153
Thanks Dave, the sheath was embossed dyed and glued but not sewn up at that time, so at least I didn't have time spent on the sewing part ") a small savings I'd say. It is a rounded surface along the edges of that cross after I emboss it, so even being SUPER careful, a drop of dye can slide off pretty easily. I tried several things to try and salvage it but, it grew worse and worse so just cut my losses...actually cut the sheath up lol...and moved on.
a small savings I'd say. It is a rounded surface along the edges of that cross after I emboss it, so even being SUPER careful, a drop of dye can slide off pretty easily. I tried several things to try and salvage it but, it grew worse and worse so just cut my losses...actually cut the sheath up lol...and moved on.
G2
edited to add, the border stamping was done before I set the cross emblem into the sheath so I can position the curve of the side of the cross to be across from the curved portion of the border stamp. I didn't highlight the border stamp until the cross was finished. btw it takes several applications of the red to attain that deep colour, so it's not just a dab and you're done it's a very fine paint brush and steady hand to apply it several times.
a small savings I'd say. It is a rounded surface along the edges of that cross after I emboss it, so even being SUPER careful, a drop of dye can slide off pretty easily. I tried several things to try and salvage it but, it grew worse and worse so just cut my losses...actually cut the sheath up lol...and moved on.G2
edited to add, the border stamping was done before I set the cross emblem into the sheath so I can position the curve of the side of the cross to be across from the curved portion of the border stamp. I didn't highlight the border stamp until the cross was finished. btw it takes several applications of the red to attain that deep colour, so it's not just a dab and you're done
it's a very fine paint brush and steady hand to apply it several times.
Last edited:
Horsewright
Knifemaker / Craftsman / Service Provider
- Joined
- Oct 4, 2011
- Messages
- 14,110
Yeah I recently tossed a fully carved sheath ready for molding to the knife. It happens but dang!Thanks Dave, the sheath was embossed dyed and glued but not sewn up at that time, so at least I didn't have time spent on the sewing part
G2
jfk1110
Gold Member
- Joined
- Mar 9, 2013
- Messages
- 28,879
Nice job GaryNeeded a nice slip sheath for my new Swiss Army Cadet folder, the red cross is always tricky as leather does like to bleed and the first go at it I had to scrap, no saving it, but this second one came out better.
The knife is a 2023 limited edition from VIctorinox which sold out pretty quickly and it is an amazing bit of work.
G2

Thanks Dave, long way to learn, this bag was one of couple ideas which I will work on,but with sewing machine is fun part that I can make so much new stuff at one day, and I hope make some money along the way. I played with slip sheats today, tried to make fast and cheap, and this came to my mind, hope you like it