- Joined
- Nov 11, 2012
- Messages
- 220
My ADD works in mysterious ways, so I always seem to have knives in various stages of completion. My work doesn't compare to a lot of the awesome stuff that has been posted here... but I figured I may as well add what I could to this thread. Here are some of the "notable" ones I've got going now:
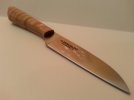
This one I actually managed to complete. It was made using scraps from other knives, in downtime... waiting for my oven to heat up or epoxy to dry and all that. Built my etching machine and got stencils in, so it also got to be my first test dummy! This one is 15n20 with Maple from Mark at Burl Source.
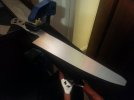
This next one is one that has been taking up most of my time. It's an 8" western style Gyuto in 52100 which my cousin commissioned for his girlfriend as a Christmas gift. I live in the city and haven't found proper/affordable shop space yet, so most of my work is done at my parent's 45 minutes away... thus, my shop time is very limited these days. Since I'm running pretty short on time at this point, and snow has turned the 45 minute drive into 1.5-2 hours... I brought some sandpaper and set up a little makeshift sanding station with some steel, micarta, and clamps, hanging off of my nightstand.
It's my largest blade yet, so it's been quite a challenge. Quite a few firsts in there for me as well. Here it is at a clean 800 grit. Note that I did leave some "meat" in the choil area and above the tip, as I'm still pretty new at this, so that is not the final profile
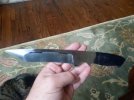
Next one has been sitting on my bench for a while. "Tactical" blades and American tantos are not my thing, and I told myself I would never make them... but my best friend is in the Marines and requested one that happened to be both, so I had to make an exception (I tried to convince him otherwise). This one is a thick piece of CPM-154. As much as I dislike the knife, the compound grind and recurve have been a nice test of my abilities, and I'm fairly happy with how they turned out.
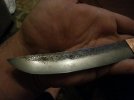
The next one... I quite honestly have no idea where I'm going with it. I wanted to try my hand at a both forging and a hamon... and have this image of something halfway between tribal and Japanese style in my head. I have no idea where I'm going with it beyond this point, beyond copper fittings that I've mostly completed, so I'm kinda just hoping I have some sort of epiphany. Kind of thinking some dark wood with some hemp wrap mixed in. Maybe someone here has some ideas?
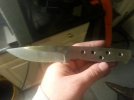
And last but not least, I have this little bushcraft knife here. Some people on another website had expressed interest in knifemaking, so I offered to put together little free "kits" for them. I basically just profiled out some 1084 blades, drilled some holes, rough shaped and drilled some micarta handles, and supplied some corbys. The plan was for them to file out the bevels, and send them to me for cleanup and heat treat, then they'd put the handles on and shape them.
Unfortunately, of the 4 or 5 I sent out, only one of them did anything with it. Took some major cleanup, but I was happy he at least tried! The whole thing did cost me a bit of my own money, but I figure if I help even one guy get started, it'll be worthwhile. I just sent it off to him, so I'm hoping to see a completed knife soon I suppose this will be my first "collaboration," haha.
This one I actually managed to complete. It was made using scraps from other knives, in downtime... waiting for my oven to heat up or epoxy to dry and all that. Built my etching machine and got stencils in, so it also got to be my first test dummy! This one is 15n20 with Maple from Mark at Burl Source.

This next one is one that has been taking up most of my time. It's an 8" western style Gyuto in 52100 which my cousin commissioned for his girlfriend as a Christmas gift. I live in the city and haven't found proper/affordable shop space yet, so most of my work is done at my parent's 45 minutes away... thus, my shop time is very limited these days. Since I'm running pretty short on time at this point, and snow has turned the 45 minute drive into 1.5-2 hours... I brought some sandpaper and set up a little makeshift sanding station with some steel, micarta, and clamps, hanging off of my nightstand.
It's my largest blade yet, so it's been quite a challenge. Quite a few firsts in there for me as well. Here it is at a clean 800 grit. Note that I did leave some "meat" in the choil area and above the tip, as I'm still pretty new at this, so that is not the final profile

Next one has been sitting on my bench for a while. "Tactical" blades and American tantos are not my thing, and I told myself I would never make them... but my best friend is in the Marines and requested one that happened to be both, so I had to make an exception (I tried to convince him otherwise). This one is a thick piece of CPM-154. As much as I dislike the knife, the compound grind and recurve have been a nice test of my abilities, and I'm fairly happy with how they turned out.

The next one... I quite honestly have no idea where I'm going with it. I wanted to try my hand at a both forging and a hamon... and have this image of something halfway between tribal and Japanese style in my head. I have no idea where I'm going with it beyond this point, beyond copper fittings that I've mostly completed, so I'm kinda just hoping I have some sort of epiphany. Kind of thinking some dark wood with some hemp wrap mixed in. Maybe someone here has some ideas?

And last but not least, I have this little bushcraft knife here. Some people on another website had expressed interest in knifemaking, so I offered to put together little free "kits" for them. I basically just profiled out some 1084 blades, drilled some holes, rough shaped and drilled some micarta handles, and supplied some corbys. The plan was for them to file out the bevels, and send them to me for cleanup and heat treat, then they'd put the handles on and shape them.
Unfortunately, of the 4 or 5 I sent out, only one of them did anything with it. Took some major cleanup, but I was happy he at least tried! The whole thing did cost me a bit of my own money, but I figure if I help even one guy get started, it'll be worthwhile. I just sent it off to him, so I'm hoping to see a completed knife soon

Last edited:


