-
The BladeForums.com 2024 Traditional Knife is available! Price is $250 ea (shipped within CONUS).
Order here: https://www.bladeforums.com/help/2024-traditional/ -
America has reached 250 years, and I am grateful to be here, in the best country in the world. Thank every one of you who helps make this country a better place, those who have gone before and risked it all, and those who've paid the ultimate price to make the United States what we are today.
Happy Birthday America! Let Freedom Ring for all time!
You are using an out of date browser. It may not display this or other websites correctly.
You should upgrade or use an alternative browser.
You should upgrade or use an alternative browser.
What's going on in your shop? Show us whats going on, and talk a bit about your work!
- Thread starter WillSwift
- Start date


nice work, what brand of ivory micarta did you use?Wrapping up this Magnacut Hunter. Last one in this batch. Ivory micarta and black turned out well. Love this sheath set up.
nice work, what brand of ivory micarta did you use?
Thanks! This was from Brisa knife supplies, in Finland. I really like it. When buffed I didn't like so much, but with this satin finish it's great
A.McPherson
Knifemaker / Craftsman / Service Provider
- Joined
- Jan 27, 2012
- Messages
- 2,942
I love the carving, but generally dislike the colored look. But hell, I'm not the one buying, and everyone else really seems to like it.
Guess I'm just boring. Lol!
Beautiful work!

ashwinearl
Knifemaker / Craftsman / Service Provider
- Joined
- Nov 9, 2006
- Messages
- 562
Used a Queen City #41 Copperhead as a pattern. This is 8670 Carbon Steel, Nickel Silver bolsters, SS liners (non relieved), brass pins, OD green micarta.
I had someone on FB reach out asking about price. I gave it to him no charge and asked for feedback over time or trade me some old patterns to take apart. I think it was someone on here who wrote somewhere, if you aren't excited to give knives away that you shouldn't be making knives. Too many things I need to work out (nail nicks, pull strength, grinding, relieving liners) before ready to sell.


I had someone on FB reach out asking about price. I gave it to him no charge and asked for feedback over time or trade me some old patterns to take apart. I think it was someone on here who wrote somewhere, if you aren't excited to give knives away that you shouldn't be making knives. Too many things I need to work out (nail nicks, pull strength, grinding, relieving liners) before ready to sell.
I figured out a way to add jimping to a blade after it's done and hardened/handled! I made up a stencil for my CriCut with all "I" letters as a text repeated. I painted the sides of the blade with nail polish and then applied the stencil to where I wanted the jimping and used my home made electro etcher! I need to do some clean up along the edge of the spine, but I break those corners anyway. I crank my DC power supply up and do 10-15 seconds at a time and cool down with water after 4 or 5 cycles and repeat. Traction feels pretty good with it!! Next time, I will do the etching before the blade is fully ground and stuff, but it's nice to be able to add jimping on completed blades, too!

a local restaurant owner friend said his 16 yr old son was interested in learning about knifemaking
The boy came over to learn over the course of 3 separate days.
I had already forged and heat treated this laminated blade.
He did some grinding, finishing on stones and hande making
The result - 26c3 core and wrought iron cladding, burnt ash from a local woodworking shop

The boy came over to learn over the course of 3 separate days.
I had already forged and heat treated this laminated blade.
He did some grinding, finishing on stones and hande making
The result - 26c3 core and wrought iron cladding, burnt ash from a local woodworking shop
- Joined
- Jun 3, 2019
- Messages
- 2,714
HSC … can you give a quick tutorial on how you make those (apparently) one piece handles for those knives? Are they actually two piece, glued lengthwise? If so, how do you do them?a local restaurant owner friend said his 16 yr old son was interested in learning about knifemaking
The boy came over to learn over the course of 3 separate days.
I had already forged and heat treated this laminated blade.
He did some grinding, finishing on stones and hande making
The result - 26c3 core and wrought iron cladding, burnt ash from a local woodworking shop
(Edit- like that wood btw. Is it desert ironwood?)
Cliff Carter Knives
Knifemaker / Craftsman / Service Provider
- Joined
- May 30, 2011
- Messages
- 782
Got these fronts done and the twins glued up!


Richard338
Gold Member
- Joined
- May 3, 2005
- Messages
- 7,669
Finally got around to trying my new OBM fuller grinding attachment. I decided not to test on scrap, but just wing it. It runs smoothly, although I need to adjust the tracking on my Northridge pretty far to one side. The fuller was pretty easy to grind, even with a curve. I ground the distal taper afterwards which tapered the fuller and softened it on the tip end.
This one has my first tapered tang also which was pretty straightforward on the platen followed by the disc.

This one has my first tapered tang also which was pretty straightforward on the platen followed by the disc.
 )
)
Hengelo_77
Basic Member
- Joined
- Mar 2, 2006
- Messages
- 6,327
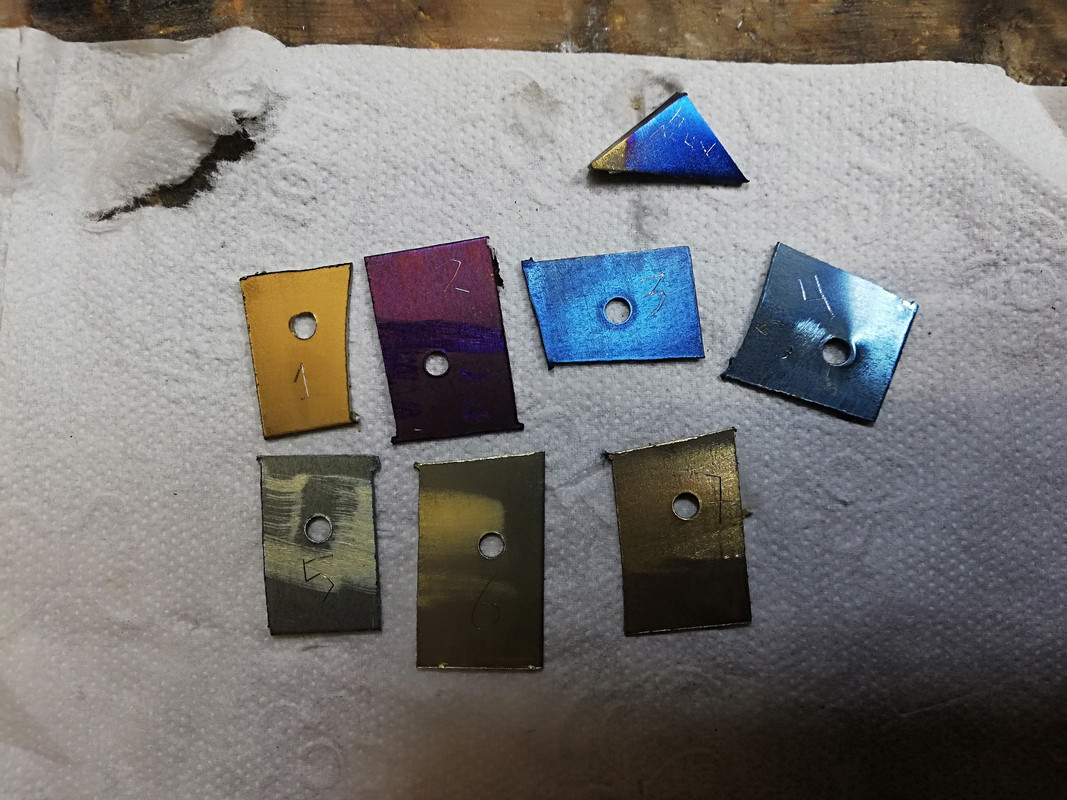
Trying something just because I always wanted to try it. Just having fun.
No decent finish or prepwork, just cutoff pieces and seeing if it works.
I went 1 to 7 9V batteries because I had 7 batteries laying around.
I'm using water with baking soda disolved in it.
The rectangular pieces are normal Ti and the triangular piece is 6Al4V
I did it in a cold workshop I think the batteries will give a different result when it is warmer.
(like how a car battery works poorly when it is cold)
The wood handle is burnt ashHSC … can you give a quick tutorial on how you make those (apparently) one piece handles for those knives? Are they actually two piece, glued lengthwise? If so, how do you do them?
(Edit- like that wood btw. Is it desert ironwood?)
Steps to make the handle. -
Square up handle material as required
Drill hole square to material
Broach out slot as required.
Burn in tang, heat up tang or similar
Shape handle as required

- Joined
- Jun 3, 2019
- Messages
- 2,714
So it really is one piece? I tried that approach once, but broaching out the slot was such a painful experience i have not tried it again. Kudos to you for so consistently making it work for you ..The wood handle is burnt ash
Steps to make the handle. -
Square up handle material as required
Drill hole square to material
Broach out slot as required.
Burn in tang, heat up tang or similar
Shape handle as required
Yes it’s one piece. It’s easier to broach in ash and oak wood.So it really is one piece? I tried that approach once, but broaching out the slot was such a painful experience i have not tried it again. Kudos to you for so consistently making it work for you ..
Do you fill the hole with a split dowel? Or just epoxy and leave it alone?The wood handle is burnt ash
Steps to make the handle. -
Square up handle material as required
Drill hole square to material
Broach out slot as required.
Burn in tang, heat up tang or similar
Shape handle as required
No dowel. Just epoxyDo you fill the hole with a split dowel? Or just epoxy and leave it alone?


- Joined
- Apr 15, 2018
- Messages
- 1,544
Not my usual style of knives but was a blast to make them. The small one is made from N690 and the bigger one from RWL-34. The only two stainless steel knives I've done for a customer so far.
The photo was taken from the customer.
View attachment 2015119
The photo was taken from the customer.
View attachment 2015119