- Joined
- Jul 2, 2009
- Messages
- 1,176
Could I ask where you got that micarta from?No such problems so far!
The BladeForums.com 2024 Traditional Knife is available! Price is $250 ea (shipped within CONUS).
Order here: https://www.bladeforums.com/help/2024-traditional/
Could I ask where you got that micarta from?No such problems so far!


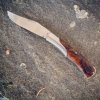
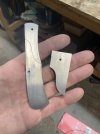
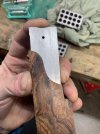
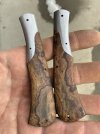
That is a stunning knife. Really beautiful! I admire all of your work that you post here, but you've outdone yourself with this one.I finished this guy today. The bolsters are soldered on. I made the bolsters together so they are identical and then fit the wood to the bolsters before soldering by holding them together over a light and carefully grinding down the dark parts, since those are the parts keeping the gaps from closing. It worked very very well, but would not work if there were bottom bolsters too.
View attachment 2001688View attachment 2001689
View attachment 2001690View attachment 2001691
Thank you, Tyson. Occasionally I get lucky!That is a stunning knife. Really beautiful! I admire all of your work that you post here, but you've outdone yourself with this one.
Could I ask where you got that micarta from?
ball bearings? You're a madman!Parts of this build were very tedious. I used hard ball bearings for the pin heads and had to grind them flat, then drill into them with a carbide bit. 12 of the 18 stems are on a 30 degree angle to match the handle facets. I made a little fixture to hammer them into to set the angle.
View attachment 2002095
View attachment 2002096
View attachment 2002097
Nope, I read that they lose corrosion resistance if annealed. My carbide bits got delivered to the wrong address and were lost for a few days. Meanwhile I tried an old trick that Nathan posted years ago, using a soft rod and lapping compound to drill by wearing a hole. 1) it sort of works, 2) it's for the birds. As soon as my carbide bits came I finished quickly. I was worried about breaking them as it was only 1/16" and they are notoriously fragile, but it didn't break. I didn't have to drill all the way through the other side which probably helped.ball bearings? You're a madman!
please tell me you annealed them first!
It looks nice.Parts of this build were very tedious. I used hard ball bearings for the pin heads and had to grind them flat, then drill into them with a carbide bit. 12 of the 18 stems are on a 30 degree angle to match the handle facets. I made a little fixture to hammer them into to set the angle.
View attachment 2002095
View attachment 2002096
View attachment 2002097
Yes, it actually feels good in the hand.It looks nice.
Is it comfortable to hold that though? I feel like thats got to be what everyone is wondering (well, at least me).
anyone who's handled Richard's balls will tell you that they feel good in the hand.It looks nice.
Is it comfortable to hold that though? I feel like thats got to be what everyone is wondering (well, at least me).
Ok. Yeah. I couldnt help but wonder, seeing it. I've never held a handle with the pins quite like that. So i just had to ask.Yes, it actually feels good in the hand.
(not that I would install them on a kitchen knife)
I like to use the super tool carbide tipped bits they sell on amazon. They seem to perform well. Plus having a steel shaft makes it less brittle as a whole.Nope, I read that they lose corrosion resistance if annealed. My carbide bits got delivered to the wrong address and were lost for a few days. Meanwhile I tried an old trick that Nathan posted years ago, using a soft rod and lapping compound to drill by wearing a hole. 1) it sort of works, 2) it's for the birds. As soon as my carbide bits came I finished quickly. I was worried about breaking them as it was only 1/16" and they are notoriously fragile, but it didn't break. I didn't have to drill all the way through the other side which probably helped.
I had to reply to your post - that bolster/scale fit is outstanding! Thanks for the explanation how you did it. I'll try to remember that method and perhaps try that one of these days. Might I ask about the second pin (toward the tail end) in the bolster, did you think it was needed after soldering the bolster on? OR, is that just a "suspenders 'n seat-belt" type of thing?I finished this guy today. The bolsters are soldered on. I made the bolsters together so they are identical and then fit the wood to the bolsters before soldering by holding them together over a light and carefully grinding down the dark parts, since those are the parts keeping the gaps from closing. It worked very very well, but would not work if there were bottom bolsters too.
View attachment 2001688View attachment 2001689
View attachment 2001690View attachment 2001691
Thanks for the kind words. I first tried just scribing the shape and carefully grinding to the line, but the fit was not perfect. Then I started holding it up to the light and did that "grind the dark part" trick and that worked amazingly well.I had to reply to your post - that bolster/scale fit is outstanding! Thanks for the explanation how you did it. I'll try to remember that method and perhaps try that one of these days. Might I ask about the second pin (toward the tail end) in the bolster, did you think it was needed after soldering the bolster on? OR, is that just a "suspenders 'n seat-belt" type of thing?
Just a beautiful piece of craftsmanship - truly the work of an artist.


Do you transfer your plan to the handle somehow, or just do it freehand? I'd like to try engraving some day.
I transfer the basic layoutDo you transfer your plan to the handle somehow, or just do it freehand? I'd like to try engraving some day.
