Let me try to summarize my findings so far -
The WSKTS (Work Sharp Knife & Tool Sharpener) continues to impress -
and as I have said, made me totally redundant in any manual freehand sharpening
(and I had been doing convex edges for years).
Although there are good reasons for more intermediate grit belts - such as getting mirror polish finish edges - they are not strictly necessary to get good sharp convex edges - using just the supplied middle P220 grit to grind, then finishing off with the 6000 grit to "polish" is more than adequate - a true polished edge using intermediate belts does improve things - but the gains are incremental in magnitude when comparing the gains going from a plain V edge to a convex edge.
The WSKTS puts a convex edge on virtually any blade with ease - because the WSKTS is a fast belt grinder/sander - it is very quick and effective - so it is very important to remember that, and a light, even, consistent touch is needed -
ie: do not exert any pressure into the belt -
keep the blade edge perpendicular to the belt -
and be careful when approaching the tip, and stop once the tip is just fully on the belt - to avoid grinding off the tip (see post
#207 above for diagram and details).
Guide or freehand? this is up to personal preference -
if one is only just beginning - it is probably advisable to use the guides, as that offers a way of getting consistency - there are some who will advocate going freehand - and there is much to be said for that - but I still use the guides - mainly as a visual guide so I can easily see whether I am being consistent or not.
Practice is key - some recommend using beater knives - a good hint was to use cheapo table cutlery - but beware those may clog up the belts (belt cleaners are available).
BUT the best tip was from Ben B in his post
#204 -
practice with the WSKTS Off/belt stationary - just practice moving the blade on the stationary belt to visualize and get a feel for using the WSKTS
Ben B
Try running the blade very slowly across the belt when it is not running and watch the edge as you go across. Then watch as you get near the tip and concentrate on keeping the edge and only the edge in contact with the belt. You should naturally see how the handle should move to keep the edge where you want it. Obviously the shape of the blade near the tip makes a big difference. A spear point would require less movement while a skinner might require the handle to be nearly vertical. The nice thing about practicing with it not running is that it kills all of the adrenaline/anxiety that you have going when you are doing it "for real"
Here are some additional hints in using the supplied 50deg outdoors (open) guide
Using light contact with the guide - grinds about 25deg per side (50deg inclusive) - but do not push into the guide - as this is basically exerting more pressure - use light contact both with the guide and the belt.
Holding the blade vertical/straight up-down give about a 20deg per side angle (40 deg inclusive) - it is easier for me to use the guide as a visual aid.
Visually dividing the difference between the vertical blade and the blade in contact with the guide will give a 22.5 deg per side (45 deg inclusive).
A very good hint given by Ben B - elevate the feet at the handle side by just over a CD case gives 15 deg when keeping the blade straight up and down/vertical.... kind of guided freehand - the CD case trick does not work too well using the other feet as it is too unstable - so just elevating one side one has to remove the guide to be able to use the WSKTS the left-handed way to hone/grind the other bevel/side.
Sharpness - most people judge sharpness by things like shaving - however this is only a very shallow cut testing the actual edge only -
ah! I hear you cry but that's what makes a blade sharp!!!
Yes, and No.
the final edge is important - but the whole point of the WSKTS is that it puts a convex profile edge on the blade - shaving and shallow cut tests do not show any benefits of the convex edge - so all those tests saying it will shave or even cut free hanging hair etc - although are impressive - they show absolutely nothing in the convex edge benefit.
Unless one actually shaves with the blade - to me it more important that a blade cuts well (dUH!

) this normally means cutting
through things - this is where the convex profile shows all the advantages - please look at the near legendary
pdf article on sharpening (manually) - Sharpening a Knife - Information & tips from a veterinarian whose wife & meat cutting put him through college - by Dee Griffin, DVM - I posted the relevant page (4) in post
#158 (link)
Or these:
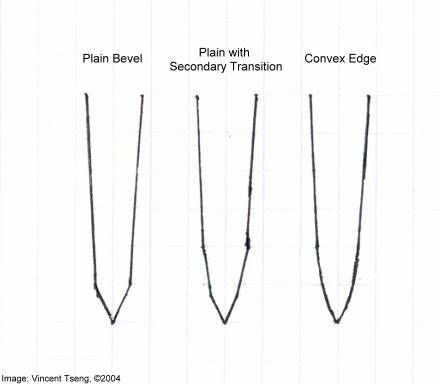
A convex edge allows the blade to glide through material better than a plain V edge which basically wedges through material - one can see an edge with secondary transition bevel is an improvement - but the ultimate edge is one with a convex profile.....
so to summarize - this is why I use, and am impressed with the WSKTS.
--
Vincent
http://picasaweb.com/UnknownVincent?showall=true
http://UnknownVincent.Shutterfly.com
http://UnknownVT.Shutterfly.com
http://UnknownVT.multiply.com/photos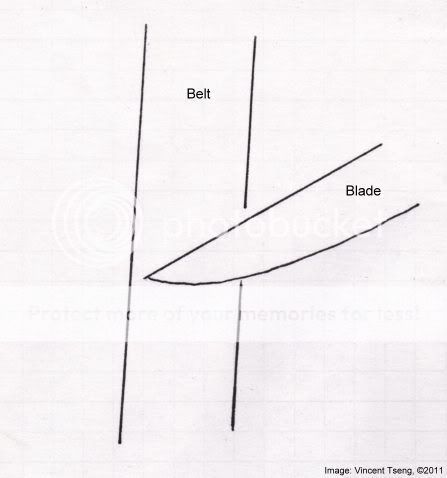


")

