Work Sharp (belt grinder) Knife Sharpener

robino, looks like you've had some good success---congrats!

Noctis (or anyone who knows) let me please ask you about the belt cleaner. On my way home from work today, I stopped by the local HF and bought one of the rubber belt cleaners I mentioned above: http://www.harborfreight.com/sanding...ner-30766.html Heckuva deal---$6.99 online, but marked as $5.99 at the store, minus the 20% from a coupon that HF widely disseminates, came out to a little over $5 incl. tax, and with a free digital multimeter thrown in, thanks to yet another HF coupon.

So, here are my questions:

1) The first thing I noticed, after removing the plastic shrink wrap, was a statement on the label saying, “No need to remove wrapper”(!) I can’t imagine that they mean you are supposed to use it with the shrink wrap still on. Any idea what that's about?

2) Secondly, the instructions say to hold the cleaner firmly against the moving belt. When I did that, though, it slowed the WS motor down to a crawl, and I don’t want to burn it up! So, I guess that means "a little" firmly?

3) I let up on the firmness and ran a clogged belt over it and it did remove a good bit of gunk. Most of the gunk, of course, stayed on the rubber cleaner. So, how do you clean the cleaner? An old toothbrush and soap removed some, and a scouring sponge and Comet some more, but about half still remains.

Thanks for any advice.

Andrew
 
robino, looks like you've had some good success---congrats!

Noctis (or anyone who knows) let me please ask you about the belt cleaner. On my way home from work today, I stopped by the local HF and bought one of the rubber belt cleaners I mentioned above: http://www.harborfreight.com/sanding...ner-30766.html Heckuva deal---$6.99 online, but marked as $5.99 at the store, minus the 20% from a coupon that HF widely disseminates, came out to a little over $5 incl. tax, and with a free digital multimeter thrown in, thanks to yet another HF coupon.

So, here are my questions:

1) The first thing I noticed, after removing the plastic shrink wrap, was a statement on the label saying, “No need to remove wrapper”(!) I can’t imagine that they mean you are supposed to use it with the shrink wrap still on. Any idea what that's about?
Sounds like the same block I got. Technically you could rub the whole thing, plastic and all, against the belt and the plastic will probably collect on the cleaner or fly off somewhere. But I prefer not to smell burnt plastic so I take it off.

2) Secondly, the instructions say to hold the cleaner firmly against the moving belt. When I did that, though, it slowed the WS motor down to a crawl, and I don’t want to burn it up! So, I guess that means "a little" firmly?
I recommend only light contact with the belt. If it doesn't stress the motor, you might find the belt climbing the cleaner block up to your hand. I also find that heavy pressure, especially on a fine grit belt, will leave a layer of the gunk on your belt. Not a fun experience when sharpening, as it might grab the blade and slam it against the table.

3) I let up on the firmness and ran a clogged belt over it and it did remove a good bit of gunk. Most of the gunk, of course, stayed on the rubber cleaner. So, how do you clean the cleaner? An old toothbrush and soap removed some, and a scouring sponge and Comet some more, but about half still remains.

Thanks for any advice.

Andrew
I prefer to leave it where it is. But if it bugs you, I found it relatively easy to just grab the gunk with my fingers(it should collect on the edge) and just pull it off.


Just did a hatchet and my neighbor's knife(chopper?) with my Worksharp today. Tomorrow I think I'll reprofile my Mora to a full convex grind for fun:D.
 
OK, I got my WS last night and immediately tried a couple of our crappy kitchen knives. I went with the 220, 600, 1800, and 6000. I got them sharp and a half mirrored edge, but not hair shaving sharp. I also had trouble with the tips falling of the guide as I pulled thru (using the 40 deg outdoor knive guide bought separately from WS) and found it hard to get the tips right. Any suggestions for a rookie like me?

I didn't try free handing it yet, but maybe I can try that next. I am practicing on old knives for now. I am going to make a leather strop to, so maybe that will help. I couldn't feel or see a burr, but I am a rookie at this.

Oh, the kitchen knives are cheap farberware, but I want to get good at it before I do my spydie delica 4, flash 1, or any other better blades.

Any help would be appreciated. Thanks. Todd
 
Last edited:
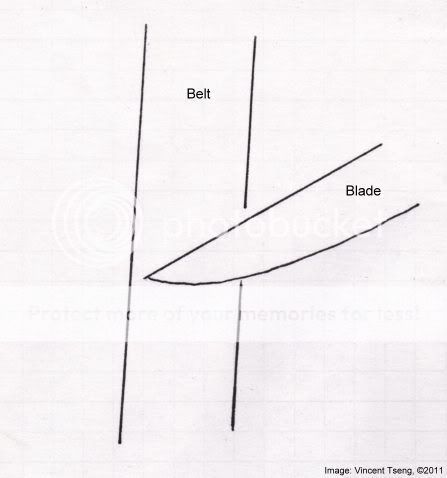
I also had trouble with the tips falling of the guide as I pulled thru (using the 40 deg outdoor knive guide bought separately from WS) and found it hard to get the tips right. Any suggestions

Basically stop when the blade tip is just fully on the belt helps mitigate the problem -

GrindTip.jpg


Post #80 earlier in this thread, has a bit more detail.

Hope that helps.

--
Vincent

http://picasaweb.com/UnknownVincent?showall=true
http://UnknownVincent.Shutterfly.com
http://UnknownVT.Shutterfly.com
http://UnknownVT.multiply.com/photos
 
Thanks Vincent.

I think I may be pushing down instead of just pulling back so when the tip goes from the edge of the guide onto the belt, the knife tip goes down (I am assuming from me putting pressure down). I also start with the machine off and knife in place and then use the temporary on setting and then shutting it off as the knive tip hits the blade. I was also pressuring the knife against the guide to keep the angle correct (and at the same time, incorrectly pushing down too).

I need to keep practicing obviously, but I might try a lighter touch.

Hey, I already have the knives sharper than I have ever had and didn't booger up the blade like I did on the Chef's Choice. I just want to get them shaving arm sharp.
 
Alrighty I am now able to get hair whittling results on the WSKT sharpener, great tool although a bit risky for new people. I recommend practicing on cheapies.
 
as with anything else, practice makes perfect.

i've done 8 knives from sharpening this butternife to some prized possessions and getting better each time i turn the machine on.

020.jpg
 
I would recommend users that would like some bite to only use the 6k belt approximately 3-5 times on each side, it varies with blade shape, and steel. 3 is the typical. Gives a good shaving sharp, paper push cutting edge but still has a decent bite.
 
i've done 8 knives from sharpening this butternife

What a great idea to use common and cheap table cutlery to practice on. :thumbup: good stuff

I would recommend users that would like some bite to only use the 6k belt approximately 3-5 times on each side, it varies with blade shape, and steel. 3 is the typical. Gives a good shaving sharp, paper push cutting edge but still has a decent bite.

Ha-ha - it's funny that the three supplied grits seem to suffice for a lot of people for any practical usage -
perhaps Work Sharp might just know what they are doing :p?

Before anyone takes offense (and none was intended) -
of course if one's aim is to get genuine mirror-polish finished edges - then there is no doubt some intermediate grits are needed
- a jump from the supplied P220 to 6000grit - merely "polishes" the honing marks - but the finish is shiny and better than most factory edges -
heck, unless the factory edge was zero bevel convex to begin with
- then a Work Sharp edge is bound to be better.

If the Work Sharp is used properly with only the 2 belts P220, 6000grit - the edge is shaving sharp even with the 25deg outdoor guide, and it is wickedly sharp for cutting through things - and it's insultingly easy and effortless - that's why I was so enthusiastic about it in my review right from the start -
yes, of course we can improve on the "standard" edge from the Work Sharp -
but it is only marginal - when one compares the Work Sharp convex edge to a regular V edge.

--
Vincent

http://picasaweb.com/UnknownVincent?showall=true
http://UnknownVincent.Shutterfly.com
http://UnknownVT.Shutterfly.com
http://UnknownVT.multiply.com/photos
 
I don't know...

It might just be the soft steels in my kitchen knives, but I found the 6000 belt to leave quite a bit of a burr(more of a wire edge) from the P220. Though I suppose it would be a simple matter to make a light edge trailing swipe along the P220 belt when it's stopped to remove the burr, I still think Worksharp should include at least one intermediate belt along with the current offerings.
 
Earlier, I posted some questions about using a belt cleaner with the WS, which Noctis kindly answered. I had also sent the same questions to Kyle at Work Sharp, and he has now replied. With his OK, I am posting below his answers, which are very similar to those of Noctis, and with some additional info. about using a brush.

Andrew

~~~~~~~~~~~~~~~~~~~~~~~~~~~~~~~~~~~~~~~~~~~~~~~~~~~~~~~~~~~~~

1) The first thing I noticed, after removing the plastic shrink wrap, was a statement on the label saying, “No need to remove wrapper”(!) I can’t imagine that they mean you are supposed to use it with the shrink wrap still on. Any ideas on that?

a. I would certainly remove the wrapper. Melting this plastic / shrink wrap into the belt would not be ideal and would likely contaminate the belts abrasive grain. This statement is likely applicable to those who use it to clean a very coarse grit belt sander where fine honing and sharpening is not done.

2) Secondly, the instructions say to hold the cleaner firmly against the moving belt. When I did that, though, it slows the motor down to a crawl, and I don’t want to burn it up! Any advice?

a. When in doubt, use just enough pressure to deflect the belt. Or you could try placing it near the top bearing area. This will be more rigid and clean the belt without having to press to hard against it. It should only require light / reasonable pressure to do the job.

3) I let up on the firmness and ran a clogged belt over it and it did remove a good bit of gunk. Most of the gunk, of course, stayed on the rubber cleaner. So, how do you clean the cleaner? An old toothbrush and soap removed some, and a scouring sponge and Comet some more, but about half still remains.

a. I usually peel this part off since it rolls up at the end and I remove it. You could also use a flat sheet of sand paper on your bench to clean the end of the stick, or your very coarse power belt sander. Or use a knife to cut off the contaminated end. Though it is not critical to have it like new every time. Some ‘gunk’ on the end is okay.

4) Finally, what is your opinion/advice in general about using a cleaner like this on the WS belts?

a. We recommend this on our WS3000 Wood Tool Sharpener (that uses 6” PSA disks). The primary reason for using it is to reduce the contamination of a coarse grit to a fine grit. The coarse abrasive particles and steel filings created can contaminate the fine honing abrasives and not provide optimal honing results. It also helps to extend the life of the abrasives since they load up less and ultimately cut better. Another way to accomplish the same thing is to use a paint brush to dust off the tool and P80 or P220 belt before moving to the 6000 belt. This is why we recommend to keep your tool clean. I always keep a paint brush in my demo kit to keep the tool as clean as possible, including the 50° Outdoor Knife Guide which is prone to collecting grit on the scissor guide (which has a magnet). If desired, this magnet can easily be removed with a small screwdriver if one wants to decrease the grit accumulation.


I hope this helps.
 
Last edited:
great point to both guys who mentioned different steel types vs different results

O-1 is just fricking awesome taking an edge with the Work Sharp - a little goes a long way, you'll quickly see and feel the difference sharpening a good steel from a chinese/korean one. I worked a small nessie on the Work Sharp which came with a rough but sharp edge, i think it might have been done with a 180 belt and left like that. I didn't even touch it with the 220, i merely buffed the rough edge with the 6000 and it polished it out nice and smooth with plenty of bite still.

So you'll definitely get better results with better steel.

022-L.jpg


024-L.jpg
 
I have the Worksharp and an EdgePro, Pro model which I use both for different edges. I use Micromesh belts along with the factory WS belts. For a polished edge, I end with the 1200MX belt. I finish off with EdgePro's ceramic steel. It gives the edge a nice bite.
 
great point to both guys who mentioned different steel types vs different results

I think you'll find, well you did find, that a butter knife or similar table knife may well be good to practice the angles and getting a good feel for the WS device, but I wouldn't expect to get them very sharp since they are unlikely hardened to the same extent as a knife made for real cutting. Hence your big difference when you moved to O1 tool steel.
Congratulations. It sure is nice to get a great edge so quickly. Did you do the nessie with a guide or freehand?
 
I have the Worksharp and an EdgePro, Pro model which I use both for different edges. I use Micromesh belts along with the factory WS belts. For a polished edge, I end with the 1200MX belt. I finish off with EdgePro's ceramic steel. It gives the edge a nice bite.
Interesting, I've heard the ceramic rod was about 3 microns, which should give it the same finish as the 1200MX belt. Still, I find the rod to be very helpful in removing a burr, though lately I've been using a glass rod for that.
 
I don't know...

It might just be the soft steels in my kitchen knives, but I found the 6000 belt to leave quite a bit of a burr(more of a wire edge) from the P220. Though I suppose it would be a simple matter to make a light edge trailing swipe along the P220 belt when it's stopped to remove the burr, I still think Worksharp should include at least one intermediate belt along with the current offerings.

Could it be that you are honing to very shallow/acute angles that you get a wire-edge that's hard to get rid of?

It is hard to follow the logic that if using the P220 grit starts a burr -
that the grinding on the opposite side would not get rid of most of the burr -
so if it is wire-edge being formed -
then it probably means that the steel is too soft to support the angles being ground -
so that a wire-edge is formed and hard to grind off
simply because grinding on the opposite side is also too shallow/acute for the steel to support,
so the steel just bends over = wire-edge

And exactly as you mused of using an edge trailing swipe, would work -
this would remove the wire-edge
since that is in effect grinding a greater/more obtuse angle at the actual final edge
- which the steel probably can now support.

This is not insinuating that the steels are actually "soft" -
but perhaps not hard enough or too malleable to support the very acute/shallow angles being ground?

EDIT to ADD -
I am starting to wonder whether it might be better to to use the WSKTS - with multiple passes starting with a very acute shallow angle - then finishing off with a greater but more durable angle?

eg: first grind at 15-20deg - but actually finish with 25deg -
this may initially sound counter-productive - obtaining a very acute sharp edge then "spoiling" it with a less sharp greater angle.

However the reason I thought of this is that the initial more acute angle would grind a thinner transition bevel - then the 25deg final grind puts in the actual edge which hopefully would not be so fragile or wire-edge prone - admittedly the actual final edge would only be 25deg (or 50 deg inclusive) but just beyond that edge the transition convex bevel would actually be at 15-20 deg (30-40deg inclusive) which hopefully will give all the advantages of the more acute angle - yet the actual edge would be more durable?

.... probably even easier would be just to use a V-hone crock stick with the typical 22.5deg (45deg inclusive) for a very light final hone.

I've been using the terminology from this a very good pdf article on sharpening (manually) - Sharpening a Knife - Information & tips from a veterinarian whose wife & meat cutting put him through college - by Dee Griffin, DVM - it had become legendary because of its clarity and explanation of the principles of sharpening - it is well worth saving a copy for reference.
[Note: the earlier pages of the article are probably not relevant here - the relevant parts start on page 4 - heck, I'll just paste that page here:

SharpenKnifeP4X.png


--
Vincent

http://picasaweb.com/UnknownVincent?showall=true
http://UnknownVincent.Shutterfly.com
http://UnknownVT.Shutterfly.com
http://UnknownVT.multiply.com/photos
 
Last edited:
UPS dropped off a Worksharp for me the other day. It's an awesome tool so far. I've made some beautiful convex edges, but I am also unable to get a screamin' sharp edge.

Should I be able to get an edge on the WS that would feel as sharp as a 40 degree micro bevel on the sharpmaker fine stones, or am I expecting to much with the stock belts? I've experimented free hand with the 6000 to try and make sure I wasn't letting it wrap around my edge, but the best I can get is paper slicing sharp (not push cutting) on my VG-10 Endura. Maybe I just need more practice. Any thoughts would be appreciated and thanks a bunch to everyone who has contributed information on this cool little device. :thumbup:

jfg,

Still learning on the WS myself, and others can give you more expert suggestions, but here's what I can say. If you are working with the stock belts (no "in between" belts), when you finish with the 220 belt, make a few very light passes. This may make for a smoother transition to the 6000 belt. And, more importantly, likewise finish on the 6000 belt with a few very light passes.

For better slicing ability, you can also first do a series at a shallow angle so as to thin behind the edge a little. Then do your series on the edge itself.

As a finishing step, I have found that some of my knives benefit from a few strokes on a leather hone with green compound, or even a few strokes on the Sharpmaker with Ultrafine stones.

As long as you're doing it carefully, with a light hand, and being especially careful with the tips, it is good to experiment---guides vs. freehand, slightly different angles and pressure, etc. Also, I do better getting a great final edge on some knives than on others, and haven't yet figured out all the reasons why.

Andrew
 
Back
Top